Current build is a mix of dark and light MDF. Both sourced from Home Despot. Both have the problem I described. I have not had the oppertunity to get a delivery from one of the top line MDF suppliers. I am pretty much stuck with what fits in my GTI from local consumer stores.
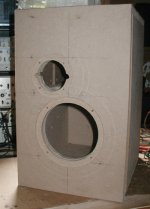
I just squeegeed on the first layer of poly resin. It seems to stay tacky on the MDF longer than it does in the pot, and this pair is too big to fit in the oven to fast cure, so it will be a while before I have a solid hard plastic substrate to finish and see if it bridges the seams permanently.
With my typical 3/4 edge radius and sanding the sides flat, all sides have cut through the slightly harder surface layer. Getting really flat will be a matter of blocking them out after the resin buildup. Just like blocking out a car. High build primer, guide coat, stiff sanding boards and a lot of elbow grease.
Will wood filler adhere to primer?
I'm wondering if I can put filler right on top of the sanded primer. Basically my thoughts were to sand the entire surface until I start breaking through the primer at the high points of the mdf surface. Then I can put filler over the entire surface (something I didn't do when originally prepping the surface) and then sand until my surface is flat. Does anyone know if the filler will adhere to the primed surface of the mdf?
I'm wondering if I can put filler right on top of the sanded primer. Basically my thoughts were to sand the entire surface until I start breaking through the primer at the high points of the mdf surface. Then I can put filler over the entire surface (something I didn't do when originally prepping the surface) and then sand until my surface is flat. Does anyone know if the filler will adhere to the primed surface of the mdf?
Also, one of the reasons commercial MDF products aren't painted to high gloss but rather satin/semi gloss is probably due to the fact that the demand for a perfectly prepped surface make it dramatically more expensive.
See the item in post 15 -- these were finished in one coat -- surface prep has no sanding but the boards come in with some residual dust and wood particles from the mill which is removed with air and captured with a negative pressure system.
The reason that high gloss isn't used that up until now it's been very expensive to finish, and once installed (say in a consumer retail environment) fingerprints and dings show up dramatically. In high end architectural, however, the product is doing well.
In China they still love lacquer finishes with gloss index near 100, and as the consumer economy has burgeoned one has to wonder what the incidence of liver cancer is going to become.
I completely missed post #15 the first time around. That is exactly the finish I am looking for! What is your process for doing that?
When I first read through that I thought it sounded fine except that I wasn't sure I could do it since I already had a few coats of primer on the boxes. I'm wondering if I can put the body filler right on top of the primer. I also can't spray the inside of the box because they are already sealed up. All of the interior surfaces are somewhat covered because all surfaces inside were sprayed with adhesive and covered with carpet. Does anyone know if wood filler or body filler will adhere to the primer that I already have on the boxes?
I completely missed post #15 the first time around. That is exactly the finish I am looking for! What is your process for doing that?
You're not gonna do be able to do this at home or in even a fairly big woodworking shop.
They're powder coated -- the powder is electrostatically charged and sprayed onto the MDF (which is conductive because of its moisture content), it's gelled in an IR oven until it flows or liquifies, then hit with UV light which cures it in under a second.
The powders are much more expensive than thermal curing polymers, but the energy cost savings are enormous, and you can handle the parts by hand immediately after the UV step.
Good if you want a couple hundred to tens of thousands of parts or cabinets, not so good for units or tens of parts.
See the item in post 15 -- these were finished in one coat -- surface prep has no sanding but the boards come in with some residual dust and wood particles from the mill which is removed with air and captured with a negative pressure system.
Looks good to me, however, they are just a single sheet and flush joints are not as easy to paint over. My main point is that you should use products that suit the purpose and furniture-grade MDF and appropriate paint usually can't be found at consumer stores.
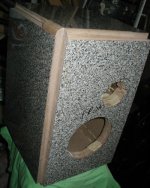
I ran into the same problem, and decided to simply cover the MDF with formica, and they turned out great,
Lukas
Nice work! Did you route out the edges where you put the pieces of trim?
Nice work! Did you route out the edges where you put the pieces of trim?
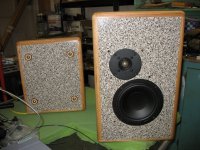
The cabs were made with 2 layers of 3/4" MDF, so I had enough beef for the 1/4" rounds, I just ran the assembled cabs thru a tablesaw to notch the edges.
Just be aware that stock 1/4" from Home Depot is not symmetrical, the 2 edges are not guaranteed to be equal. I notched the cab edges for the shortest sides, and used a trimmer bit in a router after gluing the formica & 1/4 rounds to trim the 1/4 rounds' longest sides.
Lukas
I hand sand with a large straight edge to knock down high spots and avoid creating more dips. You can put fillers over primer in fact its designed for that purpose fillers adhere to primers better than just about any other surface.
So that is what I am going to do! Sand the primer that I have on there until I hit the mdf, and then I will throw on some bondo auto filler to level it all out. I will give it a go on one of the smaller speakers first to see if it works out and then I will hit the rest of them.
jerseyguy1996 ... I'd source out a long sanding belt ... about 100-150 grit ... from the home depot. (think like 4"x36-48" here). Fabricate a block of hardwood long enough and wide enough ( and flat 😛 ) to slip the belt over. Use this sanding block to work the cab faces. Then use the filler. Do not try to sand down to the mdf using it as some sort of guide now. Your aim is to flatten the surfaces.
High gloss finishes are about optics ... absorption/refraction of light. Any finish will have some irregularities. The trick is to blend them. When any part of the surface is left with a different sanding sheen it will show up in the top coat. So, develope a technique now to correct the surface errors created by assembly and use that sanding technique to flatten the surface for the next couple of finishing steps.
High gloss finishes are about optics ... absorption/refraction of light. Any finish will have some irregularities. The trick is to blend them. When any part of the surface is left with a different sanding sheen it will show up in the top coat. So, develope a technique now to correct the surface errors created by assembly and use that sanding technique to flatten the surface for the next couple of finishing steps.
I'm wondering if I can put filler right on top of the sanded primer. Basically my thoughts were to sand the entire surface until I start breaking through the primer at the high points of the mdf surface. Then I can put filler over the entire surface (something I didn't do when originally prepping the surface) and then sand until my surface is flat. Does anyone know if the filler will adhere to the primed surface of the mdf?
Depends on the filler. "Plastic Wood" has an acetone solvent so it melts paint. Some are water based, some who knows. Automotive filler, i.e. Bondo, is polyester based and compatible with most automotive primers. AGAIN, I suggest going to the Evercoat WEB and looking at their different products. They have over a dozen fillers. Bondo is for filling up to 1/8 inch. I hope to all get out you are looking to fill in the RCH range! Use a thinner filler.
You normally seal, fill, and then prime. Then primer sealer, color coats, clear coats. After priming, use "spot putty" as it is called in the auto trade. It is a fast drying lacquer based filler for pinholes and fine scratch marks.
Nothing is flat or square from HD, or Lowes. You are dealing with wood products designed for carpentry. This is why cabinet workers have planers, jointers, routers, sanders etc. What you buy is rough stock. THis is also why router bit companies are producing special undersized router bits to do dado's with as the sheet goods are undersized.The cabs were made with 2 layers of 3/4" MDF, so I had enough beef for the 1/4" rounds, I just ran the assembled cabs thru a tablesaw to notch the edges.
Just be aware that stock 1/4" from Home Depot is not symmetrical, the 2 edges are not guaranteed to be equal. I notched the cab edges for the shortest sides, and used a trimmer bit in a router after gluing the formica & 1/4 rounds to trim the 1/4 rounds' longest sides.
Lukas
Two layers and "room for 1/4 round"? I normally use one layer of 3/4 and have plenty of meat to do a 3/4 inch roundover on the edge. ( I build small-ish cabinets) My testing of perceived tweeter harshness suggested 3/4 inch roundover was the minimum. I heard a difference between 1/2 inch and 3/4, but not between 3/4 and one inch. These were subjective tests, not measured. I did the 1 inch roundover with a belt sander. I did not hear a difference so I have not invested in a 1 inch carbide router bit.
jerseyguy1996 ... I'd source out a long sanding belt ... about 100-150 grit ... from the home depot. (think like 4"x36-48" here). Fabricate a block of hardwood long enough and wide enough ( and flat 😛 ) to slip the belt over. Use this sanding block to work the cab faces. Then use the filler. Do not try to sand down to the mdf using it as some sort of guide now. Your aim is to flatten the surfaces.
High gloss finishes are about optics ... absorption/refraction of light. Any finish will have some irregularities. The trick is to blend them. When any part of the surface is left with a different sanding sheen it will show up in the top coat. So, develope a technique now to correct the surface errors created by assembly and use that sanding technique to flatten the surface for the next couple of finishing steps.
I was thinking along the same lines in terms of the sanding block. I think one of my big problems right now is that I have been lazy and trying to use the random orbit sander for flattening, rather than going the block sander and elbow grease route. Basically just take a board (12 to 15 inches or so) and then use spray adhesive to stick the sand paper directly to it. Actually I have a drywall sanding block that may work and it has sheets of sand paper made for it.
Depends on the filler. "Plastic Wood" has an acetone solvent so it melts paint. Some are water based, some who knows. Automotive filler, i.e. Bondo, is polyester based and compatible with most automotive primers. AGAIN, I suggest going to the Evercoat WEB and looking at their different products. They have over a dozen fillers. Bondo is for filling up to 1/8 inch. I hope to all get out you are looking to fill in the RCH range! Use a thinner filler.
You normally seal, fill, and then prime. Then primer sealer, color coats, clear coats. After priming, use "spot putty" as it is called in the auto trade. It is a fast drying lacquer based filler for pinholes and fine scratch marks.
I had to look up what RCH meant but yes, it is a very small amount….not visible until I start sanding and realize that I am sanding through the primer in some places and other places are untouched by the sandpaper. I'm looking over the Evercoat products but I am not sure which one to use. Basically I am figuring that I will spread it over the entire cabinet and then sand it flat with a long flat sanding block. Where would you suggest to start?
Nothing is flat or square from HD, or Lowes. You are dealing with wood products designed for carpentry. This is why cabinet workers have planers, jointers, routers, sanders etc. What you buy is rough stock. THis is also why router bit companies are producing special undersized router bits to do dado's with as the sheet goods are undersized.
Two layers and "room for 1/4 round"? I normally use one layer of 3/4 and have plenty of meat to do a 3/4 inch roundover on the edge. ( I build small-ish cabinets) My testing of perceived tweeter harshness suggested 3/4 inch roundover was the minimum. I heard a difference between 1/2 inch and 3/4, but not between 3/4 and one inch. These were subjective tests, not measured. I did the 1 inch roundover with a belt sander. I did not hear a difference so I have not invested in a 1 inch carbide router bit.
Well, some of us have all the fancy tools and skills, others like myself do not. With the limited woodworking tools and skill I have I am extremely happy with how the cabinets turned out. In fact I was kicked out of woodshop in high school for messing up the wood, which makes the results I got even sweeter 🙂
Yes filler compounds and primers have to be compatible.
I would stay away from a belt system, its very easy to create more waves that way. Hand sand with a 1' straight edge and a level light on the opposite side of you and ruler to monitor progress and you'll have them straight as an arrow in no time.
I would stay away from a belt system, its very easy to create more waves that way. Hand sand with a 1' straight edge and a level light on the opposite side of you and ruler to monitor progress and you'll have them straight as an arrow in no time.
Last edited:
- Status
- Not open for further replies.
- Home
- Loudspeakers
- Multi-Way
- The sad realization that MDF is not flat :-(