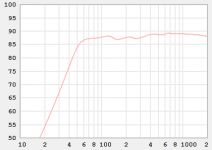
Fb = 51Hz
F3 = 46Hz [nominal anechoic]
F6 = 42Hz [nominal anechoic]
Greets!
Loaded the 'SJ' specs in HR with damping to approximate these, so wondering how it compares to MJK's, especially WRT 'ripple'.
GM
Attachments
Bump.
I am going to start drawing up my plans for these - few questions first:
1. Most other Mets have lining only on panel behind driver - why is the suggestion for this dual Tang Band 1320 to have all panels lined?
2. Does this have a partial brace like other designs, or a full top to bottom brace like the CSS EL70 bipolar Met?
3. Is Zd from the inside top or the outside top?
4. Is the 4x4 top/10x10 bottom the suggested size where the drivers will fit inside or just overall area and I still need to experiment with sizes/aspect ratio?
5. What do you draw your box layouts with?
2/ Depends how elaborate you want to get. I would use a full-length brace. The critical bit is bracing th e2 drivers together.
3/ inside top, all dmensions are inside
4/ they may need to be tweaked to ensure the drivers fit
5/ VectorWorks
dave
3/ inside top, all dmensions are inside
4/ they may need to be tweaked to ensure the drivers fit
5/ VectorWorks
dave
Greets!
Loaded the 'SJ' specs in HR with damping to approximate these, so wondering how it compares to MJK's, especially WRT 'ripple'.
GM
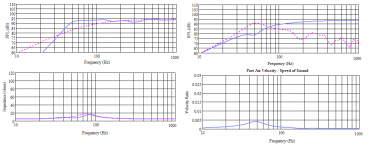
Sorry Greg, completely missed this. Attached. A few subtle differences, but looks close enough for jazz to me.
Attachments
Last edited:


Soundwavesteve,
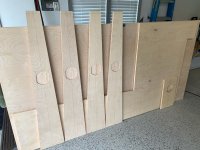
Beautiful grain on the ply and stunning woodwork! May I be so bold as to ask CNC?
Beautiful grain on the ply and stunning woodwork! May I be so bold as to ask CNC?
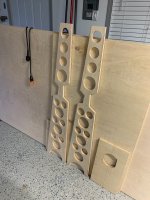
I have the same drivers in a unipolar folded TABAQ and love them...I can only imagine them in bipolar metronomes....
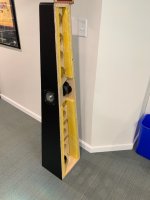
No CNC, just a jigsaw, a router, two hole saws and an orbital sander. And patience and music 😉 Currently waiting on some leather look tolex. The finished look will be black leather tolex for the center section and bare plywood for the sides. No finish, just sanded out to 400 for a smooth look. A bit of an industrial look, but still elegant.
Excellent, and I was hoping some part of the speaker would be bare/clear finish to show off some of the best grain I've seen on ply....
I just finished applying the Tolex to the center section and will probably glue the sides on this weekend. I tried my best to cut it straight, but it is not perfect. I will have to glue it using PL Premium to fill the gaps but I am worried how much will squeeze out and potentially get between painters tape and the tolex, same with staining the wood edges. What do you think? Better suggestion?
I don't have a clear mental picture of the issue.
Is the Tolex wrapped over the joint so that the squeeze out will blister it? Are you concerned that the construction glue will be hard to clean up?
One option would be to use regular wood glue and "starve" the joint for minimal squeeze out. Then you could be more precise on how you used the PLPremium or Bondo for filler. Or you could use a high quality wood filler like Timber Mate. Timber Mate comes in different colors and is a water based filler I really like. Unlike other fillers Timber Mate has a long shelf life and you can restore it with a little water.
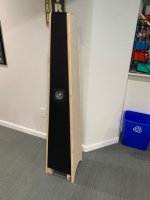
The center section of my Met is wrapped in Tolex and flush cut with the edge of the wood; the ply is exposed so I have something to glue to. The tolex does not wrap around nor does it cover a joint, it stops at the edge. The sides of my Met are bare plywood. The edges of the center section are not perfectly straight, so when I glue the sides to the center section there will be minor gaps. If I tape both sides of the joint when gluing the sides on, I am worried the glue will still get underneath the tape and stain either the tolex or the bare wood sides. Should I not worry and just be careful to clean thoroughly while the glue is still wet or is there a better way to glue the sides on and fill the gaps?
Hopefully this is a better description of the issue.
Hopefully this is a better description of the issue.
If the gaps are more cosmetic than structural then I would not use construction glue. That stuff is hard to clean up. But, for its intended purpose of construction, it's great. Myself, I use a good wood glue like Titebond. It's very strong and its easy to clean up with a rag and some warm water. You can always put painters tape over sections of wood you don't want to get covered with glue. It will clean off completely from the plastic wrap.
If you do a good job clamping, from the looks of your cuts, the worse that will happen is you have some cosmetic gaps. For the cosmetic gaps use the right color TimberMate filler. What little glue that gets on the bare wood and is not wiped clean, that will be sanded with fine grit. If you are worried about the porosity of the wood that has been cleaned up and sanded don't fret. It will be hard to see with most stains. And, if you aren't staining then it's truly a non issue.
I have confidence these will look grand, even in the daylight on close inspection. In the evening when you are most likely to be enjoying them there is no way this is going to be an issue.
Thanks for the confidence Perplexed 🙂 Mocked up it does look so elegant. Thanks for the tip about Timbermate!
When you are cleaning up the wood glue, after clamping, just wipe it a bit more at the gaps. You don't want the glue fully filling the gaps. Thats what the filler is for. Structurally, there is plenty of area for the pieces to bond. The gaps are not structural problems. If there are structural problems then the judicious use of Bondo can fix about anything, including repositioning drivers, vents, re-purposing older enclosures, etc.
When the glue fully dries just sand the gaps with the folded edge of a sheet of sandpaper. Try not to enlarge the gap but about an 1/8th" of gap will give the Timbermate plenty of purchase. With a little practice this sort of cosmetic surgery becomes pretty routine. Even if you had a table saw errors creep in requiring this sort of fudging all the time.
Cheers!
Looks great. Just cover the edges of the laminate with 1" Blue Painter's Tape before assembling and clamping. It's probably unnecessary because the wood glue will wipe off cleanly with a warm water sponge or cloth after clamping and before it dries. You can test this with some scraps ahead of assembly to see how easy this will be, or not.
I had a more involved mental picture of what you were up to. This shouldn't be a problem for Titebond wood glue. The sorts of gaps that construction glue is meant to bridge are on the order of a half inch or more. I don't see anything even close to a quarter inch on your build. Relax, you are in the home stretch!
I had a more involved mental picture of what you were up to. This shouldn't be a problem for Titebond wood glue. The sorts of gaps that construction glue is meant to bridge are on the order of a half inch or more. I don't see anything even close to a quarter inch on your build. Relax, you are in the home stretch!
- Home
- Loudspeakers
- Full Range
- The Metronome