Ok, on to project number two now that I've got the Copper Dragons set up.
The Background:
The Background:
- A few years back I snagged 40 2.5" BMR46XEL N8R drivers from Cotswold Sound Systems after having messed around with their 4.5" BMRs (and fell in love with their dispersion and midrange)
- In my office I have two Copperheads: two-way alignments using Tang Band W6-2313 drivers with a miniDSP 2x4HD and two ICEPower amps. They're the precursors to my Copper Dragons and I love using them, but want something with way more "oomph" and better dispersion.
- I have a pair of Dayton Epique 5.5" subs and four matching passive radiators
- I'd like to bake in some flexibility so that I can keep iterating without having to build entirely new cabinets again and again
- I've always wanted to try making a line array but don't have the room or drivers for a full height one, and for my office I don't really need much vertical dispersion
- ...and I want to make a line array because reasons
- Low frequencies: I'll be using a Dayton Epique E150HE-44 on each side with two E150HE-PR passive radiators
- High frequencies: At first I'm using 8 of the CSS BMR46XEL N8R each side in a vertical array. I'm adding threaded inserts to the top of the bass modules so that I can change out HF drivers easily, or even use them as speaker stands with integrated amps and subs
- Amplification: each side will have a Hypex Fusion Amp FA123 with OLED display on one side and an IR receiver/status-LED on the other
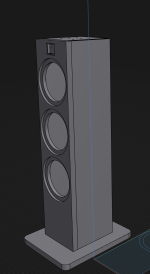
- Bass Module cabinets:
- 6.5" wide, 7" deep and 28" tall with 10"x12" screwed-on bases for stability.
- The tops have six threaded screw inserts so that I can change out the line arrays for something else as I keep experimenting
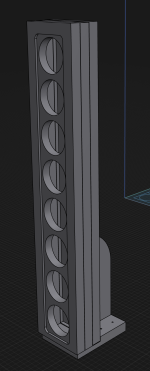
- Line Array cabinets:
- These are a fairly simple sandwich of three layers of MDF, with bold holes pre-cut to screw them into the bass modules
- At 4" wide and 24" tall, they're quite narrow and thin, so I'm affixing a "fin" onto the back to keep them stable in case they get knocked over
- Wiring:
- By default the subs will have their coils wired in series to the FA123 main channels bridged to mono
- To make it flexible I'll be using screw terminals and jumpers so that I can easily swap the subs to a single channel, allowing me to make a three-way alignment
- The ideal cabinet volume for these drivers seems to be right at 0.25 cubic feet
- I'm modeling a 20hz 4th order high pass filter to protect the woofers at low frequencies, and a +3db EQ with a Q of 2 for added bass weight
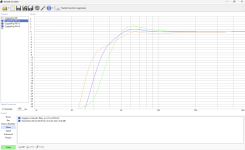
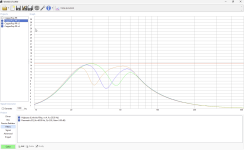
- I've gotten three different responses from WinISD based on no added weight, 30g and 60g
- No weight (v2, green) has an F3 of 45hz and a pretty big hump at 63hz
- 30g (v3, blue) has an F3 of 43hz and a flatter bass response
- 60g (v4, orange) has an F3 of 46hz and frankly much worse response even with the Eq
- None of them have cone excursion issues, just missing the XMax at 125w
Attachments
At this point the bass module/stands are built and wired up and only need the amps/drivers installed. A few lessons learned:
Despite the bugs, a few things worked out very well:
- The NC100HF amp in the Hypex FA series isn't really suited for anything below 500hz (according to Hypex). With that in mind I've wired up the subs to be driven only by a single channel with the voice coils in series.
- The Hypex Fusion Amp Remote receiver plate is a different size (35x35x4mm) vs the OLED display (43x35x2.5mm). I had made the recesses at the top of the cabinet the OLED size for both. Oops.
- The recesses for the Hypex remote/oled display are a pain to do on the CNC due to lots of mdf fuzz, and require extra pieces to plug the wire holes. I'll probably make a screw-in 3d-printed insert instead to use in the future to ease re-use and not have to hot-glue in the ribbon cables.
- The amp sub-enclosure has a large empty space above the plate amp. In the future I'll cut an opening in there and paint the internals to make it easier to access wiring for testing and also minimize the MDF outgassing.
- Because the sub-enclosure was so tight, I ended up making an extra piece screwed onto the back with binding posts for the other 125w channel and the HF amp. Wiring from inside the cabinet is done through screw terminals and gold plated crimps.
Despite the bugs, a few things worked out very well:
- I nailed the dimensions for the cabinet pieces and they fit together very well. Assembly was an absolute breeze and they required only glue, a nailgun and a brief bit of clamping on the back.
- I opted to put threaded inserts on the top and bottom so that I could bolt on the bases and also affix anything I want on the top. The inserts worked out very well: the bases and line array are extremely stable and rigid.
Attachments
Last edited:
