Thanks Z! Unfortunately the drivers really won't be seen in the end product.
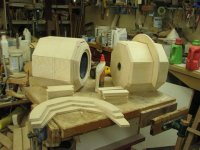
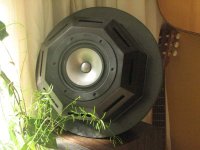
Cleaned up the front bevels like this.
nice work Douglas - almost a shame to hide these in the mesh globes
BTW, what will the electronics entail?
Ahhhh, they'll be painted flat black anyway...
Haven't yet decided upon the electronics. The Virtue amps look good, but I think that I could live with the Dayton . There will be computer bits inside, too, connecting hard drives, CD/DVD/Blueray drives. Wireless internet for streaming audio not in my library, Netflix, etc. I'm thinking of getting an Android based tablet for use as a remote. There are some affordable units around. I'll be having my LCD TV mounted on the wall above and behind.
I have a Garrad Lab 80 turntable to go in for vinyl, which is the correct turntable for this unit. It needs some cleaning, which I may even get around to doing.
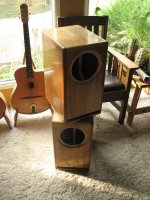
Next up on the cabinets is to do some sanding and make a flange that goes around the middle for mounting in the globes. I need to get a move on in making the globes, but I am out of fiberglass and resin right now and I have to wait for my bank account to get healthier before I drop more money.
I can start fabricating the console box while I wait as I have material on hand for that, including some really old Brazilian Rosewood veneer plywood that came out of my parents' house (went into the house about 1970)
Haven't yet decided upon the electronics. The Virtue amps look good, but I think that I could live with the Dayton . There will be computer bits inside, too, connecting hard drives, CD/DVD/Blueray drives. Wireless internet for streaming audio not in my library, Netflix, etc. I'm thinking of getting an Android based tablet for use as a remote. There are some affordable units around. I'll be having my LCD TV mounted on the wall above and behind.
I have a Garrad Lab 80 turntable to go in for vinyl, which is the correct turntable for this unit. It needs some cleaning, which I may even get around to doing.
Next up on the cabinets is to do some sanding and make a flange that goes around the middle for mounting in the globes. I need to get a move on in making the globes, but I am out of fiberglass and resin right now and I have to wait for my bank account to get healthier before I drop more money.
I can start fabricating the console box while I wait as I have material on hand for that, including some really old Brazilian Rosewood veneer plywood that came out of my parents' house (went into the house about 1970)
Last edited:


I'm happy to see how epoxy on plywood finishes as my next pair of speakers will have an epoxy base for the finish! I found that it's a heck of a lot more satisfying sanding epoxy to smoothness than wood...
Add some microballons and the sanding will be even easier. You are going to use real epoxy, right? Not the little squirt tubes sold in hardware stores?
Naw, I needed a lot more than that so I used fiber glassing epoxy. I didn't mean easy to sand as in the layer being tough or not, but that it was easy for me to get a really smooth finish. I used cheap plywood with lots of voids in the end grain, and overall not super fine or hard grain. It would have totally sucked to have tried to finish that to take a high gloss with just putty and primer.
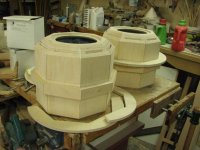
Those globe innards are looking so fresh. To get the moire effect of the dual grills, does there have to be a gap between them? where are you going to source the material for those?
Those globe innards are looking so fresh. To get the moire effect of the dual grills, does there have to be a gap between them? where are you going to source the material for those?
I don't know if there has to be a gap, but the originals had about 1mm between the screens, and they are slightly shifted. Perforated aluminum is available, but I'll need 4 sheets of 3' squares, at about $40/square. I'll leave that till later, once I get confident in my ability to shape the material to the globe. I want to get a move on with the cabinet, stand, and electronics. I'd like to be able to enjoy this unit while I fuss about the front globes!
For now I'll just make a screen out of composite. There are several ways to get what I am after, and I'm still deciding on the exact approach that I want to use. The top candidate is to take Carbon Fiber and pull strands out in regular intervals and lay that into the mold. This will result in a nice black laminate with an open screen pattern. It won't have the moire pattern, but will have its own look. I am anticipating seeing through the screen, which is why I am ensuring the cabinet looks good now.
For now I'll just make a screen out of composite. There are several ways to get what I am after, and I'm still deciding on the exact approach that I want to use. The top candidate is to take Carbon Fiber and pull strands out in regular intervals and lay that into the mold. This will result in a nice black laminate with an open screen pattern. It won't have the moire pattern, but will have its own look. I am anticipating seeing through the screen, which is why I am ensuring the cabinet looks good now.
Last edited:
Let me think on it. It would be really cool to be able to have that pattern on your reproduction.
I think the idea with laying up a screen into a concave mold is a good idea, but what a pain! I wonder if that wouldn't be more work than drilling a pattern of holes in a piece of fiberglass painted black. Still a heinous amount of work.
Also, I'll look for a way to source carbon fiber yarn. You only tend to see cloth sold to consumers, and it sucks to have to take it apart.
No kidding about wanting to get a listen to them while you figure out the details.
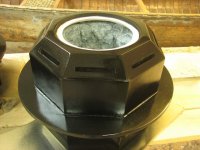
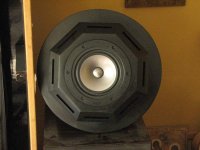
I am declaring these cabinets finished. I worked through the finishing process, refining the surfaces with each stage. In the end, I decided that I preferred the look of the paint rubbed out with 0000 steel wool, which gives a nice satin look. The high gloss was too glossy, and showed up every single imperfection!
The end result keeps reminding me of the Death Star from Star Wars. It is a very singular look.
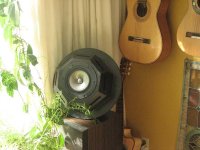
I moved my Alpair drivers over to these last night and got them fired up. While the sound very good, there is a definite difference from the Pensil series Studio Reference Monitors which now sit forlorn and vacant.
First impressions are in line with what Dave had already indicated, that these new cabs don't have the bass extension of the Pensils, favouring bass precision over extension. The bass is there, just different. They also have a different sense of "air", or space, about them. I'm going to have to live with them for awhile to get a better read. I've been listening to the Pensils for quite awhile now and they have become my "normal".
The end result keeps reminding me of the Death Star from Star Wars. It is a very singular look.
I moved my Alpair drivers over to these last night and got them fired up. While the sound very good, there is a definite difference from the Pensil series Studio Reference Monitors which now sit forlorn and vacant.
First impressions are in line with what Dave had already indicated, that these new cabs don't have the bass extension of the Pensils, favouring bass precision over extension. The bass is there, just different. They also have a different sense of "air", or space, about them. I'm going to have to live with them for awhile to get a better read. I've been listening to the Pensils for quite awhile now and they have become my "normal".
Attachments
Last edited:
Douglas:
congratulations, that looks really cool !!!
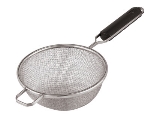
fingers crossed on the front grill. it will be challenging for sure. $40/square is awful ! perhaps you could buy some ikea pasta drainers (not sure on the name here).
they usually have many tiny holes to filter out the water.
don't quote me on this, just thinking outside the box 🙂
congratulations, that looks really cool !!!
fingers crossed on the front grill. it will be challenging for sure. $40/square is awful ! perhaps you could buy some ikea pasta drainers (not sure on the name here).
they usually have many tiny holes to filter out the water.
don't quote me on this, just thinking outside the box 🙂
Called a strainer. One may be challenged to find a big enuff one
dave
An externally hosted image should be here but it was not working when we last tested it.
dave
My intention is to make a really big one out of carbon fibers laid into the mold that I am making.
Look under colander. You can get them in larger sizes and in stainless, copper, etc. Would be much easier than the carbon fiber mess. Might be cheaper too. But likely to be expensive in other than aluminum. Regards
Look for the Chinese style with no footer or handles. I have seen them up to 16" diameter-may even come in larger sizes-for draining noodles.
Did a quick look-see. Couldn't find anything like what I need. Thanks, anyway.
Working with composites is something that I have quite a bit of experience with, I don't think that its going to be a gooey mess for me.
Working with composites is something that I have quite a bit of experience with, I don't think that its going to be a gooey mess for me.
You know what you envision-I don't but thought you might take a look. Good luck with the project. I can't wait to see the finished product. Regards
Fascinating project, spheres have a number of advantages, but mounting them can be a bit difficult.
See here Tim Bailey
And here at DIY audio for my recent post about a new project using two sizes of existing concrete spheres.
Of course any practical sphere is going to be truncated if only by the circular frame of the driver meeting the sphere's wall. Or by a baffle as in the ones I'll be using.
curved surfaces do not bend as easily as flat ones, so the output from enclosure walls is very low, and a truncated-sphere will have very few internal standing waves.
Lastly a sphere will have effectively ideal diffraction behaviour and can thus disappear even without a valve amp! ;-)!
Good luck!
Tim Bailey
Thanks for the link, Tim. That's not quite how these things are going, though. Right now the drivers are mounted in the Mar-Ken12 Octagon cabinet and the cabinet has a flange around its middle. This flange will mount the cabinet to a corresponding flange at the equatorial zone of the back globe half. This will result in the driver positioned forward of the flange. The front half of the globe will be a screen of some sort...I'm still working that one out. Its pretty much decided, but we'll see how it looks once its done.
I've taken a female mold off of my male male. It didn't work as well as I had holed, as in it didn't want to come off. After much coaxing, last Friday I decided that enough was enough and it as coming off. So I cut through it for about 2/3 of the way across and peeled it off like an orange peel, then bonded it back together. The reason that it didn't want to come off is that there were areas which had bonded to the male mold. Not enough wax? Not smooth enough? Who knows? But the bits of filler that came off with the mold are scraping off well enough with a hardwood chisel.
I'll keep everyone posted as I move along.
Wow! Can't wait to see these when you're done!
BTW, quick google search generates this link for spherical enclosure manufacturer:
Spherical Loudspeaker Enclosures
Might be worth checking out for a "project G" speaker template for mass production ;-)
BTW, quick google search generates this link for spherical enclosure manufacturer:
Spherical Loudspeaker Enclosures
Might be worth checking out for a "project G" speaker template for mass production ;-)
- Status
- Not open for further replies.
- Home
- Loudspeakers
- Full Range
- The begginings of my Clairtone globes