Nice!
Did you measure the drivers or simply used TB's own graphs?
Did you measure the drivers or simply used TB's own graphs?
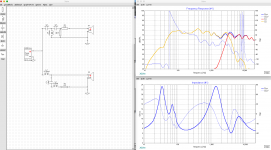
I was not happy with the TB suggested xover, so I decided to try my own.
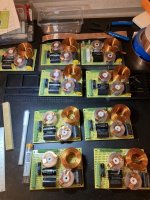
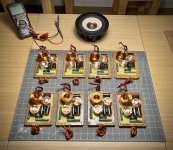
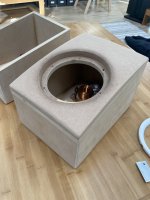
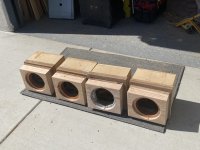
I made 8 of these for 4 surrounds and 4 heights for a HT system I'm building for a client.
I like the sound a lot better now: there was a harshness around 5khz that took me a while to get rid of: luckily the bamboo cone performs quite well at higher frequencies: drivers are cut at 3.5Khz.
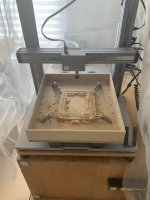
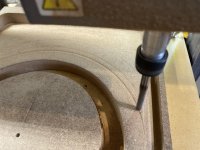
I decided early on that I would 3d print the baffles with PETG: I wish I knew better... The quite expensive Snapmaker cannot print such a large model with PETG. However the Snapmaker can also do CNC, which was my contingency plan, and the baffles came out great that way. I may paint them today.
The last pic is a CG render illustrating what we are aiming for: the side surrounds will "swivel" down from the ceiling to meet demanding WAF.
😉
PG
I guess there's a lot of stuff for frequencies to bounce off in your room!
Thanks for measuring.
Yep, it will be nice to measure at listening position as well, I'm afraid those highs will drop even more when sitting farther out.
Yes. The room was our formal living room before we had kids, and hopefully one day will be again, but right now it's the kid's play room and often looks like a Toys'R Us that was visited by a powerful tornado. I'll see if I can clean it up enough to post a picture online without angering the wife with a public display of messy house. I'll get some longer signal cable, clean up, remeasure, and post pics. Might take another week or so.
They have always felt a little flat on the high end, but I wrote it off because my home theater room has Definitive bipolar supertowers which are legitimately quite bright. I find as I age my taste is slowly shifting from bright to warm on speakers.

Here we are again. This time I measured in my listening position. My Denon receiver came with a mic for it's own calibration and the stand it came with was super handy to hold my measurement mic in my seating position. You were right about the highs getting even worse out there.
Just for giggles since I had the stand set up I swapped out the measurement mic with the audessy mic and let the receiver do it's own measurements. Strangely it showed almost no difference on the REW curves but holy hanna it sure sounded different. It made them SUPER bright. More than my def techs. Like Infinity Studio Monitor series with the polycell tweeters bright. I had to admit it sounded kinda good for a few minutes but my ears fatigued quickly after that. Audessy also has a dynamic EQ feature but when I turned that on it got louder, brighter, and the bass turned into horrible boomy Michael Bay movie bass. In the end I turned both off and then using the manual regular EQ took off 1dB at 125hz, added 1dB at 8K and added 2dB at 16K, which I'm pretty happy with.
I also noticed during the audessy test tones that I'm getting a ton of high frequency reflections off the dining room wall about 4M behind my couch. Lousy open floor plan. It wasn't super noticeable when REW was doing it's sweep but audessy makes a bunch of quick sweeps and that made it more obvious.
A friend of mine was looking at this graph and he noticed that the peaks are all 1 octave apart. He suggested there is a standing wave problem in my room. Not sure what I can do about that.
Another friend suggested the tweeters are directing most of their energy on axis and I should toe them a lot more to help with the HF roll off.
Another friend suggested the tweeters are directing most of their energy on axis and I should toe them a lot more to help with the HF roll off.
Move the speaker a bit around the room. Try not to place them in symmetry along a wall, but offset.
Yes, the tweeter loses off axis, so toe in the speakers for a brighter high end, playing with the toe in until you have the right balance for you.
Yes, the tweeter loses off axis, so toe in the speakers for a brighter high end, playing with the toe in until you have the right balance for you.
I toed them in a lot more and it noticeably brightened the highs. Seems the cone is acting like a horn for the tweeter.
Parts Express finally posted the project submission for my speakers.
Angel Steps | Parts Express Project Gallery
Parts Express finally posted the project submission for my speakers.
Angel Steps | Parts Express Project Gallery
Revisiting this, as I am cleaning up, and wanted to try something different.
Came up with this. Sounds very good, well balanced, and a -5dB from 2.5kHz to 20kHz. means it is not fatiguing at all.

Came up with this. Sounds very good, well balanced, and a -5dB from 2.5kHz to 20kHz. means it is not fatiguing at all.

Been having them playing in a few different rooms.
Perfect for smallish room, but the low end disappear in large rooms, understandably. It would need woofer support there.
But... I had forgotten how these are imaging beasts!
Set them up and sit back, then you can hear the whole band in front of you, nicely spread.
Sit at the equidistances triangle between the L/R and seat, and you are on the stage, in the middle of the band. Almost feels like you have headphones on.
Hey perceval I've been following this thread since 2020 and it has been a huge help in my speaker building journey so far. It sounds like you physically built this crossover already beyond the schematics, would you be willing to share a picture of what it ended up looking like? This is my second crossover so I am very novice and I would love to be able to copy your layout. I'm using Parts Express to source my parts and it looks like the only 4.7 uF foil capacitor they have is by Jantzen Audio and is 86 dollars a pop. Should I be expecting do drop big money like this on a single capacitor or is there an alternative that is obvious to someone more experienced. Thanks again for putting out just about the only thread on the W6-2313 Tang Band crossovers. If I get all of my questions answered then this will help me finish my very first speaker/crossover build!! I'm really looking forward to the enclosure build part of this process, i've got a carpentry background and electrical engineering is very intimidating. Look forward to hearing from you!
Been having them playing in a few different rooms.
Perfect for smallish room, but the low end disappear in large rooms, understandably. It would need woofer support there.
But... I had forgotten how these are imaging beasts!
Set them up and sit back, then you can hear the whole band in front of you, nicely spread.
Sit at the equidistances triangle between the L/R and seat, and you are on the stage, in the middle of the band. Almost feels like you have headphones on.
Hi there!
Glad you are on your way to audio fun!
I did build two XO and listened to them in prototype enclosures. The XO is a mess due to using Wago connectors, so a picture would not help. I do plan to do a serious build of them, but the timing is a bit off. We just sold our house! Now I have 1.5 months to clean up and find another temporary place, as I will also be spending the summer away.
Busy next few weeks. Do share your progress as I will be online, just no time to cut wood, glue and install XOs.
Had a neighbor come visit and I showed him the pair of W6...he really liked the sound.
For me, they are a bit bright, but I usually like my sound kinda dark, so this brightens is probably more to most people's idea of good sound. It was for my neighbor! His eyes were glowing. He was asking when I would finish them... I think he would like a pair.
Here's a page of caps, you don't need to spend $86 if you don't want to! 🙂
https://www.parts-express.com/speak...ylene-crossover-capacitors/capacitance/4.7-uF
You could always use a film cap in parallel by-pass, like a small 0.1uF to get the sparkle of the film cap, using the metalized cap for the value. That's the easy way to save money, and still get good sound.
Good luck!
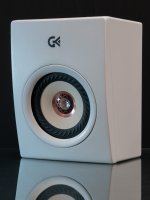
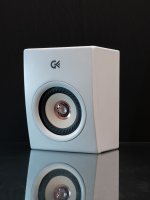
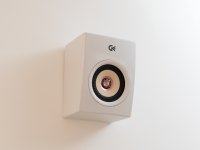
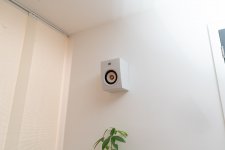
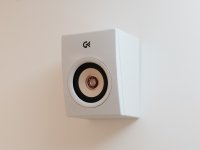
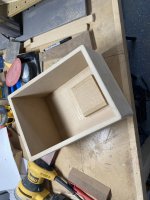
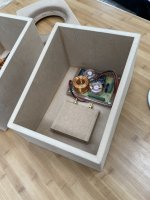
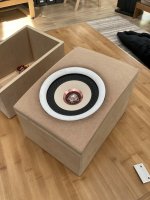
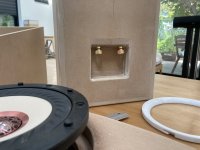
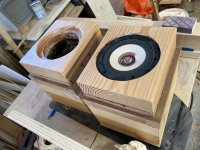
Here are the finished TB surround speakers, ready to be installed on the wall.
The cabinet is made of fiber resin reinforced MDF, with a baffle made of a MDF sandwich carved with a cnc and coated with uv resin before finish.
Pretty happy within the result: the only issue is a boomy peak caused by the proximity to the wall. That is expected and easily corrected later with EQ.
The cabinet is made of fiber resin reinforced MDF, with a baffle made of a MDF sandwich carved with a cnc and coated with uv resin before finish.
Pretty happy within the result: the only issue is a boomy peak caused by the proximity to the wall. That is expected and easily corrected later with EQ.
Attachments
-
 A9490341-CC95-489D-835D-D73E5407182F.jpeg341.6 KB · Views: 227
 -
 3E114BAD-9585-4CB0-8CD9-AF374B19FDA2.jpeg327.1 KB · Views: 223
 -
 2F8F6C24-AB02-43D9-B7B2-EA22AA051183.jpeg208.4 KB · Views: 215
 -
 D2E1141F-7479-4366-8A62-928ECB0CDE04.jpeg148.9 KB · Views: 198
 -
 0CB2865F-5EB5-4F2A-B0AB-422796F4F3C4.jpeg230 KB · Views: 210
 -
 A278D2B3-78B5-4D7A-8DC1-9215D71F98A1.jpeg190.8 KB · Views: 221
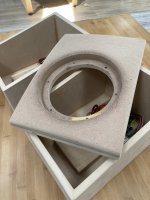
Thank you! The ring is 3D printed with a UV resin printer, and I mounted it on the baffle with a strong double side tape. Originally it was supposed to be mounted with a bayonet system, but when I failed to 3d print the baffle I had to scrap that. I did test it for spurious resonances and it seems ok (for a surround): but we are doing science here so I’m sure you want to see responses… I got to do two more so if you are interested I’ll post responses with and without the ring at various angles. That said, the ring is there mostly to satisfy WAF and only secondly to minimize diffractions to improve imaging.Very nicely done! What is the ring trim material made of, and how is it mounted/attached?
Yes, it is done very very well, looks commercially made 🙂
Seeing some responses with and without the 3D ring is also very interesting. Good job
Seeing some responses with and without the 3D ring is also very interesting. Good job
Thank you Perceval! This is part of a 15 speakers system, the main L/R/C being linear arrays made of 6 HiVi M6N and 8 GRS PT816. I’m almost done, I’ll post a more comprehensive description soon.nice!
What do you have as mains?
More pics of the surrounds, and also the heights wip.
Attachments
-
 8858261F-5311-4900-83B2-21591129F85C.jpeg632.2 KB · Views: 210
 -
 81405866-6905-44BB-ADB6-2B84BDC0E155.jpeg368 KB · Views: 201
 -
 0E47FB8C-4E01-40C2-AE44-1C51CAFD0BBE.jpeg556 KB · Views: 203
 -
 CDD29B00-81E8-4DE8-AE80-8D21B6A9B25D.jpeg352.5 KB · Views: 177
 -
 5CB5B173-D147-41B3-8AF4-A6D5485F56E6.jpeg494.5 KB · Views: 167
 -
 3E2BE592-E08F-4DD4-8331-4021DFEFD98C.jpeg444.3 KB · Views: 180
 -
 665CED3A-C723-4E8B-AFE3-037C67331D93.jpeg427.6 KB · Views: 179
 -
 3543E5F6-535A-411B-866D-C062E61FFDA6.jpeg421.9 KB · Views: 185
 -
 E1D91DEF-00F6-434C-8786-BFC5F321F341.jpeg409.6 KB · Views: 191
 -
 C874DBDB-E731-448B-B79C-A5DA188C2F7F.jpeg319.3 KB · Views: 188
 -
 88BFCA1F-6E71-41F4-91DC-AC796931F403.jpeg397.2 KB · Views: 175
 -
 533C4894-92A3-43CD-A172-758E46719184.jpeg486.8 KB · Views: 188
 -
 7943F674-52CF-4252-872A-0A5AC2475ADA.jpeg480.6 KB · Views: 205
 -
 DE0773BE-C387-4EAD-B514-9FE496A2FB32.jpeg509 KB · Views: 215
- Home
- Loudspeakers
- Multi-Way
- TB new line of Coax drivers