removed
Attachments
Last edited:
That looks very fancy, how does it sound?
I assume that money is no object here, but is a 4 layer board and those pretty crazy looking Jensen caps at all necessary?
Is the copper pour on the top/bottom side grounded too? It probably isn't a good idea to leave it floating.
I assume that money is no object here, but is a 4 layer board and those pretty crazy looking Jensen caps at all necessary?
Is the copper pour on the top/bottom side grounded too? It probably isn't a good idea to leave it floating.
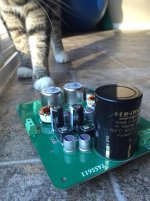
Almost rdy for sound. Need a few holes made on my enclosure.
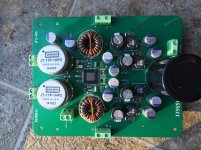
I prefer 4 layer boards. 1st attempt using 4 pole capacitors. Looking forward to the results. I designed this amp for my 98db 4-ohm speakers.
The pours are connect to ground with a ferrite bead in a couple places around the board.
Included a pic with the output filter caps.
Dwight
I prefer 4 layer boards. 1st attempt using 4 pole capacitors. Looking forward to the results. I designed this amp for my 98db 4-ohm speakers.
The pours are connect to ground with a ferrite bead in a couple places around the board.
Included a pic with the output filter caps.
Dwight
Attachments
Yes, 4 layers are nice if you don't mind the extra cost.
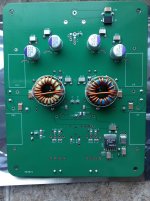
IMO, I would stitch the pours right through to the main internal ground plane. Connecting the outer planes with ferrite beads in only a couple of places could lead to ground loops.
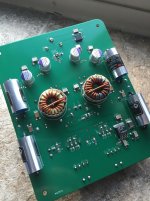
Still, looks great. Nice use of board space with the components on both sides.
IMO, I would stitch the pours right through to the main internal ground plane. Connecting the outer planes with ferrite beads in only a couple of places could lead to ground loops.
Still, looks great. Nice use of board space with the components on both sides.
The outer pours (as mentioned previously) should have many stitching via's to connect them to GND as it is they especially around the edges, they are effectively antennas at the moment.
To what frequency?
Beside this, the MLCC connections are not optimal. Maybe all is good looking, but design should follow function not the other way around.
But yeah, look nice.. wouldn't do either.
Beside this, the MLCC connections are not optimal. Maybe all is good looking, but design should follow function not the other way around.
But yeah, look nice.. wouldn't do either.
- Status
- Not open for further replies.
- Home
- Amplifiers
- Class D
- TAS5611A