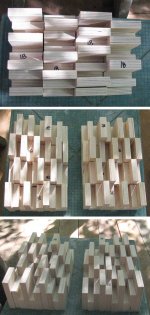
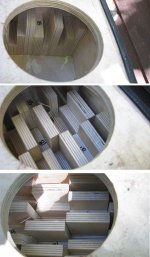
When Chris & i built (chris did the actual building) the 1st test set of Woden Maeshowe the Air Cavity behind the driver was purposely enlarged so that we could play with it. Sucess with the FE126 lead to Valiant, an adaption for FE126En.
All along we knew we'd have to fill it up/reduce its volume back to spec. I had the idea of using the "blocks" i often mention.
This is meant as an illustration of what i mean by that. I will note here that what follows was/is very successful.

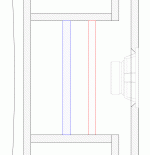
Blue is approximately where we put the divider, red is where it should have been.
1st i figured out how deep a block i would need to fill to the depth of the specified rear dividing panel (distance from blue ro red). I took this depth and multiplied & divided by the golden ratio.
I had to install thru the driver cutout so i figured a grid of blocks 4 high by 10 wide (9 blocks 15mm wide + 1 18mm). Chris made up a 1/3 each of the 15mm blocks in short, medium and long. The 18mm blocks were all made medium. Installed this gives a net air cavity volume as specified.
I arranged the blocks so that each row had the same number of s/m/l and then arranged them so that no 2 blocks with the same height were adjacent. (and mirror image for each speaker). Then using a dab of glue i installed into the cavity to create a "bumpy" rear wall. A layer of 1/2" cotton felt was placed over the top and the driver installed.
EL70eN was installed and the "issue" we were having that we were using as a benchmark had dissapeared. The new Alpair 7.3 was installed (sans extra magnet as that was quicker than cutting a hole in the damping to accomodate it) and worked superbly.
One can take this further by making a more complex grid of blocks. For instance, more of them, more lengths, cutting the outside end at an angle, using pyramids instead of rectangular prisms.
A precursor to this is the air cavity in Mikasa.
dave
All along we knew we'd have to fill it up/reduce its volume back to spec. I had the idea of using the "blocks" i often mention.
This is meant as an illustration of what i mean by that. I will note here that what follows was/is very successful.
Blue is approximately where we put the divider, red is where it should have been.
1st i figured out how deep a block i would need to fill to the depth of the specified rear dividing panel (distance from blue ro red). I took this depth and multiplied & divided by the golden ratio.
I had to install thru the driver cutout so i figured a grid of blocks 4 high by 10 wide (9 blocks 15mm wide + 1 18mm). Chris made up a 1/3 each of the 15mm blocks in short, medium and long. The 18mm blocks were all made medium. Installed this gives a net air cavity volume as specified.
I arranged the blocks so that each row had the same number of s/m/l and then arranged them so that no 2 blocks with the same height were adjacent. (and mirror image for each speaker). Then using a dab of glue i installed into the cavity to create a "bumpy" rear wall. A layer of 1/2" cotton felt was placed over the top and the driver installed.
EL70eN was installed and the "issue" we were having that we were using as a benchmark had dissapeared. The new Alpair 7.3 was installed (sans extra magnet as that was quicker than cutting a hole in the damping to accomodate it) and worked superbly.
One can take this further by making a more complex grid of blocks. For instance, more of them, more lengths, cutting the outside end at an angle, using pyramids instead of rectangular prisms.
A precursor to this is the air cavity in Mikasa.
dave
Attachments

I was trying to fake it with cans of salmon, but it wasn't quite cutting it 🙂
It seems forever that i have said that the air cavity volume could be adjusted with blocks, thot it was time for me to "eat my own dogfood" .
I think the diffusion device character doesn't hurt at all either.
dave
It seems forever that i have said that the air cavity volume could be adjusted with blocks, thot it was time for me to "eat my own dogfood" .
I think the diffusion device character doesn't hurt at all either.
dave
Yeah, glued in scrap wood makes good filler when you need it to be portable.
Agreed, though doing a proper skyline would be the theoretical ideal: http://www.avsforum.com/avs-vb/showthread.php?t=1312919
GM
Agreed, though doing a proper skyline would be the theoretical ideal: http://www.avsforum.com/avs-vb/showthread.php?t=1312919
GM
I wasn't prepared to go as complex as that. I (mostly -- didn't quite get it finished) wrote software at the start of the decade for a specific calculation of that to check to see if an AES paper had made some errors -- it was IIRC at least a couple orders higher than th ones linked off that thread -- thanx for posting that.
dave
dave
FYI
Just to get this in the database. this site has a wealth of information on Quadrature Residue Diffusors (QRDs): QRD diffusers: Technical Overview
Just to get this in the database. this site has a wealth of information on Quadrature Residue Diffusors (QRDs): QRD diffusers: Technical Overview
I wasn't prepared to go as complex as that. -- thanx for posting that.
You're welcome!
Understood, life's too short to spend much time on such a complex way to do such a simple diffusion.
GM
mmmmmmm... salmon
oh yea, good links.
edit: I've been reading too many pdf's... it's an addiction. well here's another. http://downloads.bbc.co.uk/rd/pubs/reports/1990-15.pdf
oh yea, good links.
edit: I've been reading too many pdf's... it's an addiction. well here's another. http://downloads.bbc.co.uk/rd/pubs/reports/1990-15.pdf
Last edited:
mmmmmmm... salmon
We did have 2 BBQed sockeye as part of dinner on the day of the diyFEST we tested this out 😀
How did you know?
dave
nobody BBq's a salmon without me knowing 😀
Vancouver Island DIY-fest, and no one told me... grumble grumble grumble.
do these things get posted somewhere?
Vancouver Island DIY-fest, and no one told me... grumble grumble grumble.
do these things get posted somewhere?
In the Clubs & EventsForum -- http://www.diyaudio.com/forums/clubs-events/184137-8th-annual-vancouver-island-diyfest-2011-a.html, and if put on the Calender, in the upcoming Events box on the diyA home page (burning amp the only one there at the moment)
Are you close enuff to have been able to make it?
dave
Are you close enuff to have been able to make it?
dave
😀
There will be another one next year... in all liklihood on August 18
dave
that's 51 weeks to plan for the trip, or formulate excuses for not
Diffuser Cities
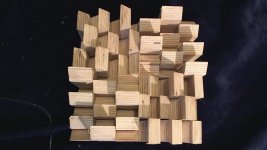
Sorry to interupt, but I figured I would show you what the imformation on this thread has inspired me to do for my Avebury project:
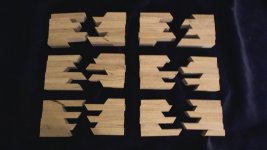
It was hard to use only prime numbers as I did not have a lot of depth to work with. And the golden ratio was done by Dave, so I went with sloped surfaces on my blocks. That way every distance is covered with-in the range of my slopes when put in continuous order from smallest to biggest. (picture 1) One group of smallest to biggest has six peices.
Next I figured the layout of the grouping of peices by attemping to make the distance from the top to the bottom of adjoining pieces as differnet as possible, creating different "cavities". One grouping has a redundency, but they slope in opposite directions creating a different "cavity". All the "pairs" have similiar patterns, but they are diferent by how they adjoin. (picture 2)
Now the fun part. I created four squares, each consisting of 3 groupings. I followed the same sequencing on creating these squares, but it is amazeing how different they turned out. I then put the squares together by rotating the adjacent square 90 degrees. (picture 3) I want a "sysmetrical" diffusion to keep the driver loading the horns equally. This may not de necessary.
Sorry to interupt, but I figured I would show you what the imformation on this thread has inspired me to do for my Avebury project:
It was hard to use only prime numbers as I did not have a lot of depth to work with. And the golden ratio was done by Dave, so I went with sloped surfaces on my blocks. That way every distance is covered with-in the range of my slopes when put in continuous order from smallest to biggest. (picture 1) One group of smallest to biggest has six peices.
Next I figured the layout of the grouping of peices by attemping to make the distance from the top to the bottom of adjoining pieces as differnet as possible, creating different "cavities". One grouping has a redundency, but they slope in opposite directions creating a different "cavity". All the "pairs" have similiar patterns, but they are diferent by how they adjoin. (picture 2)
Now the fun part. I created four squares, each consisting of 3 groupings. I followed the same sequencing on creating these squares, but it is amazeing how different they turned out. I then put the squares together by rotating the adjacent square 90 degrees. (picture 3) I want a "sysmetrical" diffusion to keep the driver loading the horns equally. This may not de necessary.
Attachments

Have I lost ya yet?
Bear with me, I am almost done! I just hope this helps someone!
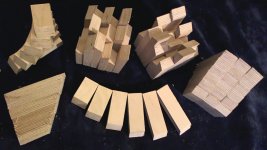
...So, after I got the squares together to form the whole diffusion panel, I rotated every other pair of peices. (picture 4)
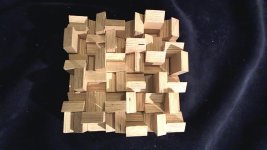
...After some looking, I decided to rearrange the four squares to scatter the sound around more "balanced" Is that an oxymoron for a diffusion panel? (picture 5+6) This is the one I like best.
I have to say, these things look really cool, it is a shame that they will be enclosed inside the cabinets!
Enjoy your salmon! Yum, Yum.
Allen
Bear with me, I am almost done! I just hope this helps someone!
...So, after I got the squares together to form the whole diffusion panel, I rotated every other pair of peices. (picture 4)
...After some looking, I decided to rearrange the four squares to scatter the sound around more "balanced" Is that an oxymoron for a diffusion panel? (picture 5+6) This is the one I like best.
I have to say, these things look really cool, it is a shame that they will be enclosed inside the cabinets!
Enjoy your
salmon! Yum, Yum.Allen
Attachments


Last edited:
Excellent work Allen. This is an excellent illustration of how the basic idea can be improved on.
dave
dave
i must say ive seen these before and thoroughly like the idea. Not tried the skyline type, but the Weems' splasher worked quite well so id imagine these would improve upon that further. My visaton tqwl has steps along the taper, which may have a similar effect, though less pronounced and as a side effect rather than deliberate. Maybe a few blocks added to the 15degree face may 'convert' my design? Nice work.
When Chris & i built (chris did the actual building) the 1st test set of Woden Maeshowe the Air Cavity behind the driver was purposely enlarged so that we could play with it. Sucess with the FE126 lead to Valiant, an adaption for FE126En.
All along we knew we'd have to fill it up/reduce its volume back to spec. I had the idea of using the "blocks" i often mention.
This is meant as an illustration of what i mean by that. I will note here that what follows was/is very successful.
dave
This has piqued my curiousity a bit... After adding the diffusion blocks and verifying that the Alpair 7.3's worked perfectly, did you ever try and see how the FE126s sounded with the blocks on?
Cheers,
Daniel
- Status
- Not open for further replies.
- Home
- Loudspeakers
- Full Range
- Taking the Air Cavity/pre-chamber to the next level...