Hello all,
For my high school senior project I will be building a pair of hybrid electrostatic speakers with the help of the techniques and designs by CharlieM.
I originally made a post back in February about building another pair of curved stats, but after some research I decided to make a stretched wire design as per CharlieM. Original Thread
I'm still a student so I don't have a lot of time dedicated to building these right now, but I get the month of May off to work exclusively on my senior project. I've already ordered most of what I need: Wire, Mylar, Subwoofers, Amps/PSUs, Glue, Tape, Resistors, etc.
I've already received the subs (very beefy) and made test cabinets for them. I decided to go sealed as it was the closest to T/L I could get without making humongous cabinets. The plan is to use a MiniDSP 2x4 HD and a UMIK-1 for crossover and EQ (and more) functionality.
Just bought 2 Sure Electronics AA-AB32313 2x400 amps and power supplies to use to bi-amp the panel and subwoofer.
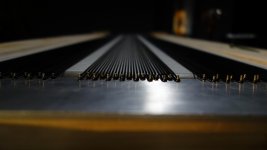
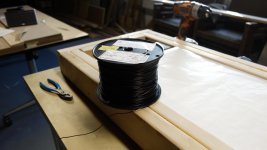
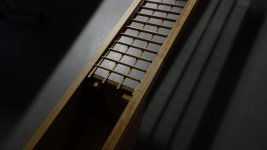
I had some difficulty getting the wire, but I eventually found a local supplier where I bought 1520 ft of 22AWG PVC insulated wire which when spaced out with 10TPI threaded rods will give me 42% open area.
I already owe much of this project to CharlieM. I'm really using exactly his design for the lattice frames and wire segmentation/resistor values, which has helped tremendously.
The next biggest step is making the wire stretcher jig and the lattice frames to glue the wires to.
Just bought 2 Sure Electronics AA-AB32313 2x400 amps and power supplies to use to bi-amp the panel and subwoofer.
I had some difficulty getting the wire, but I eventually found a local supplier where I bought 1520 ft of 22AWG PVC insulated wire which when spaced out with 10TPI threaded rods will give me 42% open area.
I already owe much of this project to CharlieM. I'm really using exactly his design for the lattice frames and wire segmentation/resistor values, which has helped tremendously.
The next biggest step is making the wire stretcher jig and the lattice frames to glue the wires to.
Attachments
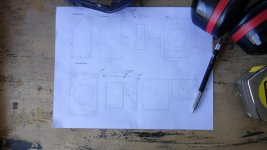
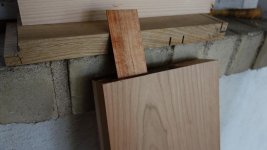
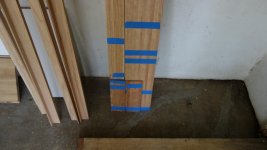
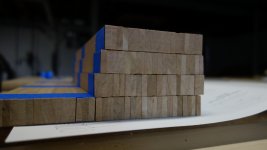
As this project and my presentation will be done in late May, I'm looking at ways to cut down time spent building. The cabinets aren't too difficult to build and can be made of 3/4 MDF and then veneered without too much trouble. There are 72 horizontal spars that I must make, for which I'm thinking of using a laser cutter for. They are supposed to be 3/16" wood, but for cost measures I plan on using 1/4" cherry plywood which should cut fine and save me loads of time not having to make each individual spar.
Plywood should work just fine, and likely have better dimensional stability than the hardwood.… for cost measures I plan on using 1/4" cherry plywood which should cut fine and save me loads of time not having to make each individual spar.
Looking forward to seeing your finished project.
.....I plan on using 1/4" cherry plywood which should cut fine and save me loads of time not having to make each individual spar.
If your pushed for time and/or money these light diffusers might be helpful? Black will blend in and not look too bad for plastic. You will only need two so its cheap, styrene has a dielectric constant of just 2.4, its water and humidity resistant for low dielectric stability with warp resistance and it will be a very quick build.
Plastic Lighting Diffusers
0.315" X 23 5/8" x 47 5/8" Black Egg Crate Sheet
The cells are 1/2" x 1/2" and the material is 5/16" thickness. Material is black styrene and can be immersed in water continuously.
An externally hosted image should be here but it was not working when we last tested it.
Last edited:
First update in a while:
Whew! These are really no easy task--especially when you're on a deadline.
I've made plenty of progress though:
-All parts and materials obtained
-Wire stretcher built
-Mylar Stretcher built
-Currently building main wood hardware
Tomorrow I plan to have all of the parts for the lattice stators done, and possibly start gluing. Today was spent cutting the main shapes and grouping them together for faster cutting tomorrow.
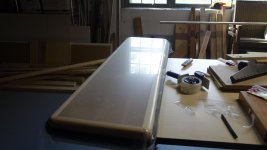
On Wednesday I hope to make the real cabinets and hopefully veneer them.
The hardwood and veneer I purchased were both cherry, and I plan on using spray on lacquer (maybe some Danish oil first) on all parts.
Enjoy some relevant photos
Whew! These are really no easy task--especially when you're on a deadline.
I've made plenty of progress though:
-All parts and materials obtained
-Wire stretcher built
-Mylar Stretcher built
-Currently building main wood hardware
Tomorrow I plan to have all of the parts for the lattice stators done, and possibly start gluing. Today was spent cutting the main shapes and grouping them together for faster cutting tomorrow.
On Wednesday I hope to make the real cabinets and hopefully veneer them.
The hardwood and veneer I purchased were both cherry, and I plan on using spray on lacquer (maybe some Danish oil first) on all parts.
Enjoy some relevant photos
Attachments
Last edited:
Very nice !
I see a similarity in stretching jigs and this is for my Quad 988 panels.
Hard woods have high Q resonances and should be damped any way you can manage when assembled
Touché !
Regards
David
I see a similarity in stretching jigs and this is for my Quad 988 panels.
Hard woods have high Q resonances and should be damped any way you can manage when assembled
Touché !
Regards
David
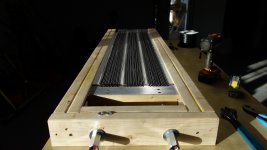
It's a lot of work-- more than any sane person would attempt 🙂
Your stretching jig looks great. It will take a lot of force to stretch those wires and I'm wondering how well just those (4) small screws into wood will hold the pin plate once you start cranking the jack bolts-- have you stretching any wires yet? You may want to add a few more screws for good measure.
Your stretching jig looks great. It will take a lot of force to stretch those wires and I'm wondering how well just those (4) small screws into wood will hold the pin plate once you start cranking the jack bolts-- have you stretching any wires yet? You may want to add a few more screws for good measure.
...have you stretching any wires yet? You may want to add a few more screws for good measure.
Last week I tried stretching the wire from 47.5" to 48", and got to 47 5/8". The rail system I made was a little weak, and so after this stator gets glued up I'll strengthen the jig a bit.
Hard woods have high Q resonances and should be damped any way you can manage when assembled
View attachment 680702
Could you elaborate on this? Is it the stator frame or the speaker as a whole I should be worried about?
I plan on attaching the panel to the frame with velcro-easy install and removal-is this the type of damping you're referring to?
Thanks
Ben
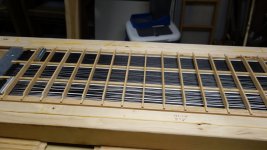
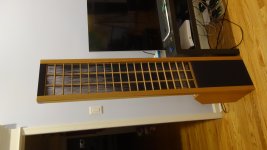
Here's the latest for today:
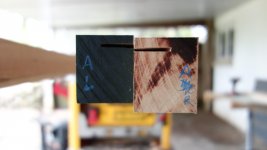
Finished making all of the stator lattice pieces. I plan on assembling it as a whole tomorrow, then spraying it with lacquer for stability, then gluing the wires in.
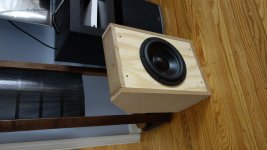
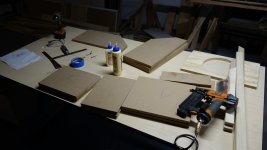
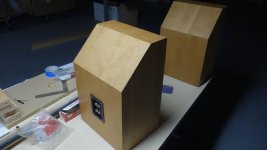
I cut all of the MDF pieces for my bass cabinets and started assembly. If there's spare time tomorrow I will finishing assembling them and start putting veneer on.
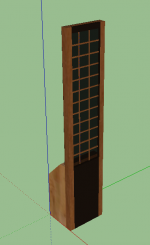
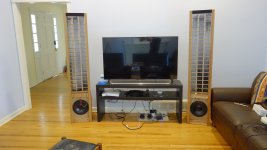
Just for fun I cobbled together the main parts of the speaker and put them arranged them together (I can almost see it coming together finally)
As much as I enjoy this project, it has also consumed almost every waking moment of my life these past two months and I can't wait to be finished! 😀
Finished making all of the stator lattice pieces. I plan on assembling it as a whole tomorrow, then spraying it with lacquer for stability, then gluing the wires in.
I cut all of the MDF pieces for my bass cabinets and started assembly. If there's spare time tomorrow I will finishing assembling them and start putting veneer on.
Just for fun I cobbled together the main parts of the speaker and put them arranged them together (I can almost see it coming together finally)
As much as I enjoy this project, it has also consumed almost every waking moment of my life these past two months and I can't wait to be finished! 😀
Attachments

Thank you for your words of encouragement! I'm too far in now--no turning back! 😀Very nice work so far. You're almost there. Keep going!
Ben
The Velcro would be an excellent way to decouple the stator assembly from the hard wood frame.
With those hardwood posts you will more than likely be generating “tuning fork “ frequencys up the frame and maybe the top joining piece should have a pocket area to be filled with sand and lead shot to counter that possibility.
Regards
David
With those hardwood posts you will more than likely be generating “tuning fork “ frequencys up the frame and maybe the top joining piece should have a pocket area to be filled with sand and lead shot to counter that possibility.
Regards
David
Last edited:
The Velcro would be an excellent way to decouple the stator assembly from the hard wood frame.
With those hardwood posts you will more than likely be generating “tuning fork “ frequencys up the frame and maybe the top joining piece should have a pocket area to be filled with sand and lead shot to counter that possibility.
Regards
David
My stators and frame are quite similar these, and I recall when building mine that I had much anxiety about their low mass, which is much lower than any of the perf metal panels I was used to. Knowing that heavier perf panels vibrate significantly, the much lighter wood/wire panels were sure to vibrate even more. So; I was exceedingly worried about vibrations and resonances coloring the sound.
My stators are isolated in the frame by gaskets front & back, formed by 1/8" x 1/2" medium density foam speaker gasket tape from Parts Express. The gasket tape is applied to the mating surfaces of the frame and back moldings which secure the panel into the frame.
(I think the best way to mitigate resonances would be to bond the panels into the frame with RTV silicone, which would couple the frame's mass to the panels and let the mass dampen the panels-- but then; that would permanently bond the panels to the frames which is definitely not a good idea, should you ever need to service the panel)
So when I fired up my panels for the first time and cranked up the volume I was awe-struck at how good they sounded. And then I placed my hand against the wooden support lattice and felt it vibrating like crazy-- even so, it doesn't seem to matter-- the panels sound fabulous!!!
Moral of the story: DON'T WORRY ABOUT IT 🙂
Do you happen to know if the vibrations were caused by the woofer? Or the ESL panel. If the panel was the source, any idea what frequencies? I did some accelerometer measurements on my panels and the only vibrations in the lattice were related to the diaphragm modes at low frequencies. Rapping the lattice structure with a screw driver did show the expecting higher frequency structural resonances, but the ESL itself just didn’t excite them even when driven hard.… I placed my hand against the wooden support lattice and felt it vibrating like crazy
Adding acoustic damping dramatically reduced the vibration caused by the diaphragm modes, although like you I didn’t notice an audible problem to begin with. Most likely this is because the radiating area is small compared to the diaphragm, and the lattice just isn’t an efficient radiator at low frequencies.
Do you happen to know if the vibrations were caused by the woofer? Or the ESL panel. If the panel was the source, any idea what frequencies? I did some accelerometer measurements on my panels and the only vibrations in the lattice were related to the diaphragm modes at low frequencies. Rapping the lattice structure with a screw driver did show the expecting higher frequency structural resonances, but the ESL itself just didn’t excite them even when driven hard.
Adding acoustic damping dramatically reduced the vibration caused by the diaphragm modes, although like you I didn’t notice an audible problem to begin with. Most likely this is because the radiating area is small compared to the diaphragm, and the lattice just isn’t an efficient radiator at low frequencies.
I'm not equipped to determine the frequencies at which the lattice vibrates, or what portions are excited by the woofer or diaphragm-- I suspect both.
My stator lattices are likely less massive than most, insofar as the stator side rails are just 3/8" thick x 3/4" wide. The surrounding speaker frame provides vertical support, and it's quite stout.
The panel is isolated in the frame by 1/8" x 1/2" med density foam rubber gaskets on both sides. I would guess the lattice vibrates predominantly alone without transferring much of its energy to the frame. In any case, it sounds really good.
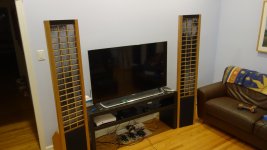
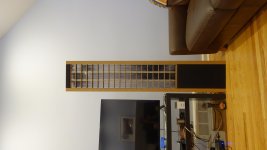
Speakers are done and functional, and just gave my presentation on them today!
The dispersion of sound is very impressive; much smoother and wider than the curved panels I previously made. There is still definitely a sweet spot, but I still am able to enjoy the music throughout the whole room.
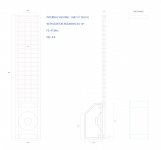
The Mylar is stretched roughly to 1.25%.
The bass cabinets work well, but some bracing may be a thought for the future. In the sealed box, they're much quicker than I would have expected.
I'm glad I designed these with subwoofers instead of woofers, as external subs would have been a pain and it's nice to be able to EQ them out and get very low bass with a great thump in kicks and a soothing rumble on bass notes.
It's possible I'm missing some detail in the mids, but I have set the crossover at a point where most of the detail is handled by the panel.
The crossover is set at 220Hz, with a 48dB/Octave slope.
The MiniDSP is incredibly useful, and I can't even imagine the nightmare that passive crossovers would have been.
I'm very satisfied with the whole system, although I bet that they could still use a few tweaks.
If I were to do another system like this, the frame lattice would be made of some kind of laser cut acrylic or some other material that could be made to have a low profile.
Of course, I need to thank CharlieM again for not only his great website which has incredible information, but also his willingness to share his plans for the wire stretcher and lattice frames with me. (I also stole his Mylar stretcher idea). I probably wouldn't have been able to complete this project had it not been for him.
Feel free to ask questions or give feedback!
Ben
The dispersion of sound is very impressive; much smoother and wider than the curved panels I previously made. There is still definitely a sweet spot, but I still am able to enjoy the music throughout the whole room.
The Mylar is stretched roughly to 1.25%.
The bass cabinets work well, but some bracing may be a thought for the future. In the sealed box, they're much quicker than I would have expected.
I'm glad I designed these with subwoofers instead of woofers, as external subs would have been a pain and it's nice to be able to EQ them out and get very low bass with a great thump in kicks and a soothing rumble on bass notes.
It's possible I'm missing some detail in the mids, but I have set the crossover at a point where most of the detail is handled by the panel.
The crossover is set at 220Hz, with a 48dB/Octave slope.
The MiniDSP is incredibly useful, and I can't even imagine the nightmare that passive crossovers would have been.
I'm very satisfied with the whole system, although I bet that they could still use a few tweaks.
If I were to do another system like this, the frame lattice would be made of some kind of laser cut acrylic or some other material that could be made to have a low profile.
Of course, I need to thank CharlieM again for not only his great website which has incredible information, but also his willingness to share his plans for the wire stretcher and lattice frames with me. (I also stole his Mylar stretcher idea). I probably wouldn't have been able to complete this project had it not been for him.
Feel free to ask questions or give feedback!
Ben
Attachments

Last edited:
OUTSTANDING !!!!
You've done a super job with your design and execution. And you needn't worry about over driving or damaging those panels-- short of poking a stick thru a diaphragm, I really don't think you can hurt them. And I have a pretty good idea of how they sound 🙂
Enjoy!
You've done a super job with your design and execution. And you needn't worry about over driving or damaging those panels-- short of poking a stick thru a diaphragm, I really don't think you can hurt them. And I have a pretty good idea of how they sound 🙂
Enjoy!
- Status
- Not open for further replies.
- Home
- Loudspeakers
- Planars & Exotics
- Stretched Wire Hybrid ESL Build