Heard about that but never tried it since the common consensus was it wasn't needed with a heated bed. The problem is that stupid z axis limit, which never stays where I set it with the first layer height adjustment. I wish someone made a decent limit switch instead of that cheap microswitch solution.
You could try to cover the bed with the blue painters tape, meant for outside use. You may need to make a small height adjustment.
The blue painters tape (even on a heated bed) will make the first layer stick quite well, as it's UV protection helps make the filament stick to it. I didn't like the use of hairspray, but we always use the painters tape.
Try it, it really works. Change the tape after a few prints or when it's damaged.

I was going to try the PEI build plate for ABS, but I heard the blue tape also works for that. I wonder if the adhesive will hold up to the 250 degree ABS print temperature.
A simple trick is to use a saturated sugar water mix. A thin layer with a brush and let it dry with a heated bed.
I printed this second one this afternoon and this time let the bed preheat at 60 deg C for 30 min. The first layer looks like it came from a professional shop. Its very clean without a single burr or flaw. Hopefully it will behave now with future prints, although it does tend to string a bit with this filament.

Last edited by a moderator:
The solution to my issue appears to be thorough preheating of the bed. Its possible a draft from the central AC system is getting to the print surface and causing some adhesion issues. The glass build surface expands by several thousands when its fully heated. I did notice curling on the edges of the failed prints, so warping may be a problem. I'm still going to try the blue painters tape just to see how forgiving it is. Hopefully its an option with ABS filament. The PLA I use is very tough, almost like ABS but obviously not as UV or heat resistant. UV is a big one down here in AZ, as i wouldn't use unpainted PLA exposed to the sun. If you're wondering why my AC is still running this time of year, its because the highs are still in the 90s...
Sanded and ready for paint -

Sanded and ready for paint -
Last edited by a moderator:
Anyone have suggestions on what type of paint to use on PLA? I usually like automotive brake caliper paint since it cures very quickly and is very durable. The VHT brand is very good, but its nasty stuff to deal with health wise.
I use acrylic (water based) primer and matte spray paint (again acrylic, water based). Not sure however if it works for glossy surface ...
I usually use a textured paint on speaker components but since its in a critical location with tight clearances I wouldn't want anything unpredictable or prone to shedding particles near the VC gap.
I'll take a chance with the VHT paint since it bonds very well with smooth plastic. I just didn't know if its going to dissolve with the aggressive chemical makeup of the paint.
I'll take a chance with the VHT paint since it bonds very well with smooth plastic. I just didn't know if its going to dissolve with the aggressive chemical makeup of the paint.
In the UK we can buy rattle cans of plastic primer for car bumpers. Might be worth a shot as is designed for plastics.
Rob.
.jpg")
Rob.
I've purchased similar stuff here in the US. Luckily I don't live in CA, which has a lot of restrictions for VOCs, which that kind of paint would fall under.
I was going to paint a test piece to make sure its compatible with the VHT enamel I want to use. Its designed to have aggressive bonding properties with all sorts of materials and I doubt it needs an adhesion promoter like urethane car body parts need. Once the stuff cures, its very durable and temp resistant, but I doubt being used on a phase plug qualifies as a difficult application.
I researched the paint compatibility of PLA and it didn't state anything special about it. Most likely any enamel will work as long as the surface is rough enough to hold onto the paint. The paint I wanted to use is made to be applied to Teflon coated brake calipers, so I think it will do just fine.
My only other concern is mounting the phase plug. Im leaning towards screw mounting it through the pole piece vent so I can remove it just in case I want to later on.
I was wondering how you were going to do that. I've used 3 small wood screws into wood plugs. Simple enough to fit and adjust, and pretty secure with a light weight plug. The hard part is getting a proper grip in case it needs to be removed. Sticky putty helps ....a bit like using chewing gum lol.My only other concern is mounting the phase plug. Im leaning towards screw mounting it through the pole piece vent so I can remove it just in case I want to later on.
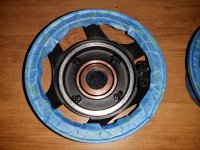
This is how it turned out so far with the phase plugs I printed. I attached them with T7000 contact adhesive. Its pretty strong stuff once it cures and holds up well to heat. You have to be careful not to have any adhesive seep into the VC gap. I left myself 0.005" wiggle room by reducing the phase plug OD. This way there's a safety margine in case they're not exactly perpendicular to the VC inner walls, but shims were still used to center them. If i decide to remove anything down the road, I can knock them off from the rear pole piece vent holes.
I also added outer copper demodulation rings which were made from a 60 x 50 x 2mm copper washers, attached with green loctite bearing retaining compound. This should improve Le a little for better top end extension and lower Qes and Qms a tiny bit.
Next step is reconing them with fresh kits from PRV. I really like that these are available and very reasonably priced. Only $40 each shipped free. Not much lost this way if you screw something up. These are very light cones. Only drawback is the VC shims aren't included, but i have a large assortment of shims thanks to my JBL and EV reconing days. Its very critical to get the VC alignment dead on for the lowest distortion possible. Odd order HD rises when the VC is misaligned, even if theres no rubbing. It also helps to dampen the spider outer diameter with some PVA in the case of a raised spider design. This reduces spider resonances, just like a coated surround helps with surround reflections at the cone.
I'll start another thread about the before and after results with some data. Hopefully this will make the driver more useful as a wideband midrange and get rid of the very annoying pole cavity resonance this thing had before.
Attachments

Last edited:
You won't regret getting a PEI build plate, I particularly like the smooth side (but gently sand with ~600 grit or fine wire wool to give the surface a key). I print PLA with the bed at 65c, that extra 5c makes a noticeable difference.
You will never get good results from ABS without an enclosure for the printer. Warps and peels off the plate like crazy. I've heard ASA can be easier to print but others say it's just like ABS. If you have any kind of airflow near the printer it can certainly affect the print even for PLA, especially if the tuning of the heaters is not spot on (PID tuning). Try protecting it from drafts with a few cardboard panels or similar.
You will never get good results from ABS without an enclosure for the printer. Warps and peels off the plate like crazy. I've heard ASA can be easier to print but others say it's just like ABS. If you have any kind of airflow near the printer it can certainly affect the print even for PLA, especially if the tuning of the heaters is not spot on (PID tuning). Try protecting it from drafts with a few cardboard panels or similar.
- Home
- Loudspeakers
- Multi-Way
- STL file for simple phase plug?