Does anyone have an STL file for a basic bullet shaped phase plug which can be scaled in a slicer? I want to add a phase plug to a midbass driver, but can't find a suitable design on line for 3D printing. I've come across some similar shapes, like nose cones for model rockets, but they're hollow and need to be filled for drilling and mounting.

Post a sketch with dims and I'll model one up for you.I want to add a phase plug to a midbass driver, but can't find a suitable design on line for 3D printing
jeff
@vinylkid58 Thanks! Will do. I have a model somewhere on my other drive downloaded from Thingiverse. It will scale on a slicer, but its hollow, so its only good as a drawing example.
The original file and the STL generated by a client.
http://www.planet10-hifi.com/downloads/FE108eS-PhasePlug-plan.pdf
http://www.planet10-hifi.com/downloads/FE108-PhasePlug-2.STL
Larger plugs usually suitable for 6.5” drivers.
http://www.planet10-hifi.com/downloads/FE16x-PhasePlugs.pdf
http://www.planet10-hifi.com/downloads/B200-phase-plug.pdf
dave
http://www.planet10-hifi.com/downloads/FE108eS-PhasePlug-plan.pdf
http://www.planet10-hifi.com/downloads/FE108-PhasePlug-2.STL
Larger plugs usually suitable for 6.5” drivers.
http://www.planet10-hifi.com/downloads/FE16x-PhasePlugs.pdf
http://www.planet10-hifi.com/downloads/B200-phase-plug.pdf
dave
I was going to mention you had done a bunch. I took the liberty of modeling the larger plugs, and have uploaded the STL files.Larger plugs usually suitable for 6.5” drivers.
jeff
Last edited:
There we go.
jeff
jeff
Attachments
Last edited:
@planet10 Thank you for the drawings!
@vinylkid58 Here's the attached modified drawing. Its not exactly to scale. Please make the nose radius fit the given proportions.
@vinylkid58 Here's the attached modified drawing. Its not exactly to scale. Please make the nose radius fit the given proportions.
Attachments

Ok, here you go. Kinda fat & short. 🙂Here's the attached modified drawing. Its not exactly to scale. Please make the nose radius fit the given proportions.
Attachments
Those are for a 6.5” midrange? What driver? 50 mm voice coil, it likely doen’t reach too high.
dave
dave
Kinda fat & short.
Very reminiscent of the few Scott made for the Eminence 12LTA.
dave
@vinylkid58 Wow, thank you so much! I really appreciate it!
@planet10 This is for a 6" PRV 6MR500-NDY wideband driver. It has decent response since it has low Le and Mms for a driver of this type. I wanted to try a phase plug since it has a relatively deep cone profile. It also suffers from a bad pole cavity resonance having such a large dustcap and tall VC former. I'm reconing a set which will have venting added to the VC and a drilled spider cavity. Its otherwise a great driver with copper shorting cap.
@planet10 This is for a 6" PRV 6MR500-NDY wideband driver. It has decent response since it has low Le and Mms for a driver of this type. I wanted to try a phase plug since it has a relatively deep cone profile. It also suffers from a bad pole cavity resonance having such a large dustcap and tall VC former. I'm reconing a set which will have venting added to the VC and a drilled spider cavity. Its otherwise a great driver with copper shorting cap.
Attachments
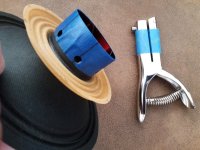

Yes, already checked it. This manual punch method requires a plastic or fiberglass former to work out. A 2" coil is the limit to as small as you can go. I do this with other drivers and it always helps to reduce air turbulence and pole chamber resonances. You can only put 6 holes in a small former, otherwise it may let it deform enough to rub.
If you try this yourself, you must punch from the inside out and protect the windings with tape. Its critical to de-burr the holes, otherwise the VC may rub or develop stress cracks, especially with fiberglass or nomex formers. I do this to some guitar drivers for better top end. Many Celestion drivers use nomex formers which need to be inspected carefully after punching and apply a thin coat of cyano resin to the hole edges.
If you try this yourself, you must punch from the inside out and protect the windings with tape. Its critical to de-burr the holes, otherwise the VC may rub or develop stress cracks, especially with fiberglass or nomex formers. I do this to some guitar drivers for better top end. Many Celestion drivers use nomex formers which need to be inspected carefully after punching and apply a thin coat of cyano resin to the hole edges.
Last edited:
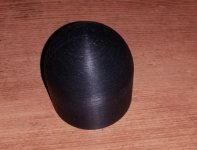
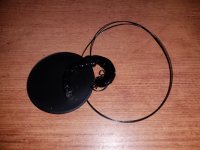
Well, one phase plug printed ok, but the next one won't. I swear to God I'd like to set this POS printer on fire. It's such an inconsistent pile of crap. Ive tried so much to make it work properly but it just won't.
Here's the one that printed, and the one that screwed up after 3 more tries. Beautiful first layers, but just decides to detach from the bed or hang up from overextrusion... believe me, I've tried every logical thing to fix this issue.
Here's the one that printed, and the one that screwed up after 3 more tries. Beautiful first layers, but just decides to detach from the bed or hang up from overextrusion... believe me, I've tried every logical thing to fix this issue.
Attachments
If anyone has experience with the Creality CR10V3, please help. All of the crap info on the internet doesn't offer any useful help.
Someone told me to use hair spray on the base plate for better attachment of first layer ...detach from the bed
Heard about that but never tried it since the common consensus was it wasn't needed with a heated bed. The problem is that stupid z axis limit, which never stays where I set it with the first layer height adjustment. I wish someone made a decent limit switch instead of that cheap microswitch solution.
I just started 3D printing two weeks ago, using a Ender 5 Pro. I've used Magigoo from Amazon and it works well. (I'm currently using the stock magnetic bed but have a glass bed that I have yet to install.)Someone told me to use hair spray on the base plate for better attachment of first layer ...
Thr glass bed on the CR10 is coated with some sort of polymer and it worked well when the printer was new. I then decided to clean it with isopropanol per Creality suggestion, then it all went wrong after that. The alcohol damaged the coating. I then ordered 2 new Creality build plates and they were both warped to the point I couldn't level the bed. Now I'm stuck with the first bad plate and since tried others without much luck. Its beyond frustrating when you get bad brand new parts.
- Home
- Loudspeakers
- Multi-Way
- STL file for simple phase plug?