IT"S ALLIIIIVVE!!... Or... it... soon... will... be...
Good news. Just saved up a little scratch. got a brand new Lilliput on the way. Should be here 10:30AM Thursday morn. (est)I wil start getting this thing together. Hopefully I can get it done by the SuperBowl. Gotta find the time though... Pics of progress forthcoming when I get to my home PC. I know I promised them before, but I will get them up now that I have some motivation.
Steamer.😀
Pics
As promised, here are som pics of the box. Should be 3 shots of the box and a shot of the setup working before I damaged the 1st Lilli:
You can see in the setup shot, it was taken while there was no enclosure, a lot of ambient light and a poor photographer. It should look good. I should have taken a size reference shot, but I wasn't thinking. Some of it will change as I have learned a few things since then... More to come.
Steamer
As promised, here are som pics of the box. Should be 3 shots of the box and a shot of the setup working before I damaged the 1st Lilli:
An externally hosted image should be here but it was not working when we last tested it.
An externally hosted image should be here but it was not working when we last tested it.
An externally hosted image should be here but it was not working when we last tested it.
An externally hosted image should be here but it was not working when we last tested it.
You can see in the setup shot, it was taken while there was no enclosure, a lot of ambient light and a poor photographer. It should look good. I should have taken a size reference shot, but I wasn't thinking. Some of it will change as I have learned a few things since then... More to come.
Steamer
Got some fresh fresnels in today. Won't cut them until I'm ready to put them in the box. I may have to alter the box a bit first, so I want to see where it'll all lays out first. I'll use the ones I have for now.
Had an interesting conundrum regarding my wiring. I plan to use 2 Evercool PCAC's for the system's cooling, and I found a 5A 12V AC/DC PSU, for laptops. I was trying to figure out how to wiring everything to one switch and have a temp controlled cooling circuit stay alive after shutoff. Every wiring diagram I found ar saw, used a DPST switch but was designed with 2 seperate power supplies for the 12V components, 1 for the LCD, and the other for the fan(s). I didn't have a lot of space to play around with. So I thought the single 12V supply would do. Long story short, the DPST switch was not going to work. Either I would not be able to isolate the LCD from the fan(s) or I would not be able to maintain power to the fan(s) without also powering the LCD. I came up with 2 solutions:
1) Get a seperate thermostat that would kill the power to the LCD, I couldn't figure the right temp that would let me do that right, or
2) use a 3PST (3 Pole Single Throw) switch and wire the thermostat and fans to the third pole, thereby isolating the fans from the LCD.
The only con I see is that there will be live power in the box after the switch is thrown to off, however I think that is the way all the wiring diagrams with a temp controlled fan circuit are setup.
Here's my diagram:
An externally hosted image should be here but it was not working when we last tested it.
Steamer's Wiring Diagram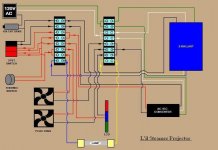
Luca Brazzi said:Maybe Im missing something but why do you want to kill power to the LCD based on Temperature?
You are mistaken. I don't want to kill power to the LCD except by the switch, I am killing power to the fans based on temps. Blow up the diagram and have another look-see.
Steamer
Well some up dates before I get to the bad news...
I just about had the box finished. I have a size comparison shot coming up. I was having difficulty with the cooling circuit. I think I was over-complicating things a bit. That said I was doing some more tweaking, being the perfectionist I am, (all this before the first real usage) And I realized I was over-complicating things.
I just about had the box finished. I have a size comparison shot coming up. I was having difficulty with the cooling circuit. I think I was over-complicating things a bit. That said I was doing some more tweaking, being the perfectionist I am, (all this before the first real usage) And I realized I was over-complicating things.
Here is the size comparison shot I promised. The Projection lens goes in the wall just to the right of the DVD case.
An externally hosted image should be here but it was not working when we last tested it.
...Now the bad news, keeping in mind that I have a dead bulb and a good bulb... I mean I had a good bulb...
I was trying to make an adjustment to the fitting of my lightbox, As the rear wall of the PJ would not fit in the current configuration. So I pulled it and tried to elongate the mounting holes and "slide" it up a little. I forgot I out the good bulb in the light engine, and the dremel tool I was using to ream the holes got away from me for a second, and "Crash!" My bulb shattered and the light box was practically destroyed, the holes were too big and not on line.
I never even fired that lamp yet! That's 2 bulbs I ruined being careless. The first one I ruined because I didn't know I should run it at least 15 min. before shutting it down.
Needless to say I had to rebuild a couple of things. I got a nice prefabbed light kit from YWH with optics that are matched to work on small form factor PJ's. I need to order a couple of bulbs and the alignment process will begin.
Pics of new light engine and finished wiring...
An externally hosted image should be here but it was not working when we last tested it.
New Light engine
An externally hosted image should be here but it was not working when we last tested it.
Finished Wiring
An externally hosted image should be here but it was not working when we last tested it.
Shot of Rear With Fan and Power Panel
I found this great lens at surplus shed that has a huge 88mm-90mm FOV and a perfect FL for my fresnel that I will eventually have to recut my front wall to accomodate it. I will show the 2 side-by-side.
My Fresnel's FL is 200mm and my original lens had a FL of 198mm, but the new lens' FL is almost perfect at 239mm I wish it were 220mm but this is good. If it's too long, I did order a 220mm Fresnel from 3Dlens.
The one on the left is my original, I got it from sciplus.com it has a 63mm barrel, about 60mm FOV (prolly a little less) and its FL is a little short. I got it to work but I havn't tried it on my big screen I just had a small 30" or so image shot on the wall
An externally hosted image should be here but it was not working when we last tested it.
Sidetracked again!
Call me Mr. Procrastinator,
We got our income tax returns and guess what?!? I'm turning my basement into the Theater I've always wanted! Pics coming. In the process, I did order that replacement bulb I needed. So as I build the theater, I will align the optics on the PJ and get it mounted in place.
Up first: the proposed video wall... I have since decided that it will be one solid color, probably the darker brown, as that is what is going on the other walls where the ocean blue is.
...and the mess that will create it...
If you can't tell from the drawing, the screen you see is my existing 53" rear projection TV that will be inset behind the wall. the PJ screen will pull down from the ceiling. That is what the black bar is across the top of the drawing.
That reminds me, I bought some screen material from a fella on eBay to make a permanent PJ screen. It is enough to make a nice 54" x 96" screen (57" x 110" seamless material) any takers? Lemme know.
Call me Mr. Procrastinator,
We got our income tax returns and guess what?!? I'm turning my basement into the Theater I've always wanted! Pics coming. In the process, I did order that replacement bulb I needed. So as I build the theater, I will align the optics on the PJ and get it mounted in place.
Up first: the proposed video wall... I have since decided that it will be one solid color, probably the darker brown, as that is what is going on the other walls where the ocean blue is.
An externally hosted image should be here but it was not working when we last tested it.
...and the mess that will create it...
An externally hosted image should be here but it was not working when we last tested it.
An externally hosted image should be here but it was not working when we last tested it.
If you can't tell from the drawing, the screen you see is my existing 53" rear projection TV that will be inset behind the wall. the PJ screen will pull down from the ceiling. That is what the black bar is across the top of the drawing.
That reminds me, I bought some screen material from a fella on eBay to make a permanent PJ screen. It is enough to make a nice 54" x 96" screen (57" x 110" seamless material) any takers? Lemme know.
By the way, I got a new lamp when I got the bulbs for the new ceiling can lights. I will get back on the PJ soon, I did get some of the interior lined up in the new viewing area. it's nice. Still gotta strip the LCD, but I have everything I need. Prolly get on it in September or October, when the motorcycle riding weather starts to dissipate. (Sheesh! Too many ovens in the fire!)
Steamer
Steamer
- Status
- Not open for further replies.
- Home
- General Interest
- Everything Else
- The Moving Image
- DIY Projectors
- Steamer's 7" Lilliput