My process is basically the same as Calvin had described and the link I posted in post #4 shows this in great detail.
First I started with a coat metal etching primer.
This because this stuff is very tough and forms very durable bond to the metal.
It will not chip or separate from the metal that you are trying to bond to, unless you try to sand it off, and, even at that is very difficult to do.
Second I build it up more using the red Primer to about 3 or 4 mil or so.
You can use a 3M pad to scuff it up in between coats if you like as well.
This will help to keep them nice and smooth and also break any air bubble's that can sometimes form, rarely does this happen but it can.
Make sure that you wipe off any/all of the microdust you have just created by scuffing them up, as this can invite air bubbles and non-bonding layers if you don't.
This also breaks loose any debris that can/will get stuck to the surface such as dust fibers.
If these are not removed upon inspection they will cause weakened spots and sharp edges of points that can invite arcing once they are coated with the next layer of paint.
These are the types of things that cause the little microscopic carbon trees that Calvin talks about once an arc occurs.
Once that happens it is like having a direct wire short from the stator material to the surface of the coating and you will "Never" "Ever" be able to re-seal them successfully without them arcing again!!
So far you should have about 4 to 6 coats applied depending on how wet and thick you did each layer (maybe even just 3 or 4).
I have had lots of practice at this and after a while you get a good eye and feel to what you have so far.
At this point you cane now add a thin coat of your color coat and only enough to get you your color of choice.
It isn't really to much of an issue about its thickness as this is only for color, and, it is sitting on top of the heavy coats of primer.
The Primer is loaded with Talc as a filler.
Talc is a great electrical insulator and it has a high dielectric constant (K) as well!!!
This is good.
You could use just all primer if you don't mind the color. 😉
Actually it doesn't look too bad on my Desktop ESL.
But, due to its nature it may be slightly porous, although my tests have shown no issues about this as far as insulating quality goes.
However, It is softer and not as smooth so next are your final coats of clear.
You can use the regular stuff or you can use the 2x type.
There may even be a 3x type but I don't remember and I have not seen it lately.
The 2x is much thicker and it is more cost effective to use, it just takes a little getting used too and longer time to cure.
I have found (depending on you choice of stator material) that you may need to switch to the regular thinner clear for your final coats.
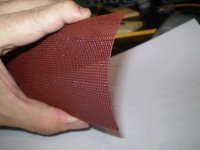
I have had to do this with my Wire mesh samples, because as you keep adding layers of paint the holes keep getting smaller.
And at some point the thicker stuff will start plugging up the holes instead of just coating the wires.
Switching to the thinner spray solved this issue for my final coats until I reached my final thickness destination.
If you do plug up a hole you can sometimes unplug it with a piece of rod or wire.
This can get messy and I have found it is easier to do it while it is very wet or after the piece has cure after awhile.
If you do try it while it is still tacky then you risk the coating sticking to the rod and as you pull it away it will form cotton candy fibers and get all over everything and ruin the look of your otherwise perfectly painted stator.
In my tests I have found that a bare minimum of total thickness is about 8mil (.008") is okay.
But, in this case more is better and so you should be shooting for at least 10 to 12 mil (if not more) of total thickness and you shouldn't have any problems with arcing.
This is the basically the same process for any good painting job.
But the trick here is what types of materials to use that work for good insulation of High Voltages.
Acrylic's are basically rated at 1500v to 2200v per mil for the most part I use 1500V per mil as a safe zone figure once I learned you painstaking it is to have to start all over again.
I have found some materials that claim a extremely high v/mil at as much as 3500v,5000v and even 7Kv or so but these materials are very specialized and I have not found a source for the average DIYer to obtain them.
One that I did use back in 2003 claimed 3500V per mil, that I found at a local electrical store.
I used it on my very First panels and it miserably failed the voltage tests I did for thickness I had on them!!
Also strangely enough, the fact is, the Volt per mil factor goes down as the material gets thicker, typically for all materials!!
So in this case more is better!! 😉
Some may choose to use a polyurethane instead.
It can work but it is difficult to use and takes a very long time to fully cure as it is an oil base.
I have read that the dielectric strength is about half that of the acrylic enamel paints as well, at about 450v to 900v per mil.
Some may claim a higher rating depending on the brand and type.
I have not tested these yet, But it was on my list of things to do.
I started to, but they are just to messy to deal with, especially when using a sprayer, as they need to be thinned in order to use them that way.
IMHO it just wasn't worth the lower Dielectric Strength rating anyhow.
The automotive types are different than the stuff you find in a can at your local hardware store, and, they do work good providing you have and know how to use a sprayer system.
I have not used them yet, But I do know others that have and is probably by far the cheapest material to use providing you have the equipment to apply them.
Never try to apply an Acrylic enamel if you have started using an oil based Polyurethane from the hardware store, It just doesn't work and it will bubble your undercoats.
I have done this already.
FWIW
jer 🙂
First I started with a coat metal etching primer.
This because this stuff is very tough and forms very durable bond to the metal.
It will not chip or separate from the metal that you are trying to bond to, unless you try to sand it off, and, even at that is very difficult to do.
Second I build it up more using the red Primer to about 3 or 4 mil or so.
You can use a 3M pad to scuff it up in between coats if you like as well.
This will help to keep them nice and smooth and also break any air bubble's that can sometimes form, rarely does this happen but it can.
Make sure that you wipe off any/all of the microdust you have just created by scuffing them up, as this can invite air bubbles and non-bonding layers if you don't.
This also breaks loose any debris that can/will get stuck to the surface such as dust fibers.
If these are not removed upon inspection they will cause weakened spots and sharp edges of points that can invite arcing once they are coated with the next layer of paint.
These are the types of things that cause the little microscopic carbon trees that Calvin talks about once an arc occurs.
Once that happens it is like having a direct wire short from the stator material to the surface of the coating and you will "Never" "Ever" be able to re-seal them successfully without them arcing again!!
So far you should have about 4 to 6 coats applied depending on how wet and thick you did each layer (maybe even just 3 or 4).
I have had lots of practice at this and after a while you get a good eye and feel to what you have so far.
At this point you cane now add a thin coat of your color coat and only enough to get you your color of choice.
It isn't really to much of an issue about its thickness as this is only for color, and, it is sitting on top of the heavy coats of primer.
The Primer is loaded with Talc as a filler.
Talc is a great electrical insulator and it has a high dielectric constant (K) as well!!!
This is good.
You could use just all primer if you don't mind the color. 😉
Actually it doesn't look too bad on my Desktop ESL.
But, due to its nature it may be slightly porous, although my tests have shown no issues about this as far as insulating quality goes.
However, It is softer and not as smooth so next are your final coats of clear.
You can use the regular stuff or you can use the 2x type.
There may even be a 3x type but I don't remember and I have not seen it lately.
The 2x is much thicker and it is more cost effective to use, it just takes a little getting used too and longer time to cure.
I have found (depending on you choice of stator material) that you may need to switch to the regular thinner clear for your final coats.
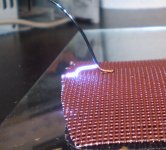
I have had to do this with my Wire mesh samples, because as you keep adding layers of paint the holes keep getting smaller.
And at some point the thicker stuff will start plugging up the holes instead of just coating the wires.
Switching to the thinner spray solved this issue for my final coats until I reached my final thickness destination.
If you do plug up a hole you can sometimes unplug it with a piece of rod or wire.
This can get messy and I have found it is easier to do it while it is very wet or after the piece has cure after awhile.
If you do try it while it is still tacky then you risk the coating sticking to the rod and as you pull it away it will form cotton candy fibers and get all over everything and ruin the look of your otherwise perfectly painted stator.
In my tests I have found that a bare minimum of total thickness is about 8mil (.008") is okay.
But, in this case more is better and so you should be shooting for at least 10 to 12 mil (if not more) of total thickness and you shouldn't have any problems with arcing.
This is the basically the same process for any good painting job.
But the trick here is what types of materials to use that work for good insulation of High Voltages.
Acrylic's are basically rated at 1500v to 2200v per mil for the most part I use 1500V per mil as a safe zone figure once I learned you painstaking it is to have to start all over again.
I have found some materials that claim a extremely high v/mil at as much as 3500v,5000v and even 7Kv or so but these materials are very specialized and I have not found a source for the average DIYer to obtain them.
One that I did use back in 2003 claimed 3500V per mil, that I found at a local electrical store.
I used it on my very First panels and it miserably failed the voltage tests I did for thickness I had on them!!
Also strangely enough, the fact is, the Volt per mil factor goes down as the material gets thicker, typically for all materials!!
So in this case more is better!! 😉
Some may choose to use a polyurethane instead.
It can work but it is difficult to use and takes a very long time to fully cure as it is an oil base.
I have read that the dielectric strength is about half that of the acrylic enamel paints as well, at about 450v to 900v per mil.
Some may claim a higher rating depending on the brand and type.
I have not tested these yet, But it was on my list of things to do.
I started to, but they are just to messy to deal with, especially when using a sprayer, as they need to be thinned in order to use them that way.
IMHO it just wasn't worth the lower Dielectric Strength rating anyhow.
The automotive types are different than the stuff you find in a can at your local hardware store, and, they do work good providing you have and know how to use a sprayer system.
I have not used them yet, But I do know others that have and is probably by far the cheapest material to use providing you have the equipment to apply them.
Never try to apply an Acrylic enamel if you have started using an oil based Polyurethane from the hardware store, It just doesn't work and it will bubble your undercoats.
I have done this already.
FWIW
jer 🙂
Jer, is there a particular brand of etching primer and red primer you'd recommend (if you mentioned it previously, I'm not seeing it)? Thanks!
The first one I ever used is made by Sherwin Williams (988).
I got it to do work on my car and this stuff is by far the toughest I have ever used.
On my Last build I think I used all Rustoleum products as they are the cheapest priced quality products around.
I may have used PlastiKote Metal etching primer as well I don't remember now, since I had ran out of the Sherwin Wiliams stuff.
I had searched high and low in the Msds's for any info I could find of what type of acid was used in the etching types, because my base material was aluminium and with those you are supposed to use a Phosphoric type or Zinc Chromate of some sort, but that info is rare.
But most any etching primer has some sort of acid in it, this is why it bonds so well to bare metals.
Check the tech sheets if you can find them for more info.
As far as the red primers are concerned there are basically two or three mixtures available.
Typically your regular types have about 10% to 15% talc filler.
And your sandables will have about 20% to 25% talc or so and your High Filler types will have as much as 35% talc as the filler.
It has been a few years now that I have studied those sheets, but you can Google them for any type of product you have questions about.
I probably still have them in my archives somewhere but recent drive crashes have my data scattered everywhere at the moment
I am no chemist but I did my best to understand what it was involved in the formulation of the Acyrlic's and the are all very similar with may be a few variations among the different brands.
This type of info is proprietary among the all of the company's and is hard to find.
But of all of the ones I tested (3 types) they all performed the same!
An Acrylic Enamel is an Acrylic Enamel pretty much.
It is a polymer or type of plastic.
This is especially true for the clears.
The pigments may very in shades and colors throughout the brands and their product lines, But the base clear's that is used is the same for all of them.
I called Krylon about this once and I wanted to know if their Clear Conforma Coating spray that is rated at about 2100V per mil was the same product as there Clear Acrylic Spray Enamel since their product numbers were very similar.
He just told "that they appear to be the same ".
But he couldn't tell me that they really are exactly the same without giving out the formula to verify that it is exactly the same, As, "Again", it is a company secret!!
I almost word for word of what a National Semiconductor engineer told me once when I inquired if that the LM4780's are in fact two LM3886's on one die!!! He,he,he,he 😉
He just said,"they appear to be", as well....Ahhhhhhh!!!!
We recently had a bargain store called Pamida go out of business and I could get a can of clear for $1.68 a can at anytime.
I never did stock up before they closed up all of the stores!! 🙁
This is the stuff I used as well when I did my testing and I described all of the types I used here,
http://www.diyaudio.com/forums/plan...tric-coatings-fact-fiction-2.html#post2894629
And I think I showed them in the latest build if not, I do show the whole process starting here,
A Segmented Stator Desktop ESL
I am just repeating stuff now and those threads should be read in there entirety as there is a lot of info in them.
But, I don't mind answering any questions at all if you don't understand something just the same.
Cheers!!!
jer 🙂
Attachments
-
 PAINTS.jpg120.6 KB · Views: 136
 -
 SAMPLE.jpg83 KB · Views: 134
 -
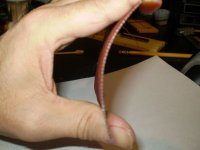
 Ready for The Diaphragm.jpg168.3 KB · Views: 133
 -
 14Kv closeup.jpg143.2 KB · Views: 130
 -
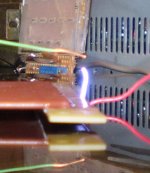 A Rare Shot Of The Arc Attracted to the Positive Ground wire.jpg127.5 KB · Views: 122
 -
 Screen Stator1.jpg97.4 KB · Views: 74
 -
 Screen Stator2.jpg69.1 KB · Views: 80
Last edited:
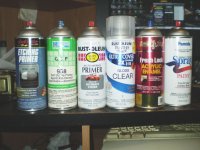
Here is the metal etching primer I have now but I my have used the plastikote brand they are nearly the same.
Stops Rust® Clean Metal Primer Spray Product Page
http://www.rustoleum.com/MSDS/ENGLISH/7780830.PDF
Here is the red primer that I used,
Stops Rust® Rusty Metal Primer Spray Product Page
It has 10% talc,
http://www.rustoleum.com/MSDS/ENGLISH/7769830.PDF
This is the Filler Primer i have but i have not used it yet, it has 15% talc (Magnesium Silicate),
Automotive Filler Primer Spray Product Page
http://www.rustoleum.com/MSDS/ENGLISH/249320.PDF
The sandable has 15% talc as well but it may have Titanium Dioxide in it, so I would suggest not to use that type,
Automotive Primer Sandable Primer Spray Product Page
http://www.rustoleum.com/MSDS/ENGLISH/249419.PDF
I guess the highest talc % was 15%, I thought that there was one higher than that, it may have been another brand or I just plain don't remember too good anymore!!! He,he,he,he
Here are the clears,
Stops Rust® Crystal Clear Enamel Product Page
http://www.rustoleum.com/MSDS/ENGLISH/7701830.PDF
And of course the 2x stuff,
Painter?s Touch® Ultra Cover 2x Clear Spray Paint Product Page
http://www.rustoleum.com/MSDS/ENGLISH/249117.PDF
And that is about it!!
If you check with other brands you will see that the ingredients are basically the same.
jer 🙂
- Status
- Not open for further replies.