Hello all.
So, I decided to build another speaker... 😀
The last open baffle speaker was a (successful) experiment, but some of the parts (Behringer) have failed and we moved to a new house with a bigger/better living room so I'm starting over, building a more "permanent" set.
I'll post more information as I go along, but for now, I'll just give a short overview and some modeling information. (Big thanks to Kimmo Saunisto for publishing such an awesome piece of software!!)
The design is a 3-way open baffle speaker + closed subwoofer (i.e. MTMWWSW) The hope is that the result will have that wonderful open baffle sound but with the option to operate the closed subwoofer in tandem with the open baffle woofer. I am optimistic I may reduce the rear radiation/reflections at the lowest frequencies while still maintaining a relatively high directivity index. The primary design goals are a higher WAF than the old monsters, even better sound, and slightly higher SPL capabilities.
I am re-using the 6.5" midranges (peerless HDS 830883) and 10" woofers (Peerless XLS830452) from the old 4-way speakers but I have purchased some much better 1" tweeters (SBAcustics SB26ADC) and some 15" subwoofers (Dayton RSS390HO) to go along with new replacement DSP/crossovers (Dayton) and slightly more appropriate amplification.
The plan is to use a recently acquired (older) 7 channel Outlaw Audio amp to power the MTM section(s) of the LCR channels with a Crown XLS1002 powering 4 @ 10" for the woofers and I'll keep the Dayton APA150 on the new subwoofers unless it needs more power. 😱
Attachments
Good progress
Made some decent progress this week. I managed to get the baffles ready for staining along with a new/matching equipment rack.
Now, for your viewing pleasure, a few pictures:
20210122_011910.jpg - Google Drive
20210120_150822.jpg - Google Drive
20210122_011935.jpg - Google Drive
20210122_011850.jpg - Google Drive
20210123_183955.jpg - Google Drive
Last edited:
If the actual measurements work out anywhere close to the simulations, it should sound very nice indeed 🙂
If the actual measurements work out anywhere close to the simulations, it should sound very nice indeed 🙂
So the above images are just simulations, my mistake, the baffle shapes will be crucial to the freq. resp. measurements if you don't get the performance you are after change it to circular shape see image per post 3259:
Ultimate Open Baffle Gallery
freq. response(FR) is measured per baffle images shown above. This my version of Open Baffle. The FR is very smooth.
The last open baffle speakers I built had +14" wide baffles. This time I'm going for a more minimalistic approach.
Below is the manufacturer's indicated frequency response for the midrange.
I imported that data and simulated various baffle shapes. This version seemed to best at hitting my targets.

Below is the manufacturer's indicated frequency response for the midrange.
I imported that data and simulated various baffle shapes. This version seemed to best at hitting my targets.
Attachments
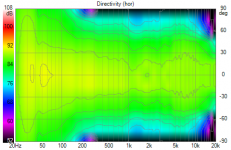
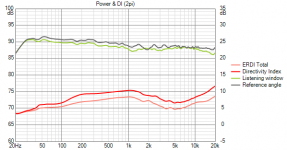
The next step of the simulation process, I exported the polar response data and came up with this:

Looks like cone breakup in the region of ~4k, so I apply a filter (Q2 -6db) which cleans that up nicely:

Then I apply the crossovers to the midrange at 160Hz asnd 1.5kHz and implement the Linkwitz Transform to compensate for the baffle loss.

A few little tweaks, plus adding the second midrange provides a very nice target response.

Looks like cone breakup in the region of ~4k, so I apply a filter (Q2 -6db) which cleans that up nicely:
Then I apply the crossovers to the midrange at 160Hz asnd 1.5kHz and implement the Linkwitz Transform to compensate for the baffle loss.
A few little tweaks, plus adding the second midrange provides a very nice target response.
Last edited:
Stained and ready for poly.
Yesterday we stained the equipment stand and today I managed to finish sanding and staining the speaker baffles/stands.


Yesterday we stained the equipment stand and today I managed to finish sanding and staining the speaker baffles/stands.
Last edited:
First coat of Poly
First coat of poly applied.


The stain turned out a little darker than I was expecting but I still like it.
First coat of poly applied.
The stain turned out a little darker than I was expecting but I still like it.
Thanks Dave. The garage is pretty cool so I'm not sure if I will be able to apply a second coat tonight. It will probably need at least 3 coats to get the coverage I'm looking for. Perhaps I can get a start on the woofer cabinets before the poly is done... I would really like to install a few speakers and start testing before the weekend. 😀
Last edited:
Progress
2 coats of poly seems to be sufficient. Maybe I'll add another coat some day but they look pretty good already 🙂

I dissected the old speakers. I cut them in half with a reciprocating saw. 😱

I'll re-use the previous Peerless woofers in the existing "H" baffle for testing while I build new ones that fit properly (i.e. inside the new baffles). 😛

The old speakers had the wires soldered directly to the midranges and tweeters but I think I'll order some new female disconnects to avoid that this time around. I can't wait to hear them but it is going to take some time to get everything hooked up before I can even start testing.
I think I'll build the new woofer baffles as an opposing pair (i.e. clamshell?). I'm also considering something more like the "ripole" design or even a simple W style box would help limit vibration over the old H frames which could rattle a lot when pushed hard, particularly when set on hard flooring. I have carpet now but that will probably not stay forever.
2 coats of poly seems to be sufficient. Maybe I'll add another coat some day but they look pretty good already 🙂
I dissected the old speakers. I cut them in half with a reciprocating saw. 😱
I'll re-use the previous Peerless woofers in the existing "H" baffle for testing while I build new ones that fit properly (i.e. inside the new baffles). 😛
The old speakers had the wires soldered directly to the midranges and tweeters but I think I'll order some new female disconnects to avoid that this time around. I can't wait to hear them but it is going to take some time to get everything hooked up before I can even start testing.
I think I'll build the new woofer baffles as an opposing pair (i.e. clamshell?). I'm also considering something more like the "ripole" design or even a simple W style box would help limit vibration over the old H frames which could rattle a lot when pushed hard, particularly when set on hard flooring. I have carpet now but that will probably not stay forever.
Last edited:
I got the speakers plugged in today. The Dayton DSP doesn't have Linkwitz transform built in 
For now I have turned on some shelving filters to give the desired effect... but I'm going to have to get the test gear setup to determine if it can even come close to matching the requirements.
For now I have turned on some shelving filters to give the desired effect... but I'm going to have to get the test gear setup to determine if it can even come close to matching the requirements.
I listened for quite a while before I decided I better get some of those measurements instead of doing everything by ear. Of course there were several additional tweaks to various filters, EQs and some better level matching than I could achieve without proper measurements. I don't think I have enough good/objective data to set the time delays quite right... and judging subjectively I'm not quite convinced yet that this build is better than the last version. Then again, the do look MUCH nicer!! 🙂
It has been a couple years since I last used the old speakers AND I'm in a completely different room now which is much larger along with vaulted ceilings and carpet so it is hard to compare directly. I'm not quite "done" yet either (i.e. haven't installed rear tweeters and no boxes for the 15" subs yet)
There are several slightly annoying quirks I encountered with the Dayton DSP408. For example, when changing the delay units from milliseconds to centimeters it seems to reset the value to zero instead of converting it. Saving and recalling presets as well as the specifics of the interaction between changes made using the Bluetooth app VS changes with the USB connection/app doesn't give me great confidence that I haven't made mistakes during programming. As mentioned earlier, it also seems to lack some features I wish were available (e.g. LW transform filters). I guess I was naive to expect more functionality without actually having researched the available features in detail. Despite my complaints, it does seem to work very well and I'm pretty sure I'll be able to live with it. It is completely silent as far as I can tell and the crossovers do exactly what you would expect although limited to 24db/oct. 😱
My biggest concern with this project was the whole notion of using the pre-amp outputs from the main receiver to feed the DSP and subsequently using the 7 channel amp as a dedicated power amp... but it seems to work flawlessly! The only glitch has been when I switched from a stereo source to a multichannel 5.1/7.1 source, I needed to switch the mode on the receiver to "Stereo" because I don't have any of the other multichannel speakers set up yet. I still haven't attached a monitor to the Outlaw amp so there may be some filtering turned on that is doing stuff it shouldn't (possible EQ and/or time delay settings etc?).
I'll probably have to wait until spring before I can actually test them outdoors and get proper measurements/polar response plots etc. But so far it is sounding really good and I'm sure I'll enjoy them until the weather co-operates 😀
Last edited:
You can easily measure and set up mid-tweeter xo indoors!
Set mic at roughly 60-100cm distance, speaker in the middle of the room, measurement axis diagonally. First reflection comes from floor at around 1khz but you can identify and ignore it. First measure mids and tweeter without xo, then eq them and set xo and delay last. Take off-axis measurements too!
Fun for snowy days!
Last edited:
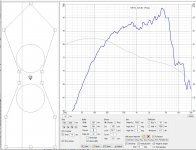
Something like this? 😉
1/3 octave smoothing

No smoothing (lotsa reflections) 🙁

Maybe I have the time alignment perfect already or I haven't played around with it enough yet but I can't seem to be able to accurately separate/pinpoint all the different driver's impulse response when I change the delay. You can see some reflections at about ~4ms right now (i didn't pull it into the middle of the room)
60ms window

10ms window

1/3 octave smoothing
No smoothing (lotsa reflections) 🙁
Maybe I have the time alignment perfect already or I haven't played around with it enough yet but I can't seem to be able to accurately separate/pinpoint all the different driver's impulse response when I change the delay. You can see some reflections at about ~4ms right now (i didn't pull it into the middle of the room)
60ms window
10ms window
Last edited:
I was spending a lot of time listening and enjoying them. But I don't have my trusty CD collection out right now so I was primarily watching youtube orchestral concerts with the kids LOL.
I finally turned on Spotify and I have to say I am much more impressed with the performance. 😎
Also a little suprised that Spotify seems to be much better sound quality... is it just me or does it have much better SQ than Youtube? 😕
I finally turned on Spotify and I have to say I am much more impressed with the performance. 😎
Also a little suprised that Spotify seems to be much better sound quality... is it just me or does it have much better SQ than Youtube? 😕
Project update
Just a quick update:
I've been listening for over a week now. I've measured them several times and I'm actually very suprised how close the measurements are to the simulations. I am really liking the way they sound! Vocals and orchestras fill the room beautifully. The bass department has been slightly disappointing. I didn't fully appreciate the significant of the impact of our new/larger living area where I have the speakers located. It is very difficult for the woofers to play large bass notes (i.e. kick drums) at higher volume levels. The old house with 8' ceiling (and concrete floor) was able to generate much more "kick". The new location is a much larger room, a good portion of the back of the listening room is completely open to the rest of the house. That, combined with the vaulted ceilings has proven to be much more demanding in terms of the raw (sub) woofer displacement required to generate the impactful bass performance I need.
So... I started work on the new boxes for those 15" subwoofers. I settled on 5.2cuft box. The box will be built so that I can run it as a vented system with 18hz Fb (i.e. for movies) and if I want to use it as a sealed box, I can plug the slotted vent and the box will be sealed. 😀
For the Dayton Audio RSS390HO-4 with a 15hz HP and 50hz LP crossover applied, the Vb=150.0 l, Ql=7.0 box simulation gives:
VENTED BOX STATISTICS
Fb 18.0 Hz System resonance frequency
f3 17.3 Hz
f6 16.3 Hz
f10 15.6 Hz
XmaxC 13.8 mm @ 22.1 Hz
Pmax 171.4 VA @ 18.9 Hz
VENT Dv=16.7 cm, Lv=121.5 cm
Sp 220.1 cm^2 Effective area of port

SEALED BOX STATISTICS:
STATISTICS
Fb 25.4 Hz System resonance frequency
f3 24.8 Hz
f6 22.1 Hz
f10 19.7 Hz
XmaxC 14.5 mm @ 24.8 Hz
Pmax 109.5 VA @ 39.4 Hz
Qtc 0.23 Total Q factor

I still have to finish making the speaker wiring harness as well as install and test rear tweeters.
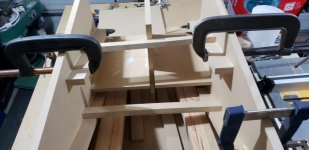
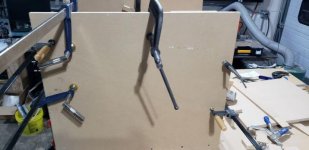
I have made some good progress on the sub boxes. Here are a few pictures during construction while clamping various braces inside the box. 😉
Just a quick update:
I've been listening for over a week now. I've measured them several times and I'm actually very suprised how close the measurements are to the simulations. I am really liking the way they sound! Vocals and orchestras fill the room beautifully. The bass department has been slightly disappointing. I didn't fully appreciate the significant of the impact of our new/larger living area where I have the speakers located. It is very difficult for the woofers to play large bass notes (i.e. kick drums) at higher volume levels. The old house with 8' ceiling (and concrete floor) was able to generate much more "kick". The new location is a much larger room, a good portion of the back of the listening room is completely open to the rest of the house. That, combined with the vaulted ceilings has proven to be much more demanding in terms of the raw (sub) woofer displacement required to generate the impactful bass performance I need.
So... I started work on the new boxes for those 15" subwoofers. I settled on 5.2cuft box. The box will be built so that I can run it as a vented system with 18hz Fb (i.e. for movies) and if I want to use it as a sealed box, I can plug the slotted vent and the box will be sealed. 😀
For the Dayton Audio RSS390HO-4 with a 15hz HP and 50hz LP crossover applied, the Vb=150.0 l, Ql=7.0 box simulation gives:
VENTED BOX STATISTICS
Fb 18.0 Hz System resonance frequency
f3 17.3 Hz
f6 16.3 Hz
f10 15.6 Hz
XmaxC 13.8 mm @ 22.1 Hz
Pmax 171.4 VA @ 18.9 Hz
VENT Dv=16.7 cm, Lv=121.5 cm
Sp 220.1 cm^2 Effective area of port
SEALED BOX STATISTICS:
STATISTICS
Fb 25.4 Hz System resonance frequency
f3 24.8 Hz
f6 22.1 Hz
f10 19.7 Hz
XmaxC 14.5 mm @ 24.8 Hz
Pmax 109.5 VA @ 39.4 Hz
Qtc 0.23 Total Q factor
I still have to finish making the speaker wiring harness as well as install and test rear tweeters.
I have made some good progress on the sub boxes. Here are a few pictures during construction while clamping various braces inside the box. 😉
Attachments

Last edited:
First subwoofer box almost complete
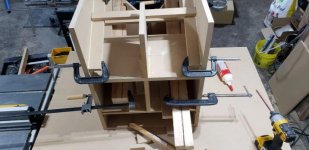
Just about ready to put the front on the first subwoofer box... I have lots of bracing and these things are starting to get HEAVY 🙂

I used ~8lbs of "Rookwool Comfortbatt" insulation (i.e. one full piece of 24x48x5.5"). It is relatively cheap at ~$12CDN per piece. It is also very easy to cut, easy to install and doesn't have much of that itchy scratchy characteristic of normal pink insulation. It also seems to work VERY well at dampening the sound. Shouting into the box gives the impression that the material kills reflected sound(s) very well indeed.
I believe I will add an extra layer of 1/2" MDF on the few panels that have the least amount of bracing.
Just about ready to put the front on the first subwoofer box... I have lots of bracing and these things are starting to get HEAVY 🙂
I used ~8lbs of "Rookwool Comfortbatt" insulation (i.e. one full piece of 24x48x5.5"). It is relatively cheap at ~$12CDN per piece. It is also very easy to cut, easy to install and doesn't have much of that itchy scratchy characteristic of normal pink insulation. It also seems to work VERY well at dampening the sound. Shouting into the box gives the impression that the material kills reflected sound(s) very well indeed.
I believe I will add an extra layer of 1/2" MDF on the few panels that have the least amount of bracing.
Last edited:
- Home
- Loudspeakers
- Multi-Way
- Starting another Open Baffle build