buckster
yeah thats what i was thinking in but with plaster, if u add some bondcrete into plaster the stuff sets rock hard, u could make a 2peice mould with it to separte the lens from the mould after pooring, u would probally have to oil the mould too before pooring.
Trev
yeah thats what i was thinking in but with plaster, if u add some bondcrete into plaster the stuff sets rock hard, u could make a 2peice mould with it to separte the lens from the mould after pooring, u would probally have to oil the mould too before pooring.
Trev
The two piece mold out of hard plaster is a good idea although it would leave a parting line. This would be less of a problem though than an indentation in the first mold because that would leave a divit in the final lens that would have to be sanded out.
It will take some time to get the first mold blank into good enough condition but once it is the rest shouldn't be to hard.
A four part hard plaster mold would be ideal because it would be easier to remove. The beauty of sand is that it is simple but it is not as accurate. It would require more hand finishing.
Any good ideas you guys have are welcome.
Hezz
Hezz
Hezz have u done any foudary work before and made these sand moulds? i have, and what they do is craft the thing they are going to mould out of wood (ive seen plaster before too), then mount that on a peice of marine ply and the actual mould is just a casing like a small rectangle frame with a locating pin on each end and what they do is put the wood in the middle that has also the locating holes and then put the mould together and then ram the sand into it, then the mould is separated and the wooden male mould is taken out then the mould is placed back together ready to be poored, its an old method but its still used very widely today, and most things get machined for the clean up process these days, but its a thought worth to keep in mind cos it is very acurate, it depends what size sand grit u use to get a better finish, silica sand would be the best, u just mix that with oil and a small amount of clay, once its rammed its hard as a brick, after the poor all u do is knock it on somthing solid for the dirt to break loose and u have your articale in the middle.
anyway hope it helped sorry for the crappy post its late here lol
Trev
Mouldng
I worked for a foundry too, several actually this proccess thaT YOU are attempting has my attention. I would like to also say that one of the foundries I worked at, had a diffeent process than the othes I worked for. They would use wax( not parafin) lol
Then they would dip the wax parts in sand and solutions which would make a kind of firebrick around the part then they would melt the wax from the mold then pour the metal into it for the finished product with minimal clean up work after.
What I was thinking if you could get a hold of some of that wax you cuold cut/carved grind it then make a mold around it etc.. just ideas
DISCLAIMER: I'm no expert in anything said here, its all based on personal experience and opinion.
Now that we have that out of the way...
I have also thought about this process for a long time, it is very close to the cylindrical anamorphic lens project I was going to do.
I dont have any formal education in this area, but I do have alot of experience making custom body panels for my honda.
To make body panels you:
1) carve a male out of blue styrofoam using a rasp and sand paper
2) spray laytex primer on it
3) apply your separating agent (which is some type of wax),
4) lay the fiberglass and apply the resin
5) gel coat the hardened fiberglass to make it smooth
Although that is the process for making custom autobody panels, some of those principals may be applied to this project.
Are you going to use a separating agent between your mold and the glass? I dont know if the lens material will adhere to your mold when heated.
I can't see why a beach ball type impression in something isn't going to be 100% accurate, and wont make a reusable mold. Although I dont think I would use sand. I would use something similar to bondo that doesn't react to heat. Probably joint compound, or plaster. Then you could gel coat (if you have a spray gun) the inside to make a smooth finish. You could also just use sand paper.
As I said before (but didn't explain too well), I would make the hole with a scoop. The scoop would look like a perfect cross-section of the lens. Each end of it would be mounted on a pivot point so that I could rotate it around the x axis, and scoop out the excess mold material.
I don't think casting is the way to go. I would melt a single thick piece of lexan glass over the hole. That way the entire top of the mold would be covered with a thin layer of lexan glass. You would have to watch the lexan melt, so that you dont melt the whole thing right down to a puddle in the middle of your mold.
Then you remove the glass, fill the hole with mineral water, and fasten another piece of lexan glass overtop of the mineral water
top piece of glass
|
_________________________ < top piece of glass
__...............................____ < bottom piece, fastened to the top
....\....water in here....../
.....\________________/
...............^
bottom piece of glass
(ignore the periods, pretend the bottom piece is the shape of the lens)
The final result wouldn't be a solid piece of glass, but it would be 2 materials that have the same index of refraction (same as DIY anamorphic project)
I dont think I fully understand what you are doing here. You didn't seem to explain very well what you are doing - well maybe im just dumb. You are casting silicon power into sand?
A female mold can only ever be as good as its male counterpart. Are you going to fix the female up later? If so, you might as well just start with the female.
Oh and blue foam is easier to work with than wood. It is also very strong and smooth. Its the easiest thing to carve thats why you use it for custom body panel construction.
Let me know if any of this made sense or if im just an idiot.
Pisonic,
There is nothing wrong with your method and thinking and for a while I was going to do something just like you described but there are a couple of factors that you are not considering.
It would be very hard to get sand or bondo to scoop out with a cross sectional scoop in a very precise manner. Although I'm sure it could be done it would be more work to build the apperatus to make it line up perfectly.
Remember that we will be hand surfacing the final lens and any excess of material will add hours to the finishing process.
I need a mold blank that is stiff and firm enough so that I can either pack sand around it without deforming or pour a more liquid molding material around it.
The beach ball method would deform to some degree in sand but might work with a pourable mold material. The only inflatable balls that are about the right size are those exercise balls but thats an extra $30. Even if the ball deformed an 1/8 of an inch that would add a tremendous amount of work to the final project because you would have to remove all the exra material down to the lowest point of the surface to get perfect sphericity.
The wood mold is the most precise method other than milling metal on a CNC mill. And it's cheap.
I spent about an hour today hand grinding the mold blank and it is coming up nicely. I'm going to have to do some more bondo work to fill small holes and bring up some areas near the edges that I took down to far with a rasp.
Hezz
Dnt32,
The wax method you describe is called investment casting or the lost was process. It is very precise and good for small intricate parts. It could be done to make the lens but then you would have to built a new wax mold blank everytime you need another lens. This is OK in a large factory where they have CNC mills automated to cut the parts out of wax. They can cut thousands of parts in a few days. The wax parts are then dipped in a liquid ceramic slurry that hardens. After that they fire the ceramic and the wax melts out then they cast liquid metal into the mold and let it cool.
A variation on this is to pour the liquid metal into the mold without removing the wax. This is called the lost wax method. The hot metal vaporizes the wax. This is how they build engine blocks in Detroit now except they use styrofoam instead of wax. They machine styrofoam into a perfect engine block and then do the slurry treatment.
I could have a wood or wax block CNC machined. $700 UDS,
Hezz
Ace3000,
What you describe is what I intend to do if I use sand. If I use plaster I will still probably do something similar. The multipart mold cavity is great but it is hard to get the parting lines correct unless you can machine the mold from clamped together blocks.
The nice thing about sand even though it will not make a good surface finish is that it is never hard to remove the part from the mold.
The nice thing about the plaster is that I can get the plaster to set up partially around the mold blank and get a better surface finish which might reduce hand work. Assuming no other flaws on the lens need extensive work.
I haven't really decided on the casting method yet.
Hezz
And one last thought,
In the real world plastic lenses are injection molded or compression molded. This is the most economical process if you are making thousands of lenses. Because the first mold is a high precision metal mold that will cost 5000 - 300,000 USD to manufacture it is not practical for one offs or even for a few. When making tousands of lenses the cost can be amortized over the cost of the lenses. Check out this link:
http://www.uspl.com/pdf/Chapter1.pdf
Buy thye way I've found out that optical plastics are actually better than most glasses at passing light in the visible range.
Hezz
investment casting
Thanks I couldnt remember what you called it, its been 10+ years since I heard the term...Just glad I dont do foundry work anymore.
Thanks I couldnt remember what you called it, its been 10+ years since I heard the term...Just glad I dont do foundry work anymore.
another thng
We also did large parts ouch my back .We did 350 pounders
Pump casings actually just FYI lol
We also did large parts ouch my back .We did 350 pounders
Pump casings actually just FYI lol
is it possible to make your own projection lens as big as the lcd iteself, that way we wouldnt have to lose so much room in the area between lcd and projection lens, or we could just buy one, but does someone manufacture and sell them at this size???
It's possible to make a giant projection lens but it will not be necessary. The first lens can capture enough of the LCD's light and collapse the light cone down into a smaller cross sectional area so that lenses of moderate size can be effectively used.
The wider the angle of vision that needs to be projected in focus the more complex the lens system needs to be to get good focus but because we are putting the LCD so close to the big lens it should funtion in a relatively paraxial fasion making the big simple lens useable.
In order to get the most perfect imaging possible the lens system needs to be designed with the exact requirement in mind. In the future I attempt to do that but for now I'm using off the shelf parts except for this big lens I am making.
Hezz
cool hezz, after your done with the conventionals and all the normal parts, and you decide to give the more radical of ideas a try be sure to keep me posted!!!
big lens progress
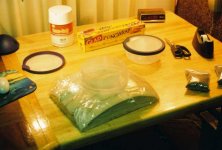
Here is some of the stuff I am using to finish the lens mold blank to a higher state. I found some silicon carbide powder at a nearby rock and lapidary shop. It is 60-90 grit and was 4.95 for each bag. I've also got two identical plactic bowls that I purchased at the local dollar store.
I then cut the bottom off of one of the bowls.
Hezz
Attachments
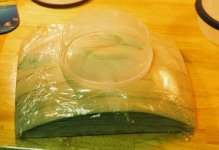
The custom made tool that we will use to grind the wood blank more spherical will be made of silicon carbide powder and polyester body filler. It is important the the tool material be about the same hardness as the wood. This is why I choose the body filler. It is NAPA economy 4.99 USD filler.
Some kitchen plastic wrap is then stretched across the surface that we have rounded with eyeball methods with a wood rasp.
The I placed the cut bottom bowl upside down on the wood blank. It will become the form to make our tool.
Hezz
Some kitchen plastic wrap is then stretched across the surface that we have rounded with eyeball methods with a wood rasp.
The I placed the cut bottom bowl upside down on the wood blank. It will become the form to make our tool.
Hezz
Attachments
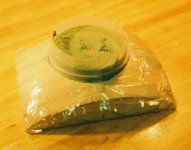
I put about 3/4 of one bag of the grit into the other bowl which was identical so that I could easily estimate how much material to mix. Then about 3/4 of the can of body filler goes in with the grit. It takes a while to mix it together well because it is very thick. This is how it should be or the grit will be too diluted in the mix. It should be a very thick dough like consistency.
After the grit and the polyester filler are thoroughly mixed it is time to add the hardener. It also must be mix in very well and should be poured in the mold as quickly as possible as the more soft it is the better it will fill in the mold.
Hezz
After the grit and the polyester filler are thoroughly mixed it is time to add the hardener. It also must be mix in very well and should be poured in the mold as quickly as possible as the more soft it is the better it will fill in the mold.
Hezz
Attachments
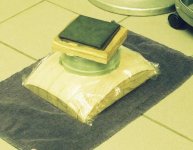
Once the tool was fully hardened I glued a wooden square of MDF to the back with silicone glue after flattening the back of the tool with a file. The tool will take on the form of the curve and allthough it is not perfectly spherical it will wear down into a near perfect sphere with the right grinding technique.
Here is a picture of the tool after about an hours worth of grinding. You can see if you look closely that the tool is making contact all around the edges and at a large patch in the center of the tool. It is hard to see in the photo but if you look close you can tell. The grinding process needs to continue with this tool until it has seated all the way down and is touching on nearly all of it's surface.
Hezz
Attachments

At first the tool will not grind very well by itself and I had to sprinkle about a half teaspoon of the loose grit onto the surface of the wood blank to get it going. Once it starts grinding it goes pretty fast with wood and body filler.
I used a cordal stroke going outward from the center of the lens to the sides and walked around the lens in a circular pattern. I would take about four stokes and count them and then move about an eighth of a turn around the lens and then turn the tool about the same amount beforre taking the next four stokes. This is very important because in order for the tool to wear spherical you must turn it everytime that you move on the lens. I doens not take much pressure and every attempt should be made to keep the tool from rocking as much as possible. This is easier said then done.
Because I had gone to happy with the wood rasp I had to add quite a bit of filler to the outside corners. These then have to be taken down with a file to near where the curve is supposed to be. The lens blank is coming together pretty well and I think it needs about two more hours of grinding before the tool completely seats.
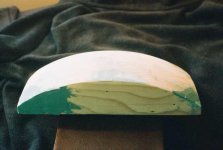
Here are a couple of pictures that show the outline of the lens blank in two different directions. You can see that the curvature is becoming very round and spherical.
I used a cordal stroke going outward from the center of the lens to the sides and walked around the lens in a circular pattern. I would take about four stokes and count them and then move about an eighth of a turn around the lens and then turn the tool about the same amount beforre taking the next four stokes. This is very important because in order for the tool to wear spherical you must turn it everytime that you move on the lens. I doens not take much pressure and every attempt should be made to keep the tool from rocking as much as possible. This is easier said then done.
Because I had gone to happy with the wood rasp I had to add quite a bit of filler to the outside corners. These then have to be taken down with a file to near where the curve is supposed to be. The lens blank is coming together pretty well and I think it needs about two more hours of grinding before the tool completely seats.
Here are a couple of pictures that show the outline of the lens blank in two different directions. You can see that the curvature is becoming very round and spherical.
Attachments
- Status
- Not open for further replies.
- Home
- General Interest
- Everything Else
- The Moving Image
- DIY Projectors
- started my hand made lens