Attachments
Awesome! Nice pics. Please keep posting your progress. I have been thinking about trying this route since I use low wattage class A.
Regards
Regards
Bravo BQC!!!
I love the way you incorporated Styrofoam into the build--very clever. I look forward to seeing your progress.
I love the way you incorporated Styrofoam into the build--very clever. I look forward to seeing your progress.
I absolutely love this! I first saw the elaborate process at inlowsound and was blown away by the beauty. My trouble has been finding compression drivers that I can afford. I am still learning about which drivers can be front loaded.
BQC, which drivers are your going to be using? Is that drywall?
BQC, which drivers are your going to be using? Is that drywall?
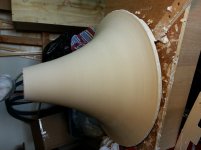
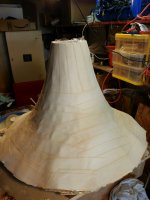
I will reveal the 6" driver that I plan to use after I have the horn finished and tested. Let's just say that it is a well known full range driver. The prevailing wisdom I have read about suitable drivers are drivers with low Qts (ie strong magnet) this make sense intuitively because at the throat the pressure is higher and you want a driver that has muscle to control the cone. If you use a non compression driver, you want a driver that has a rising response because the highs (beyond 5 K or so ) are not going to be amplified much by the horn. Yes that material is plaster, I got this at home depot in the section where they sell wall join compound , but this is in powder form in 18 lbs bag and it is rated at 90 minutes working time before it hardens. This is what John @inlowsound.com recommends. My only regret so far is not making the turntable motorized or somehow able to turn it with my feet so that both my hands can be free spreading out the plaster quicker.
I have done about the same with good results. I made a 200 hz horn using paper mache with styrofoam as the form. I used saran wrap on top of the styrofoam to keep the horn smooth and keep the paper from sticking.
Lots of luck.
Lots of luck.
I have done about the same with good results. I made a 200 hz horn using paper mache with styrofoam as the form. I used saran wrap on top of the styrofoam to keep the horn smooth and keep the paper from sticking.
Lots of luck.
daqvin_carter, this seems like an ingenious technique to aid in removal of the horn from the mold. Did you have any problems with the saran wrap creating wrinkles in the paper mache?
Because "hot mud" is susceptible to water damage, I do feel it should be sealed with polyurethane. That aside, I think the idea of using saran wrap as a buffer is excellent.
Awesome stuff. I will certainly be watching this project develop. Looks like you're a pro at handling the mud! Good luck with the paper.
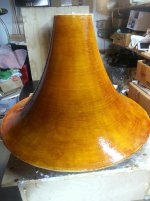
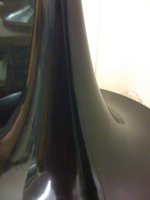
more pictures
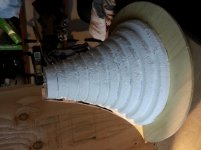
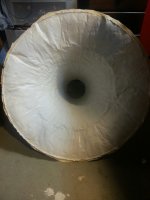
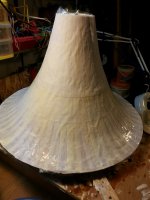
So here are some more pictures, I covered the mold with Vaseline, and put a layer cling wrap. The wrap works really good in keeping the paper from sticking to the mold,almost too good. After the 1st layer dried, the horn lifted 1/2 inch from the mold by itself. I only use 24 lbs printing paper for the 1st layer. I did put down hot mud at the mouth, but there was only 1 layer of paper, so it was quite thin so the mouth did not curl up but got kind of wavy and plus being lifted from the mold it start losing the shape at certain place. After the 1st layer, I started using drywall taping paper, because it was thicker and I could not picture myself spending 11 X 3 hours to put down the remaining 11 layers so I pun and use taping paper.
So here are some more pictures, I covered the mold with Vaseline, and put a layer cling wrap. The wrap works really good in keeping the paper from sticking to the mold,almost too good. After the 1st layer dried, the horn lifted 1/2 inch from the mold by itself. I only use 24 lbs printing paper for the 1st layer. I did put down hot mud at the mouth, but there was only 1 layer of paper, so it was quite thin so the mouth did not curl up but got kind of wavy and plus being lifted from the mold it start losing the shape at certain place. After the 1st layer, I started using drywall taping paper, because it was thicker and I could not picture myself spending 11 X 3 hours to put down the remaining 11 layers so I pun and use taping paper.
Attachments

The horn will lift from the mold as it shrinks--nature of paper. Your "cling wrap" is an interesting idea. I don't like all the wrinkles it leaves; you might want to smooth them out on the next attempt.
Frankly, I don't see you removing the air blisters in the application stage. This step must be used, and frequently as the blisters appear often.
Try using thicker layers of "hot mud" between paper layers (at the mouth use a six inch swath). There should be a short video clip of me turning the mold to smooth out the mud. Also, get several layers of paper on the mold before applying the mud.
This first attempt is a great learning experience. Your second attempt will improve the product as you learn what to do to combat wrinkles and blisters.
Drywall tape is way too heavy. Use thinner paper, preferably cotton. It's strong enough to take the repeated strokes necessary to remove the blisters (wet your brush with the glue/water mixture to lubricate the paper as you stroke out the blisters).
Also, you don't need 12 individual layers, overlapping counts as two layers. I generally apply 6 layers. The hot mud beefs up the horn's mouth, so it counters the lack of overlapping at the rim.
Last edited:
How long did you let the paper dry out before pulling it from the mold. It you pull too soon, the inner layers of paper will separate from the outer layers. It almost appears that this has happened, but not being able to touch the project, I can't be 100% certain.

One more thing: apply the hot mud before the paper has a chance to dry out. It it dries, it will wrinkle and all the hot mud in the world will not remove those wrinkles.
How long did you let the paper dry out before pulling it from the mold. It you pull too soon, the inner layers of paper will separate from the outer layers. It almost appears that this has happened, but not being able to touch the project, I can't be 100% certain.
5 days before removing from mold. inner layer seems ok, not separated.
The horn will lift from the mold as it shrinks--nature of paper. Your "cling wrap" is an interesting idea. I don't like all the wrinkles it leaves; you might want to smooth them out on the next attempt.
Frankly, I don't see you removing the air blisters in the application stage. This step must be used, and frequently as the blisters appear often.
Try using thicker layers of "hot mud" between paper layers (at the mouth use a six inch swath). There should be a short video clip of me turning the mold to smooth out the mud. Also, get several layers of paper on the mold before applying the mud.
This first attempt is a great learning experience. Your second attempt will improve the product as you learn what to do to combat wrinkles and blisters.
Drywall tape is way too heavy. Use thinner paper, preferably cotton. It's strong enough to take the repeated strokes necessary to remove the blisters (wet your brush with the glue/water mixture to lubricate the paper as you stroke out the blisters).
Also, you don't need 12 individual layers, overlapping counts as two layers. I generally apply 6 layers. The hot mud beefs up the horn's mouth, so it counters the lack of overlapping at the rim.
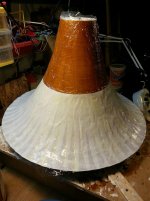
I only had 1 layer when I apply the mud because it was late and I had to quit. Next time I know to start early in the day instead of evening. I tried to remove some blisters using fingers, but there were too many and I ran out of time. Next time I'll use a brush or spatula.
different horn material
Hi John, what do you think about using a paste made from mixing saw dust and glue and spread it on top of 1 layer of paper. May be a 1/2 thick of this paste?
Hi John, what do you think about using a paste made from mixing saw dust and glue and spread it on top of 1 layer of paper. May be a 1/2 thick of this paste?
I only had 1 layer when I apply the mud because it was late and I had to quit. Next time I know to start early in the day instead of evening. I tried to remove some blisters using fingers, but there were too many and I ran out of time. Next time I'll use a brush or spatula.
Fingers work just fine. I use a brush because I get tired of sticky fingers 😉
Yes, begin early and get those blisters out. Also, get the wrinkles out of the cling wrap as it introduces air pockets which cause blisters. I've never used cling wrap, but think it's a great concept. I think you may want to cut the cling wrap into strips and lay them onto the mold like your paper strips.
You might consider using Vaseline as the "glue" that holds the cling wrap to the mold. That means you're going to apply Vaseline to the backside of the cling wrap strips before placing it onto the mold. This technique may allow you to remove all air pockets from beneath the cling wrap. If you can't get the cling wrap to lay perfectly flat, then avoid using it altogether.
Last edited:
Hi John, what do you think about using a paste made from mixing saw dust and glue and spread it on top of 1 layer of paper. May be a 1/2 thick of this paste?
The reason we use hot mud is to get a rapid set that will pin the paper to the mold. You could also tape the edges, but that opens a new can of worms as well. I have considered making a paper pulp paste by shredding paper and glue in a pale and beating it with a paddle/drill, then applying the paste to the paper strips. It's still an idea worth pursuing, but you still have to pin those first few layers.
- Status
- Not open for further replies.
- Home
- Loudspeakers
- Full Range
- Started building a 160 hz paper horn for a 6" fullrange