SI
Here's what I want to do. Change C3/C4 input coupling caps to 2.2uF Auricaps.
1. Do I just desolder/cut stock C3/C4 and solder on Auricaps?
2. If I decide to add the Auricaps directly on female RCA jacks, do I desolder stock C3 (and C4) and just bridge the 2 leads with something?
I also want to add some capacitance to power pins of the chip.
1. When I add the big cap, do I have to desolder C10 first, or can I just add the cap on top of C10?
2. When people talk about adding the big cap directly on power pins VDD1 and VDD2, since there are two VDD1 pins and two VDD2 pins, which pin do I use. Can I just solder + of cap to one of 2 VDD1 pins and solder - of cap to the "ground blob" of solder around the chip?
Lastly, I want to just get rid of volume pot altogether. There are 2 red wires and 5 white wires. Can I just cut off the pot and connect the 2 red wires together? How do I connect the 5 white wires, which to each other and which one is left (middle one?) that I connect to ground?
Thanks for all your help. I do plan to use an outboard 12V SLA battery.
Asa follow up the the previous quote, I'm wondering whether I can use a 2.2uf 50V AC cap as input cap (does it matter if the input cap is AC or DC rated, considering signal coming in is AC)? Also, instead of removing the resistors and caps on the board, can I just solder/tap the 2.2uf cap, series with a 20k metallized 1% resistor directly to the right side of R1 and R2? Thanks
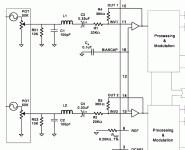
Input circuit
The attached drawing is the stock SI input circuit. The input opamp shown is a single supply type meaning the input pins have to be biased to ½ the supply. This makes the use of an input cap mandatory. To do it properly so there will be no problem with lifted pads on the funky PC board, C3, C4 should be removed and jumpered out with small bits of fine wire. Use a longer piece to be able to hold it and clip it to proper length after soldering. Remove R01 and R02 as a ground referenced DC connection direct to the input will shut down the chip. You can also remove and jumper out the 2 input inductors (L01, L02) as they serve no useful purpose. Trace the volume control wiper pin to the connecting cable. Follow the wire and clip it in the middle. Now insert a 2.2uf @ 200v Auricap between the 2 haves of the clipped wire. Black lead goes to the volume control. Do the same for the other channel. These connections could go directly to input RCA jacks. If this is done put 100k metal film res. across the jacks so voltage won’t build up on the cap and to supply a DC load for the source.
Much has been said about adding supply caps. Look through the appropriate threads for that info.
I don’t like SLA power for these units as you get too soft a supply at HF as well as no regulation. Get a 1.5-2 amp 12v regulated switch mode wall wart and adjust it to 13.2volts. Use a storage cap of 10,000+ uf @ 16volts as a buffer between the supply and the amp. This combination works extremely well. Use the buffer cap regardless of what type of supply you end up using.
Also check out the threads about output inductors, there is something to be gained there.
Roger
Attachments
Thanks for the link, which shows beautiful pic's, but it doesn't show any actual SMD component removal or input cap/PS cap addition. Do you have a link that shows what to do to remove (if necessary) SMD caps and replace with auricap input caps and add bigger PS cap to the power pins? TIA.
So you mean trace which white wire from volume pot corresponds to L (and R) and insert the coupling cap in series? The stock C3/C4 are jumped.
But other than the sheer physical size, cutting off C3 and just replacing with another cap (non-polarized Auricap?) in its place, hanging off the board, should be OK, too?
But other than the sheer physical size, cutting off C3 and just replacing with another cap (non-polarized Auricap?) in its place, hanging off the board, should be OK, too?
C3 C4
I seriously don't recommend hanging anything on the surface mount pads, even with a component there. It is way too easy to do damage. The recommended jumpers can be put on top of the caps ok but using solderwick across the whole cap makes them real easy to remove with a slight amount of pressure from the iron. We are talking ounces here not pounds!
Please read through all the SI threads. This is not a waste of time. Lots of nice pictures have been posted showing everything we have discussed including how to mount power supply caps. Lots of ideas and examples shown as well.
If this doesn’t answer all of your questions I will be very surprised.
Roger
drjlo said:Thanks for the link, which shows beautiful pic's, but it doesn't show any actual SMD component removal or input cap/PS cap addition. Do you have a link that shows what to do to remove (if necessary) SMD caps and replace with auricap input caps and add bigger PS cap to the power pins? TIA.
You may find this recently openned thread usefull - it contains many good pictures posted by @lf :
www.diyaudio.com/forums/showthread.php?s=&threadid=60345
and as sx881663 says, there are many other threads to explore - take yourself to diyAudioForums>top>amplifiers>classD>
CambshireGordon
CambshireGordon said:
You may find this recently openned thread usefull - it contains many good pictures posted by @lf :
www.diyaudio.com/forums/showthread.php?s=&threadid=60345
and as sx881663 says, there are many other threads to explore - take yourself to diyAudioForums>top>amplifiers>classD>
CambshireGordon
Gordon,
Yes a lot of effort went into doing all those pictures, a good job even if I don't agree with all he is doing. Much of it is too advanced for someone without proper skills or soldering equipment.
Roger
Is it ok to use 1% 1/4w metal resistors as replacement for feedback resistors r4 and r5? I can't source smd resistors locally. Thanks
Resistor question
In the past I have done this successfully. Just fold the leads under and clip them to fit. Be real careful of causing shorts and leave room so if they are touched and moved they won’t short out to anything nearby. Also be careful to not put any pressure on the pads or they might come loose from the board. If this does happen you might be able to save it with super glue or a liberal dose of contact cement. The contact cement is a good idea to strain relief it after you make sure it is working properly, lessens the chance of lifted pads.
Roger
D0Hbert said:Is it ok to use 1% 1/4w metal resistors as replacement for feedback resistors r4 and r5? I can't source smd resistors locally. Thanks
In the past I have done this successfully. Just fold the leads under and clip them to fit. Be real careful of causing shorts and leave room so if they are touched and moved they won’t short out to anything nearby. Also be careful to not put any pressure on the pads or they might come loose from the board. If this does happen you might be able to save it with super glue or a liberal dose of contact cement. The contact cement is a good idea to strain relief it after you make sure it is working properly, lessens the chance of lifted pads.
Roger
I could not agree more - reading about what others have done seems quite straight forward (particularly those others have been so generous to share their experiences - thank you to them). BUT openning up an SI is another prospect, especially seeing all of those SMD's and very small soldering points! AND reading how easy it is even for an experienced person, to lift a solder pad ... ...sx881663 said:
Gordon,
Yes a lot of effort went into doing all those pictures, a good job even if I don't agree with all he is doing. Much of it is too advanced for someone without proper skills or soldering equipment.
Roger
I built many valve amplifiers and other pieces of electronic equipment in my (mis-spent?) youth when we used proper 'man-sized' components, but I have not wielded a soldering iron in agnst for many a year now and certainly not on something so small as the SI.
I recongised my limitations on openning up my first SI, hence my decision to ease myself back into the soldering fold by first building the Class-t-amp-2020 kit from Autocostruire - it uses those proper 'man-sized' components - see my post number 10 on the thread "For all t-amp tweakers". (www.diyaudio.com/forums/showthread.php?s=&threadid=60480)
My Autocostruire order has shipped and I eagerly await delivery - soldering iron is plugged-in ready. Maybe after a successful build will I advance with soldering iron onto the SI's.
CambshireGordon
Si Pcb
Working with these small components can be frustrating. Get out the 10X loupe and inspect the job, looks perfect but happens to be the wrong component or wrong place...
The other thing is that the SI boards are far from being high quality. The traces are super thin and pads can be easily destroyed. Just always remember to put only very low amounts of pressure on them and you should be ok. I drape a piece of solder wick across the whole component and that way heat and remove solder from both sides at once. While the whole thing is hot a small sideways pressure will usually loosen it. Find an old computer board to practice on first. I did this and recovered some parts that are hard to find.
On putting the new components on I put a dab of solder on only one pad first then while keeping it hot place the component down. You will find getting them positioned properly will take some practice, not so bad when only one side is soldered. On soldering the other side if you find you have left a big blob, not to worry as solder wick can suck up the excess with no problem. Larger multi lead components are best super glued into place first. This keeps a strain off of the component when you solder the leads down. I broke a couple of expensive opamps trying to line them up with one lead soldered. When you are done, use a high powered magnifier to carefully inspect every thing. Particularly look for solder bridges, real easy to do with this small close together stuff. Once again solder wick to the rescue!
Takes a steady hand and a fine soldering tip. You will find one of those large lighted magnifiers and a good pair of fine tip tweezers to be helpful if not essential.
Roger
Hi there,
could someone let me know the value of cap C12 ?
I scratched it away while I was cutting it out of its original case.
Many thanks,
boarder
could someone let me know the value of cap C12 ?
I scratched it away
while I was cutting it out of its original case.Many thanks,
boarder
boarder said:Hi there,
could someone let me know the value of cap C12 ?
I scratched it away
Many thanks,
boarder
You are lucky, C12 is not critical in value as it is one of the power bypass caps. I would use from .47 up to 2 uf or so as long as they were rated at least 16 volts and are the same size. While you are at it you might as well upgrade both.
Roger
- Status
- Not open for further replies.
- Home
- Amplifiers
- Class D
- Sonic Impact Opened for mods--Help!