I was inspired to do this by this thread:
http://www.diyaudio.com/forums/full...rixed-single-stereo-speakers.html#post3946671
However the final result was a partial failure, but I will document what I did because it was a good learning experience and there are several ideas I tried that may be of use to others.
This is the design I put up for review on the thread: http://www.diyaudio.com/forums/full...ed-single-stereo-speakers-14.html#post4013959
Failure #1:
XRK971 points out in critiquing the design that the Class D plate amp might give me trouble. Turns out he was right. The matrixed full range speakers cut out in a rapid fire manner at any above quite moderate listening levels.
In my defense, I twice asked this question of Parts Express (they deleted the question both times), and I did read the manual which makes no mention of this as a problem - so I tried.
Failure #2:
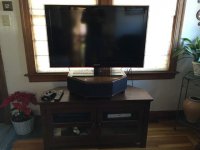
The audio outs on my TV are not controlled by the master volume control, so I have no convenient way to control volume!! D'oh!
http://www.diyaudio.com/forums/full...rixed-single-stereo-speakers.html#post3946671
However the final result was a partial failure, but I will document what I did because it was a good learning experience and there are several ideas I tried that may be of use to others.
This is the design I put up for review on the thread: http://www.diyaudio.com/forums/full...ed-single-stereo-speakers-14.html#post4013959
Failure #1:
XRK971 points out in critiquing the design that the Class D plate amp might give me trouble. Turns out he was right. The matrixed full range speakers cut out in a rapid fire manner at any above quite moderate listening levels.
In my defense, I twice asked this question of Parts Express (they deleted the question both times), and I did read the manual which makes no mention of this as a problem - so I tried.
Failure #2:
The audio outs on my TV are not controlled by the master volume control, so I have no convenient way to control volume!! D'oh!
Attachments

Building It
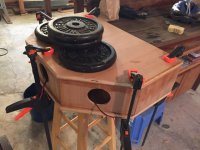
All the main parts were gotten out of a 2 foot by 4 foot piece of 3/4" nice cherry ply (60mm x 120mm x 18mm). An additional piece of 1 foot by 2 foot 1/2'" ply was used for the internal pieces.
The top and bottom were 16" cuts across the entire 2 foot width. The internal pieces were from 5 5" strips, 3 from the remaining good ply, 2 from the rough ply for internal pieces. Cut these all at once without adjusting your table saw so they are all the same width.
Attachments

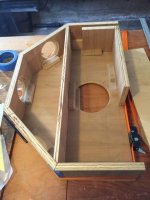
I used a variation on the tape method. Pieces were laid out full size on the bottom piece, and cut with the 22.5 degree angles. The exterior pieces were taped together on the face. Temporary cleats wrapped in wax paper were tacked in place to align the pieces during glue-up. This worked well.
A piece of 1/2' ply was wrapped in wax paper to act as a spacer for the vent. (New vent size was 6.25'' long by 1/2" by 5" deep. This worked well.
Dry fit the pieces first! I used a belt clamp to snug the pieces against the cleats. This will work better next time. The belt clamp causes the whole assembly to form a circle. I needed an additional spreader clamp to keep the back of the box at full width and perhaps another clamp to keep it from spreading at the shoulders.
Oh, use strong tape!
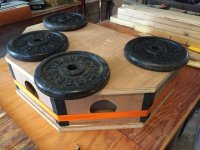
After the dry fit, everything was glued and clamped in place. The top with the weights is just there to keep the tops of the pieces level and pressed against the bottom.
After the glue is dry, cleats and wax paper are easily removed.
A piece of 1/2' ply was wrapped in wax paper to act as a spacer for the vent. (New vent size was 6.25'' long by 1/2" by 5" deep. This worked well.
Dry fit the pieces first! I used a belt clamp to snug the pieces against the cleats. This will work better next time. The belt clamp causes the whole assembly to form a circle. I needed an additional spreader clamp to keep the back of the box at full width and perhaps another clamp to keep it from spreading at the shoulders.
Oh, use strong tape!
After the dry fit, everything was glued and clamped in place. The top with the weights is just there to keep the tops of the pieces level and pressed against the bottom.
After the glue is dry, cleats and wax paper are easily removed.
All the driver holes were cut before glue-up using a router and a Jasper circle jig. You need this! The inside edges were relieved with a 45 degree chamfer bit on the router table.
Wires for the 3 front speakers were passed thru holes and sealed with latex calk. The ends of the wires were soldered to a nail to form the matrix. I mixed up red and black, so everything is reversed. Somehow 50 years of saying black is positive and red is negative made it impossible for me to do it right - event though I knew red was supposed to be positive and black was ground.
Wires for the 3 front speakers were passed thru holes and sealed with latex calk. The ends of the wires were soldered to a nail to form the matrix. I mixed up red and black, so everything is reversed. Somehow 50 years of saying black is positive and red is negative made it impossible for me to do it right - event though I knew red was supposed to be positive and black was ground.
Final Assembly
Next step was to glue on the top piece.
The top and bottom edges were trimmed flush with the sides and back with a flush cut router bit. Then the top and bottom edges were rounded over with a 1/2" round bit on the router table.
BTW: The front pieces were actually held back 1/4" from the edges. We will get to why in a minute.
The box was then stained (several coats) and two coats of polyurethane.
Attachments
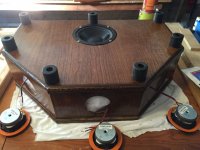

The feet and the woofer were mounted.
The three full-range speakers were mounted. I used canning jar seals cut to size as gaskets. The Vifa's have a gasket glued to the front of the speaker. Doh!
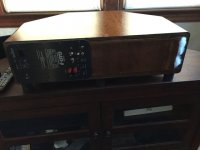
Hooking up the speakers was actually quite a struggle. I didn't have clips that were just the right size. I actually broke the plate holding the tab on one of the Vifa's trying to get the clip on, but I was able to glue the plate together, and just soldered the wire directly to the tab. Amazingly enough, the clips on the Dayton plate amp for the woofer didn't match the mounting tabs on the Dayton woofer! D'oh! Lesson: Make sure you have the right tabs before assembly day.
I originally had planned to connect the full range speakers to the amp thru the external speaker connectors, but it turned out it was easier to connect to the amp internally
The three full-range speakers were mounted. I used canning jar seals cut to size as gaskets. The Vifa's have a gasket glued to the front of the speaker. Doh!
Hooking up the speakers was actually quite a struggle. I didn't have clips that were just the right size. I actually broke the plate holding the tab on one of the Vifa's trying to get the clip on, but I was able to glue the plate together, and just soldered the wire directly to the tab. Amazingly enough, the clips on the Dayton plate amp for the woofer didn't match the mounting tabs on the Dayton woofer! D'oh! Lesson: Make sure you have the right tabs before assembly day.
I originally had planned to connect the full range speakers to the amp thru the external speaker connectors, but it turned out it was easier to connect to the amp internally
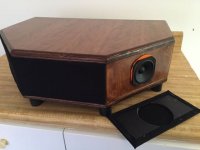
The speaker grills
As I said earlier, I held back the front pieces by 1/4". I cut 5" by 10" pieces of black foam core with a 4" hole in the center for the speakers. I wrapped in pieces of black grill cloth I got on eBay. The edges of the fabric are glued to the back of the foam core with a hot glue gun.
They are just a press fit on the front, but if they are loose you could hold them in place with velcro strips.
Attachments
How do they sound?
Disappointingly, not that great.
I stuffed the bass vent with cotton, which helped tame a boomy bass and it now integrates better.
The stereo effect works well - that part is a success. Not a great big soundstage, but definitely stereo.
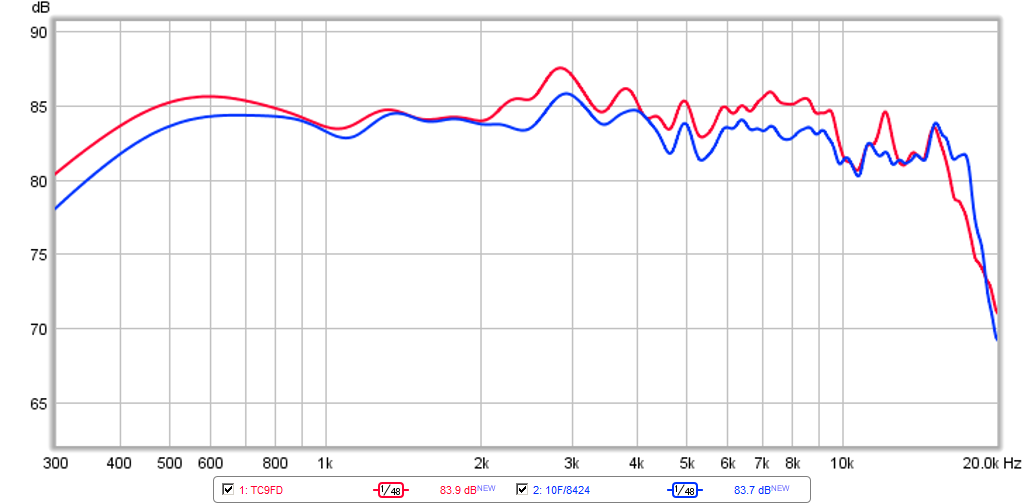
And the Vifa TC9FD's are OK, but do not seem to have that air and sparkle that I was looking for. (I did run them with uncompressed input so it's just not cable TV sound.)
As I said in Post #1, the amplifier cuts in and out rapidly once you get over quite moderate listening levels. So part of the problem may be the amp is overtaxed and affecting the sound. The Vifa's are also brand new, so they may improve with some running in.
In the meantime I will be exploring using an LM3886 board to bypass the satellite portion of the plate amp.
Does anyone have a suggestion for adding a volume control with a remote?
Disappointingly, not that great.
I stuffed the bass vent with cotton, which helped tame a boomy bass and it now integrates better.
The stereo effect works well - that part is a success. Not a great big soundstage, but definitely stereo.
And the Vifa TC9FD's are OK, but do not seem to have that air and sparkle that I was looking for. (I did run them with uncompressed input so it's just not cable TV sound.)
As I said in Post #1, the amplifier cuts in and out rapidly once you get over quite moderate listening levels. So part of the problem may be the amp is overtaxed and affecting the sound. The Vifa's are also brand new, so they may improve with some running in.
In the meantime I will be exploring using an LM3886 board to bypass the satellite portion of the plate amp.
Does anyone have a suggestion for adding a volume control with a remote?
Tom V,
Very nice design and wood work! I don't see anything inherently wrong that would cause it not to sound good. We have already established that the Vifa driver is a great driver and is up there with sound quality from some of the class leading drivers that cost more.
It is your class D amp that is the problem.
You probably need to make a custom passive line level XO (PLLXO) to high pass your Vifa's at say 150Hz (250Hz is better to keep HD low on Vifa's), and low pass the woofer. Use a DVC woofer so that a stereo amp can be used otherwise you need a summing junction mixer. Then use a class AB amp for the matrix stereo.
You might try Faital Pro 3FE25 8ohms - they will boost sensitivity to 91dB for more HF sparkle.
So the short story is your box is great, you just need to re do the amp if you want to save it and make it sound great like it looks.
You might be able to save it using same plate amp and have speaker outputs from class D hope stage go to PLLXO high pass (they may be full range?) then use that to drive a class AB amp. I have good luck with $5 TDA7297 amp that is 15 watts.
Here is one possibility for remote volume:
http://www.amazon.com/Yuan-Jing-Burr-Brown-PGA2311-Digital-Preamplifier/dp/B00QW6BLY0
And the Vifa TC9FD's are OK, but do not seem to have that air and sparkle that I was looking for.
Likely the same issue as the loss of fine detail i found they had (ie low DDR)
dave
And the Vifa TC9FD's are OK, but do not seem to have that air and sparkle that I was looking for.
Same for me. They sound like they're rolling off past 10k, and what's there isn't all that great.
jeff
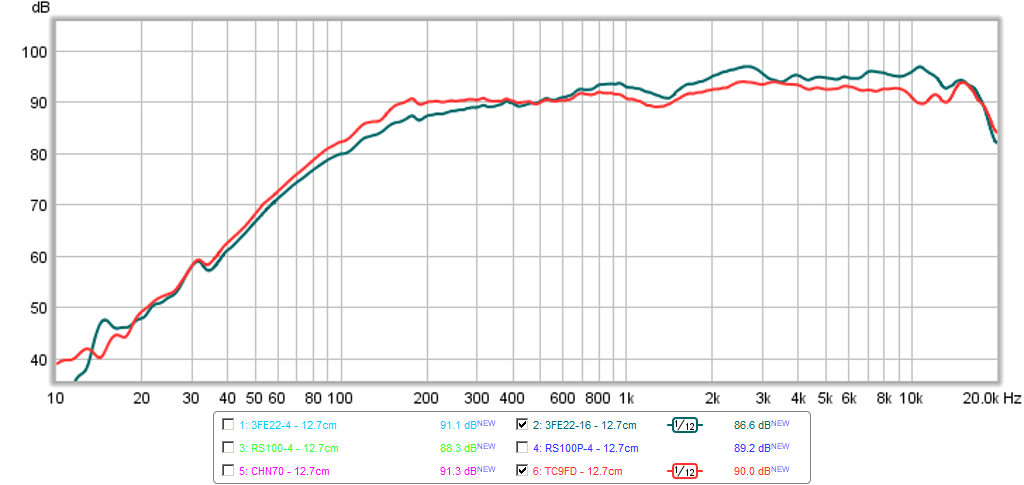
The measurements certainly show that they are not rolling off until 16kHz or so. Here is the TC9FD compared to a class leading Scan Speak 10F/8424:
XRK thanks for the amp and volume control suggestions. That will be the first order of business getting amp fixed. I will have to figure out to bypass existing satellite amp section and find a place to mount new parts. Things will be cramped.
To be clear it is far superior to the built-in TV speakers. But maybe no better than what I could have bought at Best Buy for the same $$.
To be clear it is far superior to the built-in TV speakers. But maybe no better than what I could have bought at Best Buy for the same $$.
I know what you mean. I saw a Vizio sound bar with four 3in full range drivers and a sub with spdif, Bluetooth, remote control, etc for $140 at Costco. How can you beat that!?
The measurements certainly show that they are not rolling off until 16kHz or so.
There's a 4db drop off at 9.5k! No wonder they sound dead.
jeff
Well the other speakers in the room are Foster FE127 Metronomes. I just may be used to a hot high end.
Well the other speakers in the room are Foster FE127 Metronomes. I just may be used to a hot high end.
It's that peak at 7k that really makes them sound bright. I thought they had a pretty good top end past 10k.
jeff
The Vifa's are probably as close as you can get to a totally balanced and flat driver at almost any price. The 3FE22 r16 has a little more high end past 10kHz that may suit some folks better and still stay balanced.
Very very nice job. Looks very Japanese with the color scheme, the details and understated aesthetics.
Something the master himself would've been proud of.
Also really nice how it mirrors and matches the cabinet underneath it.
About the drivers, I would probably splash for some of Fostexes smaller offerings that fits the hole, or maybe the CHR 70s if you can make them fit. Lots of treble with those and very good off-axis behavior.
About the amplifier section, maybe you could use the Ambio module to still use your plate amp?
I was inspired to do this by this thread:
http://www.diyaudio.com/forums/full...rixed-single-stereo-speakers.html#post3946671
However the final result was a partial failure, but I will document what I did because it was a good learning experience and there are several ideas I tried that may be of use to others.
This is the design I put up for review on the thread: http://www.diyaudio.com/forums/full...ed-single-stereo-speakers-14.html#post4013959
Failure #1:
XRK971 points out in critiquing the design that the Class D plate amp might give me trouble. Turns out he was right. The matrixed full range speakers cut out in a rapid fire manner at any above quite moderate listening levels.
In my defense, I twice asked this question of Parts Express (they deleted the question both times), and I did read the manual which makes no mention of this as a problem - so I tried.
Failure #2:
The audio outs on my TV are not controlled by the master volume control, so I have no convenient way to control volume!! D'oh!
Hi there,
Well, both of those "failures" are not due to the matrixed single stereo speaker concept but due to your auxiliary equipment 😀
What you'll need is a good old A/AB class amplifier with negative output terminal connected to the chassis i.e. appears as common terminal for two amplifiers.
.
- Status
- Not open for further replies.
- Home
- Loudspeakers
- Full Range
- Single Box Stereo F.A.S.T. TV Speaker