Cabinet Progress!
While I was waiting for crossover parts to arrive, I made my decision about the colour of the cabinets and got busy prepping them for painting.
This was a bigger job than expected, simply because REGA had chosen to use the incredibly tough Hylomar Liquid Gasket compound to secure the nasty little Velcro cover holders dotted around the baffle face.
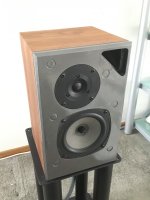
I had long ago decided that these speakers look way better without covers - and that the nasty little Velcro buttons had to go!
...But what a job!
Eventually, I discovered that only Acetone would completely remove the Hylomar compound. No picnic.
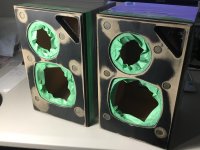
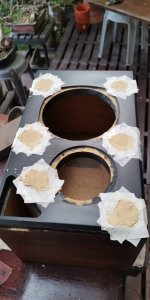
Once clear of Hylomar, I sanded and smoothed the entire baffle; and taped the driver cavities to protect the face that clamps the drivers. There was no need to remove perfectly good Hylomar Liquid Gasket, to be used again - in addition to the new Hylomar compound I have purchased.
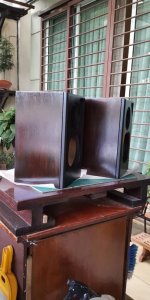
Last, but not least, I took some old Vinyl LP Pastic Covers and taped-up the nice newly finished real-wood veneer cabinets.
Only the baffles remain exposed, waiting for paint!
While I was waiting for crossover parts to arrive, I made my decision about the colour of the cabinets and got busy prepping them for painting.
This was a bigger job than expected, simply because REGA had chosen to use the incredibly tough Hylomar Liquid Gasket compound to secure the nasty little Velcro cover holders dotted around the baffle face.
I had long ago decided that these speakers look way better without covers - and that the nasty little Velcro buttons had to go!
...But what a job!
Eventually, I discovered that only Acetone would completely remove the Hylomar compound. No picnic.
Once clear of Hylomar, I sanded and smoothed the entire baffle; and taped the driver cavities to protect the face that clamps the drivers. There was no need to remove perfectly good Hylomar Liquid Gasket, to be used again - in addition to the new Hylomar compound I have purchased.
Last, but not least, I took some old Vinyl LP Pastic Covers and taped-up the nice newly finished real-wood veneer cabinets.
Only the baffles remain exposed, waiting for paint!
Attachments

Appreciation!
@Lojzek @LOJZEK
Just a quick note to thank you again for the excellent crossover schematic that has formed the heart of this project. Appreciated.
😀
@Lojzek @LOJZEK
Just a quick note to thank you again for the excellent crossover schematic that has formed the heart of this project. Appreciated.
😀
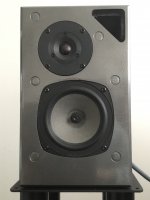
REGA KYTE Baffles Now Painted...
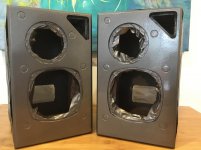
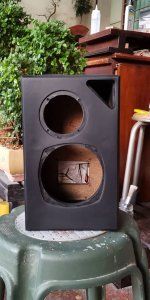
For this baffle painting process, I used a product that is new to me.
Called Rust-Oleum Hammered Paint & Primer in One.
I quite fancied the Hammered Finish and was keen to see how it turned out on these baffles.
(Photos below...)
I now need to wait for the paint to cure properly at which time I will probably perform a bit of a "cutting" excercise to see if I can gain a bit more eveness across the finish.
So far, so good.
A couple of more weeks in the hot cater cupboard should do the trick!
Attachments

A few days later...
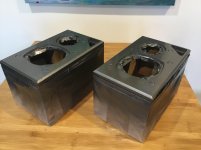
I realised that the PAINTER'S PAL (Green) Painters Tape probably needed to come off after a few days, to avoid a messy paint edge.
Sure enough, the green masking tape pulled-off leaving a nice clean edge.
Next, it seemd that the RUST-OLEUM paint had hardened-up nicely, so I used MEGUIARS ULTIMATE COMPOUND to rub down the newly painted surfaces, which helped to level-out the finish and tones down the gloss a few notches - which I prefer. One more coat of MAXWAX on the real wood veneer and the little REGA KYTE cabinets were looking a treat.
The next stage was a round of testing all woofers and all tweeters again with both crossovers. (The last thing that I wanted was to get these little lovelies all assembled and find that something was still amiss...) The good news is that everything worked perfectly.
Through this restoration process, this pair of REGA KYTES was treated to two new voice coils for the tweeters - "New Old Stock" (NOS) which means that with a bit of careful handling, the tweeters are good to go for another 30-years. The original woofers remain in simply superb condition, so they just went straight back in.
Before the final lock-down, I did some AB testing with my wife. One speaker, we repacked (to the extent that I thought judicious) with synthetic dampening. The other speaker we re-packed with the original wad of natural wool fibre.
A/B tesing - using the balance knob to swing from one speaker to the other - while we worked our way through several albums - made the sonic difference very obvious. (I have ruined the sound of speakers by over-stuffing speakers in the past, so restraint and care is required...) The sonic results were immediately clear to both my wife and I.
In this instance, the freshly packed speaker with the synthetic dampening was far superior to the other. Gone was the slight bloat and the echoing mid-bass overhang that one wouldn't normally notice - till it was gone. Once gone, we realised how much it coloured the sound. With the fresh packing of synthetic dampening, everything sounded much more in focus. Articulation had increased and the sound had a lot more snap - without sounding bright. Also, the mid-bass down was both deeper and faster. This was a gamble that had paid-off very well.
Attachments
More to come...
Over the next few days, I'll post some final photos of the finished product and share some listening observations.
For now, all I'm going to say is that, despite the fact that we have 5 pairs of favourite speakers - we may just have landed a new most favourite.
😀
Over the next few days, I'll post some final photos of the finished product and share some listening observations.
For now, all I'm going to say is that, despite the fact that we have 5 pairs of favourite speakers - we may just have landed a new most favourite.
😀
There's a New Sheriff in Town...
Even after less than 4-hours total listening time, these little improved REGA KYTA speakers are revealing nuances that the best of our other speakers have missed - and this includes some of our SINGLE DRIVER (CROSSOVERLESS) speakers, which was a big surprise!
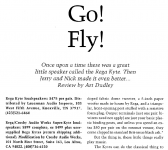
Through the process of this restoration and improvement process, I was lucky enough to be contacted by Mr. Nick Despotopoulis, one of the original designers of a 1980s product that I had never heard of; namely, the SUPER KYTE.
Evidently, back in the 1980s Nick and his partners also recognised the huge potential of the little REGA KYTE and went about producing a commercially available (Californian) SUPER KYTE model that received a glowing review by a young ART DUDLEY.
(See attached review)
What was most pleasing, was that all of the tweaks and upgrades that I was considering for the little KYTEs were in harmony with Nick's original recipe for the SUPER KYTE. Credit where credit is due, it was Nick who strongly encouraged me to upgrade the speaker connection posts AND replace the original internal speaker dampening. So I'd like to acknowledge Nick for his encouragement, generous sharing of knowledge and his contribution to this project.
Please know that I'm not claiming to have produced a SUPER KYTE here. The truth is that I had never heard of a SUPER KYTE; and to this day I have never seen or listened to a (genuine) SUPER KYTE.
That said, I will say that my little project has delivered WAY beyond any expectations.
The REGA KYTE speakers - with the tweaks that have been applied here - are the measure of the very best speakers we have ever heard - provided one is prepared to live without deep bass.
In terms of "openess" and "musicality", no caveats need apply.
These truly are giant killer speakers, for those of us who don't do DubStep.
Even after less than 4-hours total listening time, these little improved REGA KYTA speakers are revealing nuances that the best of our other speakers have missed - and this includes some of our SINGLE DRIVER (CROSSOVERLESS) speakers, which was a big surprise!
Through the process of this restoration and improvement process, I was lucky enough to be contacted by Mr. Nick Despotopoulis, one of the original designers of a 1980s product that I had never heard of; namely, the SUPER KYTE.
Evidently, back in the 1980s Nick and his partners also recognised the huge potential of the little REGA KYTE and went about producing a commercially available (Californian) SUPER KYTE model that received a glowing review by a young ART DUDLEY.
(See attached review)
What was most pleasing, was that all of the tweaks and upgrades that I was considering for the little KYTEs were in harmony with Nick's original recipe for the SUPER KYTE. Credit where credit is due, it was Nick who strongly encouraged me to upgrade the speaker connection posts AND replace the original internal speaker dampening. So I'd like to acknowledge Nick for his encouragement, generous sharing of knowledge and his contribution to this project.
Please know that I'm not claiming to have produced a SUPER KYTE here. The truth is that I had never heard of a SUPER KYTE; and to this day I have never seen or listened to a (genuine) SUPER KYTE.
That said, I will say that my little project has delivered WAY beyond any expectations.
The REGA KYTE speakers - with the tweaks that have been applied here - are the measure of the very best speakers we have ever heard - provided one is prepared to live without deep bass.
In terms of "openess" and "musicality", no caveats need apply.
These truly are giant killer speakers, for those of us who don't do DubStep.
Attachments

Last edited:
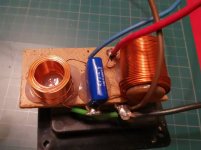
More on Rega Kyte
I supposed this would might help some fellow Rega Kyte owner that wants to know more about the crossover..
Tweeters = 4.1 ohms
Drivers = 7.2 ohms
12db HP is estimated @3.981kHz
4.7uF + 0.34mH (0.9 ohms)
6db LP estimated @2.031kHz
0.58mH (0.6 ohms)
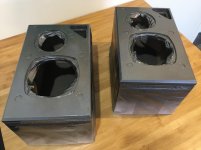
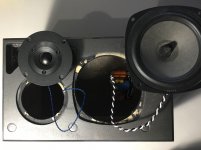
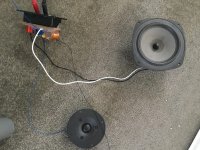
I did a bit more work by stripping down the entire varnish (as the condition was very bad & I've ignored them for a long while) and adding at least 5 to layers of light water-based polyurethane varnish and to have better seal I finish them with wipe-on poly!
The front baffles were sanded down lightly and I did a very bad patch job on the shallow holes that was used to attached the front grills (which I've never had). Went thru almost 2 cans of flat black to make sure that it's well sealed.
Also added a light layer of wood glue to all the side hoping to improve the overall rigidity of the speakers and also seal the gaps due to wood movements over the years.
What is more interesting is that I shifted the 12db high pass filter from est. 3.981kHz to est. 4.202kHz with Audiophiler capacitors (nothing fancy), I remove the 4.7uF and replaced them with a 3.3uF+1uF (for testing) and will definitely add bypass cap (might want to try using my old skool silver mylar) to bring out more glows on the top end.
I tend to find them to be a bit flat at the top end and it's rather bass-shy even for 5.5 inch drivers. The result of this mod is rather interesting (from my listening only, not on bench test yet). Am not too bothered with the low as am running a sub with them.
Have fun guys.. I hope this will come useful to some adventurous Rega Kyte owner someday.. reason why am doing this is that I can't find much information on Rega Kyte and hopes this helps..
I supposed this would might help some fellow Rega Kyte owner that wants to know more about the crossover..
Tweeters = 4.1 ohms
Drivers = 7.2 ohms
12db HP is estimated @3.981kHz
4.7uF + 0.34mH (0.9 ohms)
6db LP estimated @2.031kHz
0.58mH (0.6 ohms)
I did a bit more work by stripping down the entire varnish (as the condition was very bad & I've ignored them for a long while) and adding at least 5 to layers of light water-based polyurethane varnish and to have better seal I finish them with wipe-on poly!
The front baffles were sanded down lightly and I did a very bad patch job on the shallow holes that was used to attached the front grills (which I've never had). Went thru almost 2 cans of flat black to make sure that it's well sealed.
Also added a light layer of wood glue to all the side hoping to improve the overall rigidity of the speakers and also seal the gaps due to wood movements over the years.
What is more interesting is that I shifted the 12db high pass filter from est. 3.981kHz to est. 4.202kHz with Audiophiler capacitors (nothing fancy), I remove the 4.7uF and replaced them with a 3.3uF+1uF (for testing) and will definitely add bypass cap (might want to try using my old skool silver mylar) to bring out more glows on the top end.
I tend to find them to be a bit flat at the top end and it's rather bass-shy even for 5.5 inch drivers. The result of this mod is rather interesting (from my listening only, not on bench test yet). Am not too bothered with the low as am running a sub with them.
Have fun guys.. I hope this will come useful to some adventurous Rega Kyte owner someday.. reason why am doing this is that I can't find much information on Rega Kyte and hopes this helps..
Attachments
-
 129906f9-6704-45e4-9436-b5421af8020f.jpg61.5 KB · Views: 156
 -
 f129fd96-0b60-4a1f-a19a-72726d7484bd.jpg46.9 KB · Views: 147
 -
 b6624e77-2df5-4d05-a25c-0bf563e647dc.jpg58.7 KB · Views: 148
 -
 38e1e730-ed44-4895-b1da-82365f45e454.jpg54.7 KB · Views: 164
 -
 842cf81b-24f7-4ce4-92c0-27d9c5953f7c.jpg59.6 KB · Views: 188
 -
 b1c5712b-1a2d-4b0f-ad30-7c02ba333582.jpg53.5 KB · Views: 174

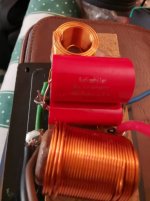
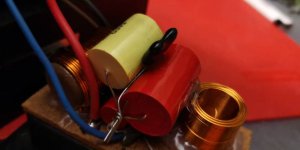
I'm wondering if anyone has successfully experimented with BYPASS CAPS for a simple High Pass Filter application - like this one?
I'm thinking of adding a .o1uF (say) Polystyrene BYPASS CAP in addition to the base 4.7uF cap that I am replacing...
Any feedback on this line of thought?
With the bypass capacitor: increasing in air and detail with harshness and discontinuity in the upper treble.
Without the bypass capacitor: still presenting all the detail with cleaner and smoother in the high frequencies.
Last edited:
From my personal experience, bypass capacitor does make a different but it's highly dependent of the type of capacitor that we add even though at 0.1uF or 0.01uF they doesn't seemed to be significant.
I would suggest that you replace the 4.7uF with MKP. The differences are rather significant and add a bypass with Sliver Mica.
From the above.. I added 0.22uF and Cornell Dubilier Sliver Mica 0.01uF.. I believe by adding a. 22uF and 0.01uF, I could have brought the freq to 4.087kHz from previous 3.981kHz.. Original should in the range of 4.202kHz.
Attachments
- Home
- Loudspeakers
- Multi-Way
- Simple 2-way Crossover Rebuild... Help Please?