Thanks Stephen 🙂
I'd have to agree with the amount of low bass being adequate (for my tastes) in HT even with my current tuning of about 36Hz...
I was listening to Enya, Watermark the other day and it probably has the lowest freq's in it of any cd's I own, I don't know how low, but seriously low, Not sure if its "artificial" or not.
I also use them for music (as you would have guessed from the Enya above), but they are definitely in current form more of a HT speaker. The revised cabinets will hopefully improve them musically too 🙂
Tony.
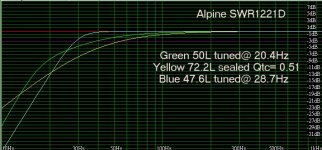
Remember He's crossing at about 50Hz so the sealed, or the green plot will give a flatter response.
I based the green plot on the the'adire' alignment which is somewhere between sealed and 'standard' vented alignment.
I dunno how much output he'd get from 1 sub though - I doubt it'd be enough.
Cheers
Rob
I based the green plot on the the'adire' alignment which is somewhere between sealed and 'standard' vented alignment.
I dunno how much output he'd get from 1 sub though - I doubt it'd be enough.
Cheers
Rob
Mantronic said:[subwoofer...]
I will also place it on spike! But not 4! I will use 3 of them to be sure that the contact will be perfect. [/url]
A senior mechanical engineer I know would be so proud of you. Three is the right number of legs.
Four is not a very good number for legs - unless of course you have knees or pasterns or whatever. Said mechanical engineer would say the legs on a table are "over-determined."
Two legs is really not enough, particularly if there is Johnnie Walker envolved, although feet and toes can ameliorate.
One is right out.
Mantronic: I looked at the sort of results you are getting from WinISD and it is apparent to me that you are doing something wrong if you are getting 47,000-liter enclosure sizes and 29,999 Hz port tuning frequencies. Instead, in the interest of making sure you have something that works, why don't you leave it up to me, hmm?
Here is a design that should suit your tastes well:
12" Dayton Loudspeaker Co. "Titanic" (from http://www.partsexpress.com)
350W Rhythmik Audio amplifier (from http://www.acoustic-visions.com)
4" Inside Diameter "Precision Port" double-flared port kit (from http://www.partsexpress.com
Here is the page for the Dayton Titanic woofer we will be using: http://www.partsexpress.com/pe/pshowdetl.cfm?&DID=7&Partnumber=295-402
Here is the page for the Rhythmik Audio amplifier we will be using: http://www.acoustic-visions.com/~acoustic/products/subwoofer_amplifiers/rythmik350/
It's would appear to me that you have little or no experience doing this before, so I have taken the liberty of coming up with a design. First off, we are completely scrapping the idea of using an Alpine TypeR subwoofer for a home application. Car subwoofers are designed ot take advantage of natural cabin gain, which provides more and more boost to bass frequencies as the frequencies get deeper and deeper. In a home environment, there is a little bit of cabin gain (called "room gain") but it is almost negligible. A home subwoofer, on the other hand, is designed to rely heavily on its resonant enclosure to produce the larger amounts of bass required by a home environment. That is why you can seem to get away with 0.75-cubic-foot enclosures inside a car, but the same woofer in the same box will sound like crap inside the home. The woofer we are using is a very competent woofer, probably more so than the Type R you were planning to use, but it is also cheaper because there are fewer cosmetic things (which don't improve the sound anyway).
Make a box out of a material similar to particleboard, called MDF (medium density fiberboard). Use material no thinner than 3/4". This stuff should be available from your local Lowe's or Home Depot. I am giving you the internal dimensions of the box. It's important for you to recognize that these internal dimensions are specifically designed to give you the proper air space inside the box, so that the port tunes the box to the proper frequency. This design will give you powerful, low bass even below 20 Hz in your room, powered right into your chest by a massive 350-watt amplifier.
Height: 19"
Width: 16"
Depth: 24"
Port: Inside Diameter = 4", Length = 13-1/2"
You will put the woofer and port on the front of the box, and the amplifier on the back. Make some drawings on graph paper so you can determine where you want these things to go.
You will want to have some sort of internal bracing. Cut a two-by-four board into 19" and 16" lengths. Place them in a position where they will not interfere with the rest of the enclosure. The 19" two-by-four piece goes from top to bottom and the 16" two-by-four piece goes from one side to the other. Please place them so that the spots where the boards join to the panels are as close to the middle of their respective panels as possible. when cutting panels, please double-check and triple-check your measurements so you aren't running back to your lumberyard for more MDF like I did on my most recent project. then cut your driver, port, and amplifier holes. Do this by first drilling a pilot hole (big enought o fit a jigsaw blade through) within the piece that will wind up getting cut out, and then cut the hole with a jigsaw. The cutout for the 4" Precision Port kit is not 4". Buy the stuff before you begin to build the box so you can know what the cutout sizes are.
Wire the woofer to the amplifier using no less than 14-gauge speaker wire, with 12-gauge being highly recommended. You can get that from Parts Express. The best value, I found, was the Phoenix Gold 50' roll of 12-gauge wire.
When you are gluing the panels together, I strongly recommend that you use clamps to apply pressure. You should get "pipe clamps" which use clamping assemblies that attach onto a piece of galvanized pipe with threaded ends. These can be found at your local Lowe's or Home Depot. Make sure that the pipe sections you get to use with these clamps are no less than 3 feet long and have threaded ends. You will be using wood glue. A good wood glue like Titebond II is worth the extra investment. Once you have the top and side panels gluing, use 4 or 5 wood screws at every junction to tie it together structurally. Then, put the bracing pieces in. Measure where you put them and use wood screws coming in fom the outside to hold them in place. then clamp on the front and back panels and add the screws to those panels. Take care to countersink your screws with a countersink bit on your drill and then not try and turn the screws in too deeply or you will strip the hole and the screw will be useless. I recommend using a screw driver bit on the drill to make it easier to add the screws. If you want to paint the box or apply another type of finish, then do this before the drivers are monted.
Also, you will be using machine screws and T-nuts to secure the driver to the front of the box. Parts Express sells a Cast Frame Driver Mounting Kit. I have added it to the parts list below, as well as the 12 gauge wire. First drill the holes for the machine screws. Put the machine screws into the holes. Then put the T-nuts on them and use a hammer to drive the T-nuts into the MDF. Do not hit too hard - remember that MDF is relatively soft material. Use lighter taps, until the T-nuts have bitten into the MDF enough that you can safely remove the screws. Only then should you mount the woofer. The mounting kits use screws that have allen socket heads so you will need an allen wrench to turn them. There are two possible cast frame driver mounting kits. I'm not sure which cast frame driver mounting kit fits the Titanic, so get both. They're only $3 so just use the one that has the largest screws that will still fit through the screw holes in the frame of the Titanic. I am listing both possible mounting kits in the parts list so get both. You can use ordinary wood screws to mount the external port flare and the amplifier.
Wiring: Make sure you keep your positives and your negatives straight, obviously. Use beefy speaker wire. You will be wiring directly to the amplifier. Don't be unnerved by the fact that the rear electronics of the amplifier are exposed. All the possible exits for air have been sealed so you won't hear any leaking.
If you're not sure about your fit for the panels, use wood filler putty, and sand by hand until it's even with the wood. Then use some sort of caulk inside the box. Wait for it to cure completely before adding the woofer because the chemicals in silicone-based caulks tends to attack butyl rubber surrounds and cause them to break down and have premature failure. You want this thing to last, since you're spending $300 on parts.
Parts List for Titanic 12" Subwoofer:
12" Dayton Titanic Mk II subwoofer driver - Parts Express #295-402
350W Subwoofer Plate Amplifier - Acoustic Visions Rhythmik Audio 350 (see web site linked above)
4" Precision Port Flared Port Kit - Parts Express #268-352
Cast Frame Driver Mounting Kits - Parts Express #260-776 and #260-778
That should do it. Ask back here if you have problems or questions. It is even better, if you have a digital camera, to take pictures of what you want us to help you with. Once it's done, take s final picture of it and let us see what you would up with. Oh, and yeah: Tell us how it sounds, as well.
wow, tanks alot for the help!
It's very well described!
And it's true that the titanic 12" seem well suited for home use!
For the price it's near what I was planning so it's allright!
Also, would it be possible to get 2inche from the depth and extend the box height (while keeping the same volume: (4,22 cf. less driver volume, less amplifier volume)) so that the port would be placed in a better position? I heard that you must not place the port near the woofer or the cabinet surface.
In case of 4inche port I would need a 4 inche clearance from everything around?
tanks alot
The front is the panel whose dimensions are 17.5"x20.5" (assuming 3/4" MDF; internal dimensions are 16"x19"). If you do not want to mount the port on the front panel, the rear panel should have enough space. I suppose as long as you check and re-check that your resulting volume is the same, you can cut off two inches from the length but that doesn't mean you can just add the two inches back on as height. It's complicated, and I don't recommend that you try and make that change. Just mount the port on the back. The port is 13.5" long, so you should be good if you mount the port on the front, just below the woofer. The depth of the enclosure is 24" so there should wind up being plenty of space between the rear of the box and the end of the port. I really would not worry about it myself.
A friend of mine down the hall from me (I am in a college dorm) actually has two of the same subwoofer in his room, in similar enclosures (4" flared port, about the same internal space), and he decided to turn up a rap track one day when my parents were visiting, and my dad thought there was a car with really loud subs going by on the street but it was actually my friend down the hall with his two Titanic 12". It was very, very loud. You should be impressed.
A friend of mine down the hall from me (I am in a college dorm) actually has two of the same subwoofer in his room, in similar enclosures (4" flared port, about the same internal space), and he decided to turn up a rap track one day when my parents were visiting, and my dad thought there was a car with really loud subs going by on the street but it was actually my friend down the hall with his two Titanic 12". It was very, very loud. You should be impressed.
- Status
- Not open for further replies.
- Home
- Loudspeakers
- Subwoofers
- Serious subwoofer project!