 I wish I could get an at listening position 1/3 octave smoothed curve like that in my listening room!
 Tony.
Yes, Morel DMS37. The FR curve of the speakers measured outside is very good. In room however I have massive variations (I put this down to the room). This thread has some measurements http://www.diyaudio.com/forums/multi-way/240098-tracking-down-source-distortion-peak-my-mtm.html I still haven't dealt with the surround... will get to it one day 🙂
Tony.
Tony.
Hey Daniel,
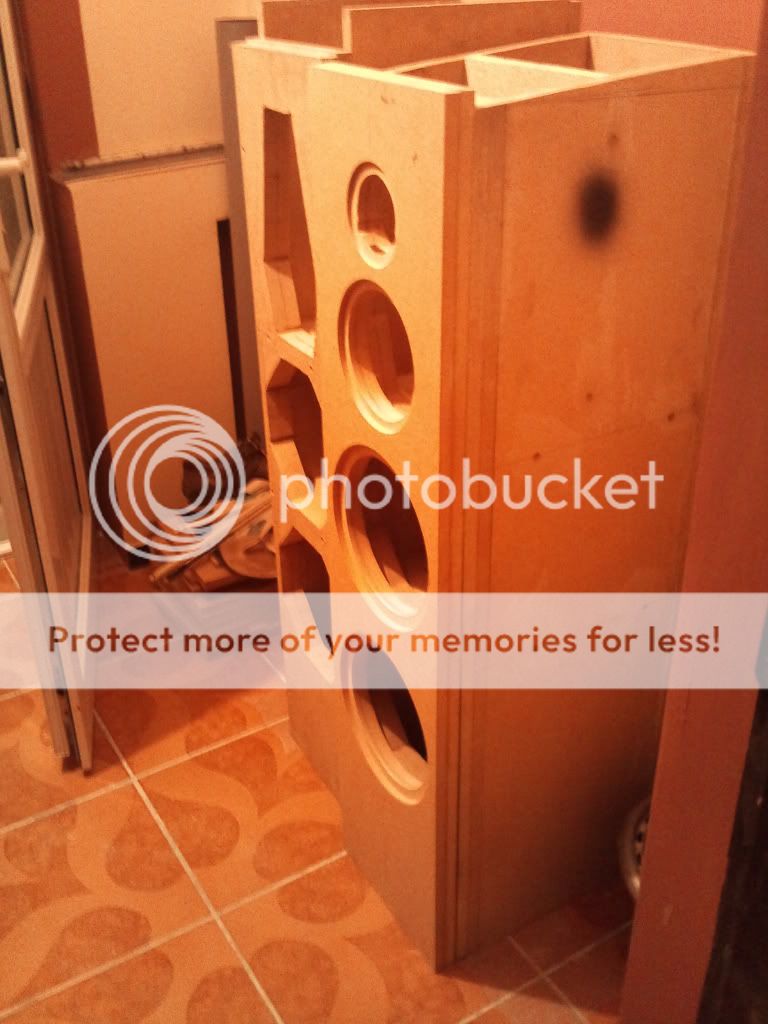
Nice looking speakers. They hit a nice niche for a full range 3-way using high quality good value drivers and has come up a couple of times in the last week or so in terms of recommendations.
If you could finish your thread off by posting the cabinet info - tilt angle, baffle size, driver locations, internal volumes, port size, etc - I think that may significantly help people out who may wish pay you the ultimate compliment and built your design for themselves.
Cheers

Great build indeed!
You could try putting them in a larger room with space to the boundaries. The design is for free-standing, right? With them being up against the wall, you must be getting significant LF lift.
You could try putting them in a larger room with space to the boundaries. The design is for free-standing, right? With them being up against the wall, you must be getting significant LF lift.
Hello!
Hello guys, and I'm sorry for not answering for such a long time.
I will post details regarding cabinet dimensions, and the way I built it.
But first, for everybody that wants to build these speakers, please be advised: not every amplifier on the market can drive them! You need a solid and robust amplifier, because the impedance drops below 3 ohms! Don't even think about driving them on an amplifier designed for 8 ohm speakers!
With that out of the way, the front panel looks like this:
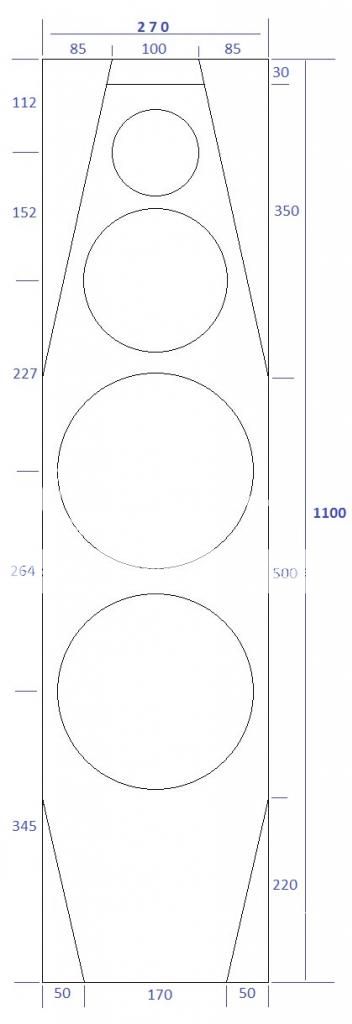
The dimensions on the left are dimensions to the drivers center. The smaller dimensions on the top, bottom, and the right side are for the cut-away corners.
It's important to keep the distance from the tweeter and midrange as close to the one in the drawing as possible (15mm between the tweeter chassis and the midrange chassis). It's also pretty important to keep the cabinet width as close to 270mm as possible, and the distance from the tweeter to the top of the cabinet. Other dimensions are not as important.
I made the baffle out of 4 16mm MDF boards. Everything else is made of 18mm MDF. Please make sure to chamfer the midrange driver hole, as much as possible! I split the baffle in 2 32mm layers, the top one nicely routed, and the lower one.... not so nicely routed 😛, to allow more "breathing space" for the drivers. Like so:
Then, on to the "skeleton". For construction simplicity, the rear panel has the same length as the baffle, but it is 40 mm offset from the baffle. The grey parts in the drawing are the driver cut-outs, and rectangular cutouts in the cabinet reinforcement panels.
The cabinet's "magic angle" is 5 degrees. I will be back with more details soon. 🙂
Hello guys, and I'm sorry for not answering for such a long time.
I will post details regarding cabinet dimensions, and the way I built it.
But first, for everybody that wants to build these speakers, please be advised: not every amplifier on the market can drive them! You need a solid and robust amplifier, because the impedance drops below 3 ohms! Don't even think about driving them on an amplifier designed for 8 ohm speakers!
With that out of the way, the front panel looks like this:
The dimensions on the left are dimensions to the drivers center. The smaller dimensions on the top, bottom, and the right side are for the cut-away corners.
It's important to keep the distance from the tweeter and midrange as close to the one in the drawing as possible (15mm between the tweeter chassis and the midrange chassis). It's also pretty important to keep the cabinet width as close to 270mm as possible, and the distance from the tweeter to the top of the cabinet. Other dimensions are not as important.
I made the baffle out of 4 16mm MDF boards. Everything else is made of 18mm MDF. Please make sure to chamfer the midrange driver hole, as much as possible! I split the baffle in 2 32mm layers, the top one nicely routed, and the lower one.... not so nicely routed 😛, to allow more "breathing space" for the drivers. Like so:
Then, on to the "skeleton". For construction simplicity, the rear panel has the same length as the baffle, but it is 40 mm offset from the baffle. The grey parts in the drawing are the driver cut-outs, and rectangular cutouts in the cabinet reinforcement panels.
The cabinet's "magic angle" is 5 degrees. I will be back with more details soon. 🙂
Last edited:
Did you stick with the vent tuned to 30 Hz?the enclosure is vented, around 70-75 liters, tuned at 30 Hz via a 105 mm tube, 30 cm long, in . The bass is pretty close to a sealed box, short and dry, not boomy. If I will change my mind, I can always seal them. But I like them like this!
Thanks for that.
I trust you are still enjoying them? 😀
Of course I am enjoying them! 🙂
Did you stick with the vent tuned to 30 Hz?
Well, I still haven't moved them in a larger room, and they are very close to the rear wall, so now I'm using a sort of "aperiodic tuning". I've put a roll of sound absorbant in the reflex port. They are not as boomy as they would be vented in such a small room, and they have more bass than sealed. Altough the sealed bass sounds better... Well, compromises! 🙂
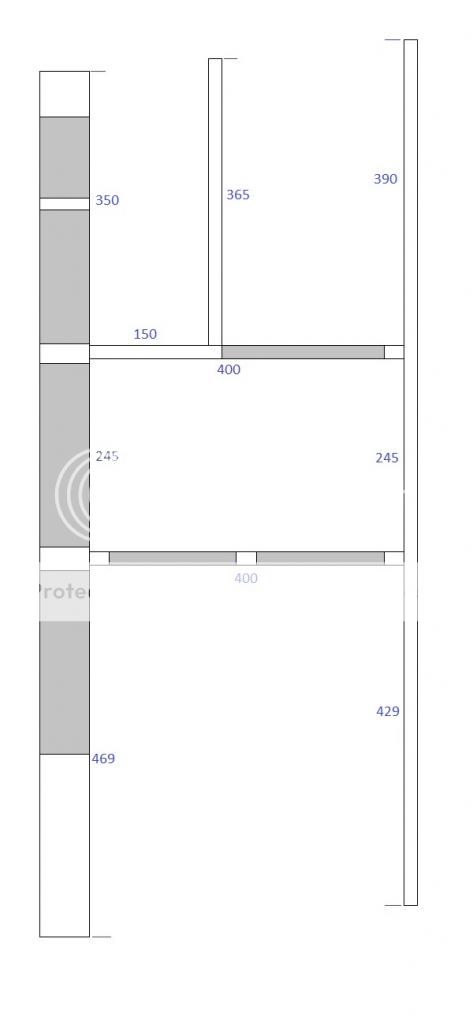
Now, back to the cabinet. First of all, I am sorry, but yesterday drawings were a bit incorrect. I have updated/corrected them.
How I have built them, and how I would do it again: build the "skeleton" from the drawing posted earlier. You need to cut a few parts at a 5 degree angle (the front baffle, the rear panel, and the panel connecting the upper reinforcement to the top panel). For the top reinforcement, leave 170 mm from the front uncut, to create the midrange enclosure. Make a large hole in the rest of it, leaving 25-30mm of MDF around the edges. Make the lower reinforcement like a digital 8.
The side panels are a bit tricky. They need to be 1140mm x 400mm, with two corners cut out. Don't cut a rectangular 1140x400 piece and try to cut away the corners, tough... You'll probably ruin the corners.
I placed the bass-reflex port on the bottom of the cabinet, around 100mm from the rear panel. It's a round 100mm tube, 300mm long. For it to "breathe", I stacked 3 layers of 18mm MDF, and made a "horseshoe" for the cabinet. I left 250mm from the front and 100mm from each side uncut, getting a hole 230mm by 170mm.
Put all of them together, and the top and bottom panels, and you'll get this:
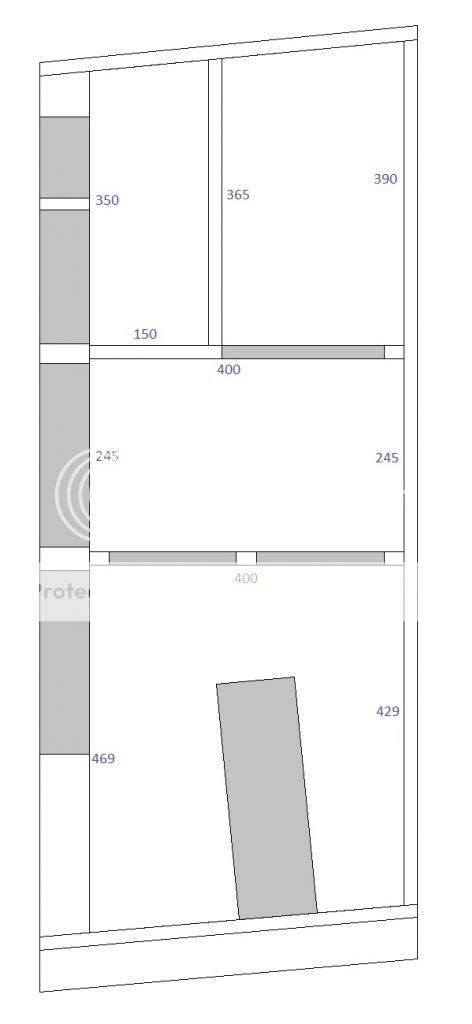
Now to the tricky parts. Cut the top front part of the cabinet. Cut it at 45 degrees from the top panel. It's red in the drawing below.
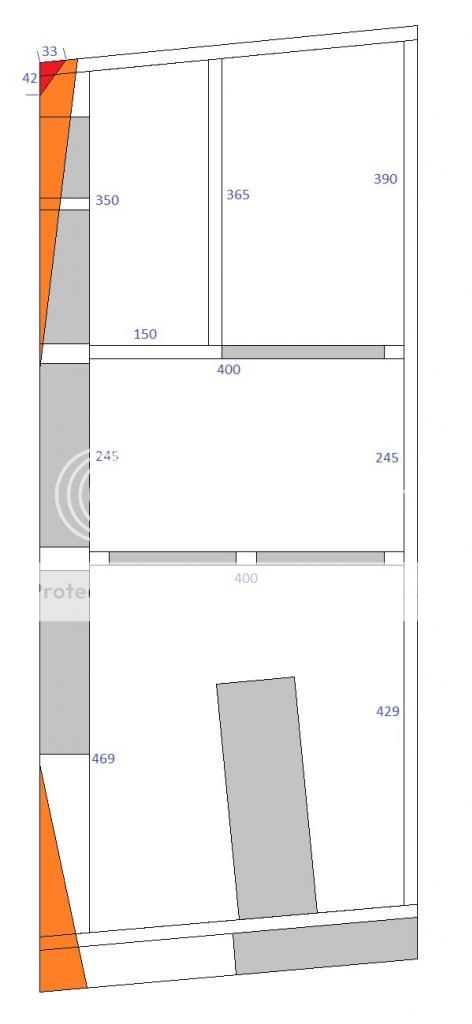
You can use a handsaw, a chisel, or a circular saw. Then you can cut away the corners (orange), using the same methods. To use the circular saw for the corners, you need a bit of trigonometry. Hint: remember arctangent? 🙂 Or you can just do it like this:
An externally hosted image should be here but it was not working when we last tested it.
When cutting the corners, don't cut too deep. Make sure you'll leave 18mm of MDF in each corner. You wouldn't want 2 extra ports in the corners, right? 🙂
And that's about it. Please use sound dampening material on the inside panels. I used a cheap liquid automotive sound dampener. It' a tar-like substance, rubberized, vibration-absorbant, that gets applied in thick layers. As for the sound absorbant, make sure you use a lot behind the midrange driver, and a lot on the bottom panel, around the reflex port. Try to fill these spaces, but without compacting the material. And place some on the rest of the side and rear walls.
Indeed. Did you try or consider a longer port and a lower tuning of perhaps 25Hz? I can see it would foul in the current arrangement without a bend or angling but it may reduce the boom a bit while keeping the bass extension.Well, I still haven't moved them in a larger room, and they are very close to the rear wall, so now I'm using a sort of "aperiodic tuning". I've put a roll of sound absorbant in the reflex port. They are not as boomy as they would be vented in such a small room, and they have more bass than sealed. Altough the sealed bass sounds better... Well, compromises! 🙂
I haven't considered a lower port tuning. I think it might work well regardless of my current room size.
My main issue here is that the cabinet volume is a bit small for these woofers, and that lifts the response around 60-70 Hz, right on one of my primary room nodes.
The "aperiodic" tuninng works well, though. And when I'll finally move them in a larger room (in a few months), I'll just remove the "plug" from the reflex port. 🙂
The SB Acoustics website was changed. The old link to the SB23NRX now is redirected to the aluminium version. The link is now: SB Acoustics :: 8'' SB23NRXS45-8
I updated it in the first page. Thanks for pointing that out!
I updated it in the first page. Thanks for pointing that out!
I understand, that the filter design is not based on actual measurements of the dynamics in the cabinet, and taken somewhere on the Internet?
- Home
- Loudspeakers
- Multi-Way
- SB Acoustics 3 ways