Hello All
I have been repairing Klipsch subwoofer amps for about 15 years as a hobby. I have decided to start blogging my repairs and eventually do videos of each one. This thread is intended to be a blog and a resource for information. I will try to answer repair questions as best I can. Comments and tips are also welcome, If you do not have the experience or the tools, PLEASE do not attempt any of these repairs. You will only end up damaging the board and it will end up costing more for a tech to repair the damage. If you do not have a high quality vacuum desoldering station (Hakko or Weller) and a current limited mains supply, you should not be working on these amps. These subwoofers do not have any user serviceable parts inside. If you open up the sub or attempt any repair you see in this thread, you are doing so at your own risk!!!
I have been repairing Klipsch subwoofer amps for about 15 years as a hobby. I have decided to start blogging my repairs and eventually do videos of each one. This thread is intended to be a blog and a resource for information. I will try to answer repair questions as best I can. Comments and tips are also welcome, If you do not have the experience or the tools, PLEASE do not attempt any of these repairs. You will only end up damaging the board and it will end up costing more for a tech to repair the damage. If you do not have a high quality vacuum desoldering station (Hakko or Weller) and a current limited mains supply, you should not be working on these amps. These subwoofers do not have any user serviceable parts inside. If you open up the sub or attempt any repair you see in this thread, you are doing so at your own risk!!!
RSW-10 PLATE SERIAL ???
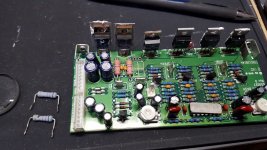
First up we have a RSW-10 and this one already is a challenge, because someone was already inside and changed parts. I have 2 burnt resistors that look to be replaced and might not be the correct value. R44 and R45 on the amp board. I also see that 3 fets were replaced. I need to confirm that Q7 should be an IRF640 and not a IRF530. The amp board is 650027 and it appears that SVS used this same amp in the 20-39PC. Oddly enough the Infinity IL60 uses the same amp board so I should be able to get a good parts reference from that. More to come tomorrow, I'm tired.
First up we have a RSW-10 and this one already is a challenge, because someone was already inside and changed parts. I have 2 burnt resistors that look to be replaced and might not be the correct value. R44 and R45 on the amp board. I also see that 3 fets were replaced. I need to confirm that Q7 should be an IRF640 and not a IRF530. The amp board is 650027 and it appears that SVS used this same amp in the 20-39PC. Oddly enough the Infinity IL60 uses the same amp board so I should be able to get a good parts reference from that. More to come tomorrow, I'm tired.
Attachments
Update:1/18/20
I replaced the fets and have the resistors on order. The resistors are .1ohm 2W Wire Wound
ADJUST BIAS PROCEDURE
(Mandatory when any output MOSFET transistors Q3,4,7,8 are replaced)
1. Amplifier should be unplugged and OFF.
2. Remove Amp assembly from cabinet; remove rear plastic cover if present. All wires exiting
the cover can remain connected unless they will prevent you from removing the amplifier or
accessing potentiometers on the Linear board PCB in the following steps.
3. Locate the Linear board assembly (PCB with the output transistors)
4. Adjust R11 and R27 fully Counter Clockwise. See diagram below.
5. Apply 120 VAC power to unit, Turn power switch ON.
6. Verify LED illuminates on the front gain control dial unless you have disconnected the plug.
7. Connect voltmeter set to DC millivolt range to twin pins on terminal J7, on Linear board
8. Verify initial voltage is less then 0.1 mV.
9. Adjust R11 Clockwise until voltmeter reads 0.3 mV + the initial current from step #8.
10. Adjust R27 Clockwise until voltmeter now reads 0.6 mV + the initial current from step #8.
11. Turn amplifier OFF. Disconnect AC power to unit.
12. Remove voltmeter from terminal J7.
13. Replace cover (if present), wires if disconnected, and replace amplifier back into cabinet.
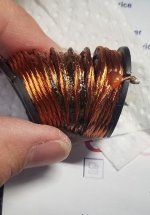
This is one that separates the men from the boys. This amp came to me a complete mess. It successfully achieved meltdown. The inductor on the secondary power supply overheated and was destroyed. I took some measurements, ordered the special LITZ wire and 3D printed a new bobbin for the coil. I then vacuum potted the coil with thinned polyurethane and let it air dry for a week. I still need to do more repairs on the amp, It has shorted fets and outputs and all sorts of other issues, but here is a teaser for this one.
One thing I learned, is definitely to tin the leads before starting the winding and before potting. It was not easy at all to clean them as they wicked up the poly.
One thing I learned, is definitely to tin the leads before starting the winding and before potting. It was not easy at all to clean them as they wicked up the poly.