Rockport (Avior2) styled 3way speaker DIY - finally completed.!
I love rockport technology speakers, both sound and style.
So I decided to make it by myself.


tweeter : scanspeak 6640
mid : audiotechnology 15H
Woofer : audiotechnology 23I * 2


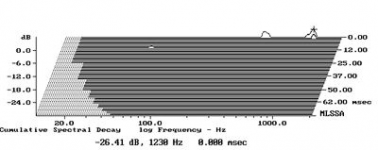
Frequency response as follows. Crossover design is not finished yet.

I love rockport technology speakers, both sound and style.
So I decided to make it by myself.
tweeter : scanspeak 6640
mid : audiotechnology 15H
Woofer : audiotechnology 23I * 2
Frequency response as follows. Crossover design is not finished yet.
Last edited:

Wow! I think I liked them better in white though...
Wolf
yes, I guess white is also good. but side carbon wrapping finish goes well with pantera gray colors..
Oh my. Great build. Ever thought about using textreme satoris?
you mean SBAcoustic's Satori units?
I also love them, too.
but rockport used audiotechnology's units in earlier products, so I decided to use them..
Thanks for advice.
Actually I chamfered front baffle, but it's very thick (about 5 in.), hard to notice in photo..
Very awesome looking! I actually love everything about these. I am wanting to do something similar using all Satori Textreme drivers. Where did you get your cabinets made? Or did you make them all yourself?
Very awesome looking! I actually love everything about these. I am wanting to do something similar using all Satori Textreme drivers. Where did you get your cabinets made? Or did you make them all yourself?
I made it all by myself.

Impressive.
ScanSpeak 7100, AT 15H and 23I ??
Love your cabinets, they look stiff, heavy and well damped, I believe the cabinet is the most underestimated part of this crazy hobby of ours, we wast most of our time discussing drivers and crossovers (which is interesting and nice). Rockports cabinets are extreme (Antares, Stereophile's measurement), they use some kind of CLD with fiberglass/epoxy, and they are heavy.
How do like the bass from the ATs? And can I ask where you cross the Midrange driver?
Attachments
Impressive.
ScanSpeak 7100, AT 15H and 23I ??
Love your cabinets, they look stiff, heavy and well damped, I believe the cabinet is the most underestimated part of this crazy hobby of ours, we wast most of our time discussing drivers and crossovers (which is interesting and nice). Rockports cabinets are extreme (Antares, Stereophile's measurement), they use some kind of CLD with fiberglass/epoxy, and they are heavy.
How do like the bass from the ATs? And can I ask where you cross the Midrange driver?
scanspeak beryllium tweeter (6640) is used, and mid & woofer are as you say.
I agree with you on enclosure. Enclosure is very important to make good sound. My speaker weights about 50~55kg /1ea . I also used epoxy on front baffle..
midrange COP is 210Hz, 3,000Hz.
Last edited:
Hello,
I find very clever the way you made the baffle recess angle in the top sides by overlapping lesser en lesser width front baffle layers then shaped the angles with white plaster or polymer, in order to avoid perhaps a complex angle cut on a table saw.
Very inspiring. I personally likes the gloss quality you achieved. You certainly should know one or two things about painting and shaping ? Cars' tweaks?
Try to pad down the 2K to 4K hz area...
If I may, I just try to make more recess behind the drivers to avoid the tunnel effect difraction. Look at the guys at HT Guide that are making some clone as your.
Just one word last :Bravo !
Last edited:
Hello,
I find very clever the way you made the baffle recess angle in the top sides by overlapping lesser en lesser width front baffle layers then shaped the angles with white plaster or polymer, in order to avoid perhaps a complex angle cut on a table saw.
Very inspiring. I personally likes the gloss quality you achieved. You certainly should know one or two things about painting and shaping ? Cars' tweaks?
Try to pad down the 2K to 4K hz area...
If I may, I just try to make more recess behind the drivers to avoid the tunnel effect difraction. Look at the guys at HT Guide that are making some clone as your.
Just one word last :Bravo !
Yes, I worked as you said exactly!
It's hard to work recessed angled baffle without 3D CNC, but just hobby, I do not have CNC, so I devised this way.
I referenced car painting. Used spray paint for car.
Chamfering is applied behind baffle, though you can't see it well in photo because baffle is too thick (over 5in.)..
Awesome cabs. Congrats. How do they sound?
I recorded sound and upload youtube.
Rockport styled DIY speaker recording - YouTube
Of course it's different from real sound, but it will help you imagine sound...
More pics pleaaaaaase 🙂 ! I'm interested on how you curved the side and the cutting of the individual layers before gluing them together.
I don't understand how you succeed to make the round shape transition of the side after the epoxy sides were plan. Did you cut a jigg in wood or paper-card with a concave shape to control the abrasion made by hand after ? Symmetry between the two sides is hard to do when the sides are not plan like an Avalon loudspeakers.
It's much more complicate than the Avalon like loudspeakers because the curves.
The curves are progressive like in a car, that's awesome to achieve such result without mold or CNC...
While I like very much the sharp transition seen in Avalon loudspeakers, what is made with the Avior is much more pleasing (at least according my tastes) to look at. More elegant despite the massive object, it adds lightness 🙂
Also I see that the first front layer had been cutted with oval rounded shapes with a perfect symmetry (2D CNC or by hand?)
What is please the width difference of the top of the front baffle and the back of the front baffle ?
Last edited:
Long time no see..
Finally, I finished other one.
MDF 6-in front baffle (other side 1~1.5-in thickness), high-glossy finished (same as Car painting)..


Frequency Response - 1m distance measurement from speaker

Frequency Response - room correction applied

Impedance graph


External Cross over network box

XLR connector used between speaker and network box
Finally, I finished other one.
MDF 6-in front baffle (other side 1~1.5-in thickness), high-glossy finished (same as Car painting)..
Frequency Response - 1m distance measurement from speaker
Frequency Response - room correction applied
Impedance graph
External Cross over network box
XLR connector used between speaker and network box
More pics pleaaaaaase 🙂 ! I'm interested on how you curved the side and the cutting of the individual layers before gluing them together.
I don't understand how you succeed to make the round shape transition of the side after the epoxy sides were plan. Did you cut a jigg in wood or paper-card with a concave shape to control the abrasion made by hand after ? Symmetry between the two sides is hard to do when the sides are not plan like an Avalon loudspeakers.
It's much more complicate than the Avalon like loudspeakers because the curves.
The curves are progressive like in a car, that's awesome to achieve such result without mold or CNC...
While I like very much the sharp transition seen in Avalon loudspeakers, what is made with the Avior is much more pleasing (at least according my tastes) to look at. More elegant despite the massive object, it adds lightness 🙂
Also I see that the first front layer had been cutted with oval rounded shapes with a perfect symmetry (2D CNC or by hand?)
What is please the width difference of the top of the front baffle and the back of the front baffle ?
I'm sorry for too late reply, diyiggy..
I used a jigg in wood to make the symmetric round side wall. Internal frames also were used.
As you said, it's very difficult to make round curved side for me...
The first fron layer was cutted by hand only, not CNC.
- Home
- Loudspeakers
- Multi-Way
- Rockport (Avior2) styled 3way speaker DIY