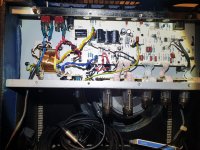
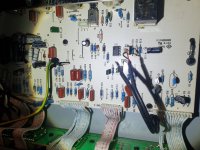
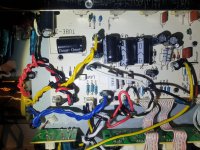
I have a SUBZERO 20R (BluesJR clone) and I recently started to take interest in "bettering it".
I just did a small lead dress for starters and it really helped get rid of a lot of noise!
I am now considering changing the cheap trashy condensors for some more suitable substitute.
Would this help give the tone some more sweetness and lower the noise even more?
I'm thinking of replacing all of the Black Changx but am not sure about the rest of the red ones...
Very greatful for any insight because im just getting into all this mod stuff 🙂)
Pictures:


Not easily answerable I'm afraid. I agree the name on those caps doesn't look to promising but having said that if they function as what they are marked then you won't see (hear) any difference. The red caps look to be film types (perhaps metalized polyester) and so almost certainly no point in changing those.Would this help give the tone some more sweetness and lower the noise even more?
Having said all of that the total cost of replacements for all those caps is buttons and so if you will get pleasure from swapping them then go ahead 🙂 Be sure to take pictures and make notes of what goes where and which way around the caps are fitted before removing any of them.
Big electrolytic caps. Single sided PC boards. NOT a good combination for considering DIY Mods unless you have a VERY light touch with the soldering iron.
It will take a lot of heat to get those caps desoldered (lots of thermal mass there). In my experience, high heat on a cheap single sided board means you stand a very good chance of lifting traces on the PC board.
And with all of that,I seriously doubt that those mods will make any audible difference...
The biggest difference it could make is if the caps were NFG. Cheap no name caps and high voltages don’t always mix, but any decent brand will likely last. It’s more about cheap fire insurance, not improving the sound.
Those aren’t really too big to unsolder easily. Larger snap-ins and 4-leggers, yeah you might wreck the board trying.
Those aren’t really too big to unsolder easily. Larger snap-ins and 4-leggers, yeah you might wreck the board trying.
I would spend some time tracing the board to verify, but I would guess those big electrolytics are the main filters in the power supply. Whether or not replacing them would improve the tone of the amp is an "It depends" situation.
If their actual capacitance is too low to be a good filter, replacing them with caps that do have enough capacitance to be in that location in the circuit should result in less ripple. High ripple from the power supply manifests as a hum or buzz that can be heard with no input. If the caps have a high enough capacitance value, this shouldn't be a problem.
The other possible effect of poor performance from the caps can come from them having a high Equivalent Series Resistance (ESR for short). High ESR will result in a voltage drop when high current is drawn from the power supply (when a strong signal is played into the amp when it is turned up loud). This voltage drop across the capacitor in high current conditions can cause it to get hotter than it might otherwise, causing the caps to wear out faster. The other effect this voltage drop can have is adding a degree of compression when the amp is played hard. Some players like this effect, making the amp feel squishy and more touch sensitive. Others do not. I could be wrong, but I suspect that if the amp does not have a bothersome hum or buzz when idle and run from a properly-grounded wall outlet, the caps do not have a high enough ESR to make the power supply sag when the amp is run loud.
I'm going to join the others in cautioning attempting to replace the caps.
If your goal is to improve the sound of the amp, I recommend taking some time to trace the circuit out, and then start asking questions about what you do and do not like about how the amp sounds or behaves when you play it. What do you want to change about its sound and feel? What do you want to stay the same? Once you can answer that question, that will point you in the the direction of mods that might help the amp get closer to what you want. Or it might point to a different amp entirely that better suits your needs/wants.
I have done this job before on similar units. You will get improved performance and reliability by using better grade parts. I use mouser/digikey, order the parts you need for the values and voltages ratings, keeping in mind the diameter/length of the parts that need to fit there. I don't always trust the ratings on the caps. I always measure the voltage across them to be sure and give a rated voltage headroom of 25% or more for the new parts.
The hardest part is flipping the PCB over to be able to de-solder the parts off the board. It can be a little tricky and intimidating the first time. Go slow and be gentle till you see how everything is released. You may have to release some wires to do it properly (note the locations and polarities before you do it! -- esp without a schematic). It is quite a bit of work to remove all the knobs and nuts from the pots of the front panel on these units. Some people will just tack the parts on from the top but its a hackjob then. There is adhesive that glues down the parts to the boards too... you need to loosen it with hot air (hairdryer sometimes works) the adhesive it there to reduce vibrations on the leads and its best practice to reapply RTV or a good silicon to the new ones in the same fashion. Good luck!
The hardest part is flipping the PCB over to be able to de-solder the parts off the board. It can be a little tricky and intimidating the first time. Go slow and be gentle till you see how everything is released. You may have to release some wires to do it properly (note the locations and polarities before you do it! -- esp without a schematic). It is quite a bit of work to remove all the knobs and nuts from the pots of the front panel on these units. Some people will just tack the parts on from the top but its a hackjob then. There is adhesive that glues down the parts to the boards too... you need to loosen it with hot air (hairdryer sometimes works) the adhesive it there to reduce vibrations on the leads and its best practice to reapply RTV or a good silicon to the new ones in the same fashion. Good luck!
- Home
- Live Sound
- Instruments and Amps
- Replacing Chinese Condensors in Tube Amp