I use spray contact glue 3M90. Just spray, wait for five minutes and
mount the veneer using a rubber roller. Much easier that pva glue and its dry in
just 15 minutes.
yes, but the downsides are no room for error on grain alignment, and possible incompatibility with solvent based finishing materials (stains / lacquers etc)
Here is a good site for DIY veneering.
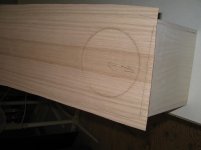
As long as you know what the end result will be you could scorch the wood . For a first timer I wouln't recommend it. Been there, done that, got the t-shirt (pun intended).
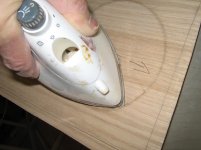
fair enough - but the degree of "scorching" I'm talking about is minimal, and with a little practice, you can even use the nose of the iron to pre-score the edges of cutouts on paper backed veneer, then trim out with sharp knife and 150 / 220 G sandpaper


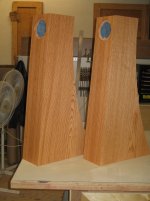
Hey Chris, those Frugals look great!
Is that fir veneer?
Best
Don
Oh, yes, the hot iron / glue combination works beautifully, no nasty contact cement fumes either!
Is that fir veneer?
Best
Don
Oh, yes, the hot iron / glue combination works beautifully, no nasty contact cement fumes either!
Hey Chris, those Frugals look great!
Is that fir veneer?
Best
Don
Oh, yes, the hot iron / glue combination works beautifully, no nasty contact cement fumes either!
thanks, Don:
flat sliced oak with Watco Fruitwood and satin wax finish - for our friend Cal
Ever used the iron on method for raw veneer? I have a bunch of birds eye maple. I've been trying with a caul and clamp with partial success on some trial pieces. Unsure how it's going to go on a larger piece.
I usually use the paperbacked veneer, but have also used the hot-iron method for the 'raw" variety.
In truth though, I haven't done much with the latter, just a couple of projects.
Best
Don
In truth though, I haven't done much with the latter, just a couple of projects.
Best
Don
Ever used the iron on method for raw veneer? I have a bunch of birds eye maple. I've been trying with a caul and clamp with partial success on some trial pieces. Unsure how it's going to go on a larger piece.
yes, but only smaller pieces myself (repairs to a disintegrated VPI turntable base) -
vacuum bagging or weighted cold-press (several layers of MDF cauls, and sandbags, barbells, whatever you can devise) would be my best guess for that
note that if you could attain a pure vacuum, bagging would deliver 1 atmosphere of pressure - that's 14.6bs psi at sea level or over 2,100 lbs per square foot - hard to approach with cold press and weights.
the biggest issues were chipping on cross grain trimming - it just takes an extra step with careful trimming with veneer saw and sanding block
I work with paper (not phenolic) backed veneers for a lot of reasons, the ease of iron-on process and trimming among them
Last edited:
I used 3M90 on my FH-3 with excelent result.
the best glue was that old hot glue made from animal hides or bones applied hot
but hard for a beginner. With hot glue you can apply heat and correct misstakes.
My dad was a carpenter making one off furniture with lots of inlays and he prefered the old school hot hide glue.
the best glue was that old hot glue made from animal hides or bones applied hot
but hard for a beginner. With hot glue you can apply heat and correct misstakes.
My dad was a carpenter making one off furniture with lots of inlays and he prefered the old school hot hide glue.
what type of finish did you use?I used 3M90 on my FH-3 with excelent result.
One of the reasons I'm trepidatious with solvent based contact cements (unless it says latex, it's likely still solvent carrier) is that our commercial millwork shop had exactly the issue I described above. A few years ago, solvent based stain & lacquer products applied on site by a separate finishing contractor caused de-lamination of paper backed sheet veneers on paneling. Finishing first and applying with contact cement after curing didn't seem to cause the same problem.
Haven't tried that yet, or the veneer only glues like Titebond, BetterBond, etc.the best glue was that old hot glue made from animal hides or bones applied hot
but hard for a beginner. With hot glue you can apply heat and correct misstakes.
My dad was a carpenter making one off furniture with lots of inlays and he prefered the old school hot hide glue.
that's 14.6bs psi at sea level or over 2,100 lbs per square foot - hard to approach with cold press and weights.
At work I have access to a press capable of over 200MPa (29,000psi) with a 8" diameter ram. Would that be enough?
Might give the cauls and cab some trouble 😱
I used an semi hard oil vax that i rubbed on. I always use oil or wax to keep
the wood natural.
I used to clue with pva before when i had a big hydraulic veneer press and did the veneering before building the boxes (on both sides).
I'll try the pva/heat method next weekend on my second pair of FH-3.
the wood natural.
I used to clue with pva before when i had a big hydraulic veneer press and did the veneering before building the boxes (on both sides).
I'll try the pva/heat method next weekend on my second pair of FH-3.
I used an semi hard oil vax that i rubbed on. I always use oil or wax to keep
the wood natural.
I used to clue with pva before when i had a big hydraulic veneer press and did the veneering before building the boxes (on both sides).
I'll try the pva/heat method next weekend on my second pair of FH-3.
after a few years DIYing, we all fall into habits of materials and construction techniques with which we're most comfortable - sometimes perhaps too much? so whether you're happiest with contact cement, yellow PVA or dried yak snot, it's the results that matter
enjoy
ichi is right, as i mentioned before just use super 90 from 3m and spray both surfaces well, let sit for a few seconds or until tacky not wet to touch, apply the veneer to the surface and use a firm putty knife or plastic squegee and work the veneer from top to bottom. let it dry for at least 24 hours before sanding, staining or sealing. you can leave excess venner over the edge and trim useing a staight edge/razor. the edges will look fine. just remember to turn the can upside down one time and give it a short squirt to keep the glue from drying the tip shut.
I just finished applying some Raw 1/42" Sapele veneer to some 3/8" BB.
I used contact cement and a J-Roller.
Follow the application directions on the can.
Pick up a bundle of paint stir sticks from Home Depot, if you buy the contact cement there you can grab a dozen and nobody will say anything.
Use the stir sticks to hold the veneer off the panel and rub your thumb up to the first stick.
Remove the first stick and continue to rub until the second stick.......rinse, lather and repeat.
After all the sticks are gone pull out the J-Roller and go to town.
It worked flawlessly on the first try.
I'm lucky to have a mentor that has been a professional cabinetmaker for 20 years.
He has shown me many tricks of the trade.
after a few years DIYing, we all fall into habits of materials and construction techniques with which we're most comfortable - sometimes perhaps too much? so whether you're happiest with contact cement, yellow PVA or dried yak snot, it's the results that matter
enjoy
Yes Chris, I totally agree with You. There will always be as many methods as builders. "Dried Yak snot" thet was a glue I missed 😉
Yes Chris, I totally agree with You. There will always be as many methods as builders. "Dried Yak snot" thet was a glue I missed 😉
limited availability - perhaps mountain goat or feral elk?
- Status
- Not open for further replies.
- Home
- Design & Build
- Construction Tips
- Putting veener on cabinets