I want to self contain mids with ridged cylinders that wont budge or ring locked in between baffles and rear wall with glue and screws.
I guess I could seal the cabinet this way and simply not plan to open it.
Or scrap the solid baffles even though I feel pretty set on using them, Id hate to have them crack if I glue them on.
I guess I could seal the cabinet this way and simply not plan to open it.
Or scrap the solid baffles even though I feel pretty set on using them, Id hate to have them crack if I glue them on.
I've used removable baffles for swapping drivers on a couple of different enclosure or open baffle designs for a few years now, and have found a simple technique.
- cut an opening on the enclosure panel(s) larger than the largest driver planned.
- fabricate removable baffles and bore holes to align with at least 4 threaded insert fittings on the enclosure panel(s) . Use T-nuts if you like, but I don't recommend them.
- apply a border of self adhesive closed cell foam weatherstripping or glazing tape around the enclosure openings. I usually run that outside the location of the threaded inserts.
The only downside to this approach is the exposed heads of the screws, but with either counter-boring - holes can be covered with self adhesive screw cover caps such as FastCap brand, or use of a low profile button or truss head machine screw, that can be minimized.
Whether or not the solid panels will crack, or warp beyond the ability of the fasteners to flatten out and properly seal to the enclosure, is a different story.
I dont have a problem with counter boring to flush heads even if the surface remains visible.
I had a Canadian site some years back that sells (sold?) what seemed like every type of nut bolt washer and obscure fastener system under the sun and an abundance of metals from steels to coppers to titaniums. If it had threads you could probably find it there unless it required some one off machining. It made places like brafasco look like toy stores. Would like to know if they are still in business. Even on occasions while not certain what would work best browsing there would get ideas rolling again.
I had a Canadian site some years back that sells (sold?) what seemed like every type of nut bolt washer and obscure fastener system under the sun and an abundance of metals from steels to coppers to titaniums. If it had threads you could probably find it there unless it required some one off machining. It made places like brafasco look like toy stores. Would like to know if they are still in business. Even on occasions while not certain what would work best browsing there would get ideas rolling again.
Last edited:
Fastenal, maybe
https://www.fastenal.com/
Or Fastener Force One?
Products | FastenerForce One Resources
Then there's Richelieu - good luck trying to navigate their most recently updated website.
https://www.richelieu.com/ca/en/category/screws-and-fasteners/1001246
https://www.fastenal.com/
Or Fastener Force One?
Products | FastenerForce One Resources
Then there's Richelieu - good luck trying to navigate their most recently updated website.
https://www.richelieu.com/ca/en/category/screws-and-fasteners/1001246
I came up with a system to make removable baffles that has worked well for me. Here is a link to it on the PE TT forum:
BaffleXchange cabinets
There are some new offerings for the cabinets now, but this technique is useful in general with any cabinet. I have installed and uninstalled these fasteners many, many times and if you are careful when you start to screw them in they never gall or bind.
BaffleXchange cabinets
There are some new offerings for the cabinets now, but this technique is useful in general with any cabinet. I have installed and uninstalled these fasteners many, many times and if you are careful when you start to screw them in they never gall or bind.
Fastenal, maybe
https://www.fastenal.com/
Or Fastener Force One?
Products | FastenerForce One Resources
Then there's Richelieu - good luck trying to navigate their most recently updated website.
https://www.richelieu.com/ca/en/category/screws-and-fasteners/1001246
Thanks I will check those.
I came up with a system to make removable baffles that has worked well for me. Here is a link to it on the PE TT forum:
BaffleXchange cabinets
There are some new offerings for the cabinets now, but this technique is useful in general with any cabinet. I have installed and uninstalled these fasteners many, many times and if you are careful when you start to screw them in they never gall or bind.
Again I will read more in, thank you. The system you used with allens and "hurricane" nuts crossed my mind. If I counter sink those they might not allow adequate room for movement, or I'm concerning myself a bit too much. Or it should be fine if I slot the anchor points inside.
I came up with another method of mounting anchors to inner side, only I will have to make the rear removable. Ill try not to forget the golden rule to -keep it simple stupid-.
Ive been collecting parts for some time to make that perfect speaker. Planned baffles are parts from an air loom. If baffles stay intact all the better and useful.
Last edited:
When you get " the perfect speaker" dialed in, will you grant us a short dissertation on the process and results, before retiring from active posting - because once you share that, what else is there left for you to accomplish? ")
All snark aside, please do share your journey - and remember, no photos / in room measurements and it never happened
All snark aside, please do share your journey - and remember, no photos / in room measurements and it never happened
Pardon me for stating the obvious, there is one possible drawback. The screws might go against your design esthetics. Other than that it's just extra work but that shouldn't matter since it's a labor of love.
And hey, prototypes are never perfect, that's why they're called prototypes, right?
And hey, prototypes are never perfect, that's why they're called prototypes, right?
The way I did it was with large pan-head bolts through the baffle into threaded inserts behind.
To make more than one set of baffles (I made two) the thing was to make sure there was a way of accurately reproducing the position and spacing of the holes on the duplicate set.
I made drilling jigs, secured the baffle in place with ratcheted straps, put the jig on and drilled small bore pilot (like 1/64 or 1/32") holes through the baffle and into the cabinet frame behind. Then finished drilling with the right sizes (in the frame for the inserts and in the baffle for the bolt and the countersink).
Attachments

There's not a lot to say really.
I was on the start of a 15" driver thing (Altec 605s then 604s and right now with 515s) and knew it would be harder to make a small box bigger than to make a big one smaller (by throwing something inside to eat the volume) so went for something kinda big. I've spent a lot of time in boats and just figured waves in air would move pretty much the same as waves in water so starting with the footprint (plan view) guestimated the angles for best rearward movement. There is zero science or technical calculation in its design, but lucky for me it seems to work pretty good. When people ask I usually say it's 10 cubic feet but honestly I've never measured it and don't really know for sure.
If you want measurements I can draw it up but it might be a few weeks before I can get to it.
PS Funny thing, the spell check hasn't yet heard of the word guestimate. Is this a Canuckyoidalismic expression? (Doesn't even have Canuck - Where's that at?)
When you get " the perfect speaker" dialed in, will you grant us a short dissertation on the process and results, before retiring from active posting - because once you share that, what else is there left for you to accomplish?
All snark aside, please do share your journey - and remember, no photos / in room measurements and it never happened
I hit another bump, my way of isolating mids has me rethinking things a little more. Same plan more or less but I may be better permanently fixing the front and going with a 1 1/2 ply front.
Would be happy to post process and findings. Aside from some iso housings for mid range I have not began construction. I'd like to finish a bass cannon Im working on.
The way I did it was with large pan-head bolts through the baffle into threaded inserts behind.
To make more than one set of baffles (I made two) the thing was to make sure there was a way of accurately reproducing the position and spacing of the holes on the duplicate set.
I made drilling jigs, secured the baffle in place with ratcheted straps, put the jig on and drilled small bore pilot (like 1/64 or 1/32") holes through the baffle and into the cabinet frame behind. Then finished drilling with the right sizes (in the frame for the inserts and in the baffle for the bolt and the countersink).
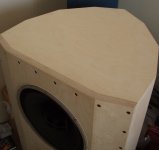
Those look perfect, beautiful work Hearinspace. With the cabinets fully assembled what are the final wall top and baffle thicknesses? Those look seriously over built.
Thanks for sharing.
It wasn't meant to be over-built so much as it was to be sure that it would be able to handle whatever driver(s) might get put into it. At the time, I was given the chance to work in a good wood shop and knew the opportunity wouldn't last forever. I figured it would be unfortunate if I ended up with a resonant cab I couldn't fix later so decided to build a sturdy cabinet that would work as a platform for trying stuff, yet not look like a perpetual kluge.
I don't remember why but I couldn't get 1" Baltic ply so laminated 3/4" (18mm) with 1/4" for a roughly 1" ply. The walls and baffle are made of that.
The top and bottom are double thickness of the straight 18mm ply.
There is extra framing around the opening to make it a better interface with the baffle.
The braces are cut from a single thickness of 18mm ply.
What in the photo might make it look like there's a rabbet around the inside of the opening is actually a small dado meant to take a silicone bead for tight seal but the fit was tight enough without it.
- Status
- This old topic is closed. If you want to reopen this topic, contact a moderator using the "Report Post" button.
- Home
- Loudspeakers
- Multi-Way
- pros and cons with removable baffles