You should put huge roundovers on the front of the cabinet to reduce diffraction effects. Perhaps you could get the front baffle CNC'ed and incorporate the waveguide?
If you get frustrated with diy, Adam Audio T7V is about 200€/piece https://www.adam-audio.com/en/t-series/t7v/
Tweeter has wider dispersion, which may be good or bad, depends on one's taste. BR port is on the backside. I like it.


Tweeter has wider dispersion, which may be good or bad, depends on one's taste. BR port is on the backside. I like it.
This is a softer variety of polyurethane that I have used. I have also had success with a less soft variety but I can't remember which one just now.
How easy was it to work with? I used the Skia 292i, and while it performed well, it was rather tough to spread with the fine toot trowel. While the Weicon was like butter.
It wasn't difficult to spread evenly. One thing I notice about polyurethane is it's very sticky. If you get it on your hands you'll have difficulty getting it off.
I had a thought today about how you might attach the front and rear baffles without an externally visible fastener.. I attached a basic mock-up of the cabinet and baffles, I'm still going to try and make the baffles removable
you could attach the front and rear baffle together with a threaded connection, such as a threaded rod, or a tunbuckle. With the woofer removed, you tighten the fitting, and the front and rear baffle are drawn together, clamp around the rest of the cabinet (sides, top/bottom) and squeeze the cabinet.
There may be other ways of achieving the same clamping force... a long bolt from one baffle to a captive nut in a flange on the second baffle...
You may find this useful, or not. 🙂
Attachments
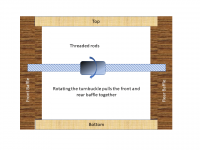

^Rods and the turnbuckle shoud have windings in oppposite direction to work!
I had a thought today about how you might attach the front and rear baffles without an externally visible fastener.
you could attach the front and rear baffle together with a threaded connection, such as a threaded rod, or a tunbuckle. With the woofer removed, you tighten the fitting, and the front and rear baffle are drawn together, clamp around the rest of the cabinet (sides, top/bottom) and squeeze the cabinet.
There may be other ways of achieving the same clamping force... a long bolt from one baffle to a captive nut in a flange on the second baffle...
You may find this useful, or not. 🙂
Now that is a hell of an idea! It reminds me a bit of the solution Dutch & Dutch uses in the 8c. I'm definitely going to explore these turnbuckles first, lets see if I can get my hands on some.
Just a small weekly update:
When I moved, I sold off my CNC so I have to either buy a new one or just pay a CNC service to do the chopping for me. The latter seems cleaner but that means measure twice, cut once.
I got in touch with some Chinese sources for vertical carbonized bamboo, as well as Plyboo, waiting to get some quotes for a test run of cabinets. In the meantime, I forgot IKEA has these bamboo cutting boards which are actually quite nice to cut and aren't horizontal garbage. They fit the dimensions of the "inner box" and are 3/4" thick. Does anyone have any experience with these, and would they be worth using as a CLD panel @augerpro ? I guess 3/4" bamboo outer layer + WEICON + 3/4" bamboo inner layer + CLD Bamboo Braces + Resonix? I guess my concern would be I'm now looking at 1.5" thick walls, which starts eating away at inner volume, and possibly not worth the effort.
I also swapped out the MiniDSP Flex for the 2x4HD since DSP is going to be the core for these speakers. This adds $270 back into the budget, which makes it easier to spend more on the cabinet. I also started thinking about the waveguide, which is where I'm thinking the most beautiful options are either cutting the waveguide into the walnut baffle like the Dutch Dutch 8c, OR I just make the standard 6.5" cutout for swappable tweeters. If I go the second route, it would be nice to have something like a metal waveguide made of copper or brass, but I'm not sure how that'd throw off the dispersion. But brass would look sexy on walnut...
Last thing I'm looking at is Class D amps, there's some audiophonics items that caught my eye.
RECAP:
Total cost so far dropped from $1720 to $1450 by swapping the Flex to the 2x4HD
Reached out to Plyboo and Chinese Bamboo Manufacturers
Looked at IKEA Bamboo boards as potential cabinet walls
Reached out to CNC services for baffle cutting and Waveguide making in metal or right in the wood
CLD panels don't require thickness to work. I use 1/2" and 1/4" for a nominal 3/4" thick panel, but with much lower resonances than a solid wood panel.
I use a Dayton audio KABD 4100 4x100w amp with DSP. it’s pretty dang good. I upgraded the wiring harness to a full 18 guage copper one and it made it sound really really good. Personally, I use both analog and active crossovers on my amp. I have the woofer crossover over with an Indictor with too high a frequency, and then I use the DSP to pull the cutoff back. I have the tweeter crossover over too low, and then I raise the cutoff with the DSP. This allows me to remove any noise from the amplifier with an analog crossover and have the adjustability of dsp.Recently saw the review for the Neumann KH 150s over on ASR and it impressed me with just how technically strong a 2 way can be with DSP implementation at its core, and it got me thinking, can a DIYer get to that level without spending MSRP of $3500 USD? I've seen the measurements for the March Audio Sointuva as a passive speaker, really elite, and that got me inspired to see if a DSP version of that can, in theory, match the KH 150 as a benchmark.
I'm going to treat this like an executable project, even if I don't go all the way and finish, which means deciding on parts, prices, cabinets, amps, DSP software, bracing, since all of that comes with the sticker price of the KH 150. We'll save the really hard part for later on, (measurements for the XO, in-room adjustments, near-field).
Some considerations, I think the KH 150s are all around solid, but I wouldn't call them beautiful per se. Beautiful to me is the Purifi 2 way Joachim Gerhard released a few years ago, see here: link. I really, really love walnut, so I'm immediately leaning towards a walnut baffle even though this might cause pains in the future for resonance. Another pain point, I'm thinking maybe I don't want to rebuild a cabinet every few years if I want to swap out drivers, maybe I like the idea of removing the baffle and driver swapping. This would be huge down the line for flexibility, and it means that in theory, I can do a sealed box, a passive radiator box, or a ported box in the future if I simply also swap the back baffle. So front and back removable walnut baffles, with Purifi at the core to start? Seems reasonable enough...
The next consideration is the tweeter, and this is where the budget of the DIY operation gets tough, since the Purifi woofers and passive radiators already are pushing $1300. I think it just makes sense to go with a waveguide based tweeter like the KH 150 and the Sointuva, helps with directivity, alignment, and I like the aesthetics. Thanks to the work of augerpro, there are some tweeters that are available with a WG, like the Bliesma 25 and 34 ($$$$$) but the tried and true DXT from the ASR Directiva also works.
I'm no CAD wizard but I quickly whipped up my idea of a beautiful walnut baffle, which used 3/4" roundovers, chamfered woofer cutout on the back, waveguide cutout on the front, holes for 5mm t-nuts on the back to mount to a sturdy box and allow the baffle to be removed and swapped down the line. The back will be identical except the cutouts will be sized for 2 Purifi passive radiators and four binding posts at the very bottom. Simple enough, nothing crazy, would like to use a CNC to machine to walnut since one of my hands is no longer working. Baffle is 220mm wide, 418mm tall, 20mm deep.
This leaves the issue of a box, which probably has me the most worried in Phase 1. I've been reading multiple threads here, reading up on somasonus, looking at what KEF, Ascend, do for their boxes and right now I'm leaning towards a 6 sixed box made of vertical 3 ply bamboo 20mm thick, primarily because of Ascend Acoustics, and using CLD KEF bracing for the interior. I have an idea of what that would look like in reality, but I'm drawing a blank on what kind of glue, acoustic damping, resonance combatting I'd need to do to deal with walnut baffles.
Step 1: Part Selection - $1450 spent/$2800 total budget
Woofer: Pair of Purifi 6.5" $860 (already owned)
Passive Radiators: 4 Purifi PRs $460 (2/4 owned)
Tweeters: Undecided + Waveguide
DSP: MiniDSP 2x4HD $225 (already owned)
Amplifier: Undecided Class D
Cabinet Materials: Black Walnut lumber, vertical carbonized bamboo ply, CLD damping
Step 2: Cabinet Making
Cabinet: 3-Ply Verticall Carbonized Bamboo 30mm "Box"
Baffles: 25mm Black Walnut Lumber with Rubio Monocoat Finish
Bracing: Augerpro CLD 90% Overlap with Weicon Adhesive, Resonix applied to inner Panels
Miter: Traditional 45 degree, perhaps with 6.35mm Roundover on edges
Removable Baffles via Bamboo L-bracket glued to rear of baffle and then screwed into panel of bamboo via driver holes?
View attachment 1128032
View attachment 1125380
As of right now, it's actually the "inner cabinet" that has me the most worried. With the front and back walnut portions being removable, I can swap them in the future if need be, but I need to make the inner core be the foundation and be the permanent structure going forward. I am not sure if the bamboo is a good idea, I'm not sure how much it'll cost, and I'm not sure how to brace and damp it. Being one-handed, these issues need to be ironed out before getting too far ahead, since I can't really go into a workshop and experiment myself anymore. The DIYers here have been doing this for years, please chime in while the passive radiators are on order, tweeter selection is still up for grabs too.
I can always say eff it and sell the drivers I do have and just buy the KH 150's, but I'd like to give this a shot.
I HAVE A CNC AND I CAN CUT YOUR SPEAKERS FOR YOU. PM ME.
Last edited:
Funny you should mention PlyBoo! (Please note, everyone, "PlyBoo" is not a generic term; it is the trademark of one particular supplier!)Bamboo plywood comes in a huge range of quality, so you can get crap MDF, crap, plywood, crap bamboo. And really good.
Stranded/fossilized bamboo ply is a very good speaker building material. Really stiff & hard. No need for any veneers just a bit more care with joinery.
We used plyboo.
dave
RICHLITE has a product that is PlyBoo core and Richlite faces (Richlite Stratum Bamboo).
I used it in the pictured design (Roxy Deluxe) on the theory that the phenolic-resin cladding will have at least some CLD effect.
Then of course I had to buy two teaspoons of gemstone-quality powdered Amber dissolved in Poppyseed Oil as a varnish colorant ($184). Then I hired a Gold-Medal-winning violin maker to apply seven coats of hand-rubbed Amber Violin Varnish to the perimeter of the front panel. Fortunately, this was in the summer, so the varnish could dry in the sun. A very nice look with the Audax tweeter.
I am not rich, I am just cray-cray like a Honey Badger.
BTW, Winslow Burhoe, a good friend and the inventor of the inverted-dome tweeter, loved the Audax tweeter, he told me it was a "winner." I'd like to think the over-the-top front panel had something to do with that!
Oh, yeah, CLD pads on the inside from New England Soundproofing, and Mongolian Longhair Cashmere Sheepswool stuffing, Cardas internal wiring. Cryogenically treated crossover.
The CF woofer is from MISCO/Bold North Audio--built like a hand grenade!
all my best,
john
Attachments

so maybe the best way moving forward in my case is to use 1/2” vertical carbonized bamboo panels in a CLD array, since I’m not sure if I can source good bamboo thinner than 1/2”. Then CLD brace with leftover bamboo piecesCLD panels don't require thickness to work. I use 1/2" and 1/4" for a nominal 3/4" thick panel, but with much lower resonances than a solid wood panel.
You can get 3mm veneers… the outer ply of the stranded plywood but all by itself.
dave
Hey Dave, in your experience is it worth going down the CLD route with stranded plywood
I believe that one can build an enclosure more easily that does just as well.
I might use CLD for specific instances (ie something squishy between the top and a chunck of rock on top of my subwoofers, but i would not take the unneeded effort to do an entire enclosure.
dave
I might use CLD for specific instances (ie something squishy between the top and a chunck of rock on top of my subwoofers, but i would not take the unneeded effort to do an entire enclosure.
dave
Dave likes the way he's been doing things for the last 20 years. Even when the data contradicts it.

I would consider making my own plywood out of those bamboo veneers. 15mm should be sufficient, 2 more plies to 21mm would be overkill.
dave
dave
As you can imagine, there are multiple strategies/philosophies pertaining to the cabinet structural design. In other words, the wall stiffness, wall density, bracing, structural damping, construction methods used to minimize the negative sonic impact of structural resonances in the cabinet.
What @augerpro is alluding to is a fundamental philosophical divergence between the two main strategies employed today in DIY and in (sometimes) high end commercial speakers. Augerpro is a proponent of constrained layer damping, with the goal of reducing the magnitude of the resonance by damping (i.e. absorbing) the structural energy. @planet10 is a proponent of the high stiffness approach, with the goal of driving resonances higher in frequency and higher in Q, such that they become less audible, and statistically less likely to be energized by the musical signal. There is evidence supporting both strategies, but there is not compelling evidence that either method is fundamentally flawed, or that one method is superior to the other. There are outstanding examples of speakers designed with each strategy, so obviously both methods can work very well.
It would be a mistake to think that you can easily combine elements of the two strategies. If you choose the CLD approach, then follow Augerpro's guidelines all the way.
If you choose a high stiffness approach, then use a proper bracing strategy and be cautious about haphazardly adding damping, which may only move the resonances down in frequency without making them less audible.
In my opinion, the high stiffness approach is a reliable way to get a cabinet with a low sonic signature... BUT, it is a complicated construction project, with many bulkhead braces which intersect each other. If you have ever seen a matrix-style cabinet bracing, this is what you are aiming for with this approach. It requires a lot of machining operations and a lot of woodworking skill. I have used this method on my last several projects, but that does not mean I believe it is the best method, and I have not yet decided how I am going to design my future project.
Augerpro has developed a set of guidelines which allow us to make an effective CLD cabinet. Before his research, we were really just guessing at what might work with damping and CLD, and copying what a few commercial builders were doing. Now he has shown a method which is pretty simple and uncomplicated.
So the choice is yours. Either method can lead to a low sonic signature cabinet. Both methods have been used to make excellent speakers.
If you want more information on implementing the high stiffness approach, I can offer some guidance, and Planet10 has been doing it for a long time as well.
j.
Dave likes the way he's been doing things for the last 20 years. Even when the data contradicts it.
What @augerpro is alluding to is a fundamental philosophical divergence between the two main strategies employed today in DIY and in (sometimes) high end commercial speakers. Augerpro is a proponent of constrained layer damping, with the goal of reducing the magnitude of the resonance by damping (i.e. absorbing) the structural energy. @planet10 is a proponent of the high stiffness approach, with the goal of driving resonances higher in frequency and higher in Q, such that they become less audible, and statistically less likely to be energized by the musical signal. There is evidence supporting both strategies, but there is not compelling evidence that either method is fundamentally flawed, or that one method is superior to the other. There are outstanding examples of speakers designed with each strategy, so obviously both methods can work very well.
It would be a mistake to think that you can easily combine elements of the two strategies. If you choose the CLD approach, then follow Augerpro's guidelines all the way.
If you choose a high stiffness approach, then use a proper bracing strategy and be cautious about haphazardly adding damping, which may only move the resonances down in frequency without making them less audible.
In my opinion, the high stiffness approach is a reliable way to get a cabinet with a low sonic signature... BUT, it is a complicated construction project, with many bulkhead braces which intersect each other. If you have ever seen a matrix-style cabinet bracing, this is what you are aiming for with this approach. It requires a lot of machining operations and a lot of woodworking skill. I have used this method on my last several projects, but that does not mean I believe it is the best method, and I have not yet decided how I am going to design my future project.
Augerpro has developed a set of guidelines which allow us to make an effective CLD cabinet. Before his research, we were really just guessing at what might work with damping and CLD, and copying what a few commercial builders were doing. Now he has shown a method which is pretty simple and uncomplicated.
So the choice is yours. Either method can lead to a low sonic signature cabinet. Both methods have been used to make excellent speakers.
If you want more information on implementing the high stiffness approach, I can offer some guidance, and Planet10 has been doing it for a long time as well.
j.
Dr Geddes tends to indicate bracing, stiffness and damping are good when done well at the same time.
In theory I can't see this, perhaps you mean something that only happens in practice?be cautious about haphazardly adding damping, which may only move the resonances down in frequency without making them less audible.
In theory, damping, stiffness, and mass are all independent variables that can be played with... in practice, everything has mass, stiffness, and damping, so they are not independent.
When we add plywood bracing, we are adding stiffness, but also mass and the small amount of internal damping that plywood has. if the bracing is designed right, the stiffness of the bracing more than offsets the added mass, and the resonance frequency goes up.
When we add damping, we are also adding mass, and this drives the resonance frequency of the structure down. This is what I was getting at in my statement.
- Home
- Loudspeakers
- Multi-Way
- Project: Can I get close to Neumann KH 150 without dropping $3.5K