To work with the Apple remote, the IR receiver will need to be changed from the 36kHz one needed for RC5 to a 38kHz version to match the IR frequency sent by the Apple remotes. The rest will involve removing the RC5 library currently used and replacing it with this one. This entailsIRremote
https://github.com/Arduino-IRremote/Arduino-IRremote?tab=readme-ov-file#supported-ir-protocols
It says it can handle the modified NEC protocol that Apple uses
- deleting https://github.com/guyc/RC5 from the lib_deps section in platform.ini and replacing it with the address for your new library.
- there may also be some changes to definitions of the device pin expected by your new IRremote library to match pins currently used.
- replacing #include <RC5.h> in main.cpp with a new #included declaration to match your new library
- rewriting/renaming the RC5update() subroutine to align with commands available from the Apple handset.
Last edited:
To set this, change the -447 value in the current routines to -360 (as in 4 x -90)The -90dB minimum volume would be sufficient.

Is it possible to use two remote controls/libraries in parallel in the program? Because I found a remote control in the desktop drawer that can control the Mute/Volume+/Volume- functions in the current state of the software. With 38kHz IR receiver 😉😀To work with the Apple remote, the IR receiver will need to be changed from the 36kHz one needed for RC5 to a 38kHz version to match the IR frequency sent by the Apple remotes. The rest will involve removing the RC5 library currently used and replacing it with this one. This entails
I don't currently have an Apple handset and no experience of its command set. Have a look through the examples within the new library and look up info on the commands sent from the Apple remote handset.
- deleting https://github.com/guyc/RC5 from the lib_deps section in platform.ini and replacing it with the address for your new library.
- there may also be some changes to definitions of the device pin expected by your new IRremote library to match pins currently used.
- replacing #include <RC5.h> in main.cpp with a new #included declaration to match your new library
- rewriting/renaming the RC5update() subroutine to align with commands available from the Apple handset.
Two quick questionsBecause I found a remote control in the desktop drawer that can control the Mute/Volume+/Volume- functions in the current state of the software. With 38kHz IR receiver 😉😀
- What functions do you need / want besides mute vol up/down (e.g. source 1, source 2, display on/off)?
- What other buttons are available for use on the remote that you found in the drawer?
Yes, it is but if you have available buttons on your remote control from the desktop drawer, we may easily repurpose them to give you what additional functions you need.Is it possible to use two remote controls/libraries in parallel in the program?
Have a look at the example within the RC5 library to see how you can find out what codes are sent for each button on your remote.
Also have a look at the info within Wikipedia's RC5 page and Guy Carpenters explanation of the RC5 protocol
Last edited:
The +/-/Mute button works properly for volume control. I can switch between these two inputs by alternately pressing Phono and CD. The controller does not respond to any other buttons. I would like to be able to select the other inputs. A display on/off would also be great.Two quick questions
- What functions do you need / want besides mute vol up/down (e.g. source 1, source 2, display on/off)?
- What other buttons are available for use on the remote that you found in the drawer?
Are there any other functions currently available on the controller?
Attachments
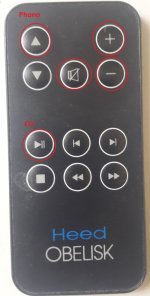
Load the attached contents of the attached zip file into a new folder (call it ESPRemoteTest) within the PlatformIO /Projects folder on your PC. Temporarily upload this to your ESP32 setup. It will enable you to press each button on your Heed remote and note down the address and command that is generated. These will (should be) displayed on the TFT screen. They will also be available via the serial monitor in Platform IO (available on the bottom toolbar of PlatformIO.The +/-/Mute button works properly for volume control. I can switch between these two inputs by alternately pressing Phono and CD. The controller does not respond to any other buttons. I would like to be able to select the other inputs. A display on/off would also be great.
Are there any other functions currently available on the controller?
Once we know the address/command for each of the buttons on your remote, we can rewrite the relevant bits of the RC5Update() routine to suit your controller and what commands you want to have.
Attachments
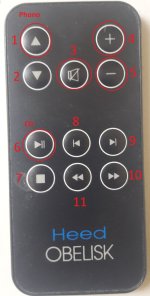
The codes (B=button)
B1= a:16 c:1 t:1 or t:0
B2= a:16 c:0 t:1 or t:0
B3= a:16 c:13 t:1 or t:0
B4= a:16 c:16 t:1 or t:0
B5= a:16 c:17 t:1 or t:0
B6= a:20 c:53 t:1 or t:0
B7= a:20 c:54 t:1 or t:0
B8= a:20 c:33 t:1 or t:0
B9= a:20 c:32 t:1 or t:0
B10= a:20 c:52 t:1 or t:0
B11= a:20 c:50 t:1 or t:0
When the same button is pressed consecutively, the value of "t" changes between 0 and 1, the values of "a" and "b" are always the same.
Attachments
Great info!
Now put together a list of what you need in the way of actions, e.g.
Now put together a list of what you need in the way of actions, e.g.
- Vol +
- Vol -
- Mute/Unmute
- Display on/off
- Source 1, 2, 3, etc. (and what names you want for each source
In source selection, could the Up(1)/Down(2) button be used to step the inputs or is there a dedicated button for each input?Great info!
Now put together a list of what you need in the way of actions, e.g.
- Vol + 4
- Vol - 5
- Mute/Unmute 3
- Display on/off 7
- Source 1, 2, 3, etc. (and what names you want for each source
Deenoo:
I've gone through the RC5Update() routine within main.cpp and amended it to align with your requested button functions. The attached zip file contains that amended controller coding. Create a new folder within the PlatformIO/Projects folder. I suggest you call it DeenooMuses Then extract the attached zip file into it. If you upload this to your ESP32 that's controlling your Putzeys/MUSE72323 board, you should achieve your requested set of functions.
Be aware that if you have a CD player that responds to the Heed Obelisk remote handset, pressing the button you requested as a display on/off will stop any cd that may be playing.
Attachments
To help you understand what the decoded data means - a:16 - Address 16 is for amplifiers, a:20 - Address 20 is for CD players. The t:1 or t:0 (toggle0 or toggle1) relate to whether a button is being held down or a new button has been pressed.The codes (B=button)
B1= a:16 c:1 t:1 or t:0
B2= a:16 c:0 t:1 or t:0
B3= a:16 c:13 t:1 or t:0
B4= a:16 c:16 t:1 or t:0
B5= a:16 c:17 t:1 or t:0
B6= a:20 c:53 t:1 or t:0
B7= a:20 c:54 t:1 or t:0
B8= a:20 c:33 t:1 or t:0
B9= a:20 c:32 t:1 or t:0
B10= a:20 c:52 t:1 or t:0
B11= a:20 c:50 t:1 or t:0
For amplifiers (a:16)
- commands 0 -9 correspond to digits 0 to 9
- command 13 corresponds to Mute/De-mute
- command 16 corresponds to Volume increase
- command 17 corresponds to Volume decrease
- command 53 corresponds to Play
- command 54 corresponds to Stop
- command 33 corresponds to Previous
- command 32 corresponds to Next
- command 52 corresponds to Fast forward
- command 50 corresponds to Rewind/reverse
- In the coding, it enables simple verification of what the user wants from a button press and enable correct functionality for short button press and button held down. Examples are as below
- Holding down a Vol+ or Vol- button will allow the volume setting to be smoothly increased or decreased while the button is held down.
- For Mute/de-mute, holding down the button will only toggle the mute on or off once, not continuously flip back and forth between muted and original volume.
Last edited:
The remote control works perfectly! 😀
I can now make adjustments (1dB volume step etc.) to the program to suit my own tastes.
Thank you very much Geoff!
I can now make adjustments (1dB volume step etc.) to the program to suit my own tastes.
Thank you very much Geoff!
When muting (MUTED) is switched off, a character trash remains on the display in the range 0-9dB. Can this be removed? Thank you!Deenoo:
I've gone through the RC5Update() routine within main.cpp and amended it to align with your requested button functions. The attached zip file contains that amended controller coding. Create a new folder within the PlatformIO/Projects folder. I suggest you call it DeenooMuses Then extract the attached zip file into it. If you upload this to your ESP32 that's controlling your Putzeys/MUSE72323 board, you should achieve your requested set of functions.
Be aware that if you have a CD player that responds to the Heed Obelisk remote handset, pressing the button you requested as a display on/off will stop any cd that may be playing.
Attachments
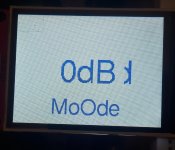
Yes. Simply add an extra space character into the line shown below of the setVolume() routineWhen muting (MUTED) is switched off, a character trash remains on the display in the range 0-9dB. Can this be removed? Thank you!
sprintf(buffer1, " %.2fdB ", atten);
This will then overwrite the leftover partial character from the "Muted" line.You might take the opportunity to adjust your MoOde string too 🙂
The library currently in use to control the MUSES72323 volume controller doesn't include a routine for adjusting the gain section (there is only a non-functional placeholder). This library, originally created by Christoffer Hjalmarsson, has now been modified. Changes include:
- Increase clock speed to align with MUSES72323 data sheet of 1MHz (- 200KHz margin)
- Amendment of volume_to_attenuation routine to align with MUSES72323 settings
- Implement setGain function to provide option to adjust gain section between 0dB and +21dB in 3dB steps
Do I simply overwrite the Muses73323 directory in the program with the new one?The library currently in use to control the MUSES72323 volume controller doesn't include a routine for adjusting the gain section (there is only a non-functional placeholder). This library, originally created by Christoffer Hjalmarsson, has now been modified. Changes include:
This updated library is now available here MUSES72323 Library
- Increase clock speed to align with MUSES72323 data sheet of 1MHz (- 200KHz margin)
- Amendment of volume_to_attenuation routine to align with MUSES72323 settings
- Implement setGain function to provide option to adjust gain section between 0dB and +21dB in 3dB steps
Easiest way isDo I simply overwrite the Muses73323 directory in the program with the new one?
- Delete Muses72323 directory from Library folder of the program
- Add " https://github.com/GeoffWebster/Muses72323" to lib_deps = section of Platformio.ini
Hi,
I've been following the original thread and thought that perhaps my display module would fit nicely as control + display board for MUSES72323:
https://www.diyaudio.com/community/threads/front-panel-vfd-and-control-knobs-modules.416868/
There is an STM32 mcu and all the necessary signals are routed to 12 pin header, such as:
1. SPI (this is what needed to control MUSES)
2. STM32 programming pins
3. UART, I2C - these can be used as GPIOs to select inputs, for example.
I'm using U8G2 library to draw things on display and there is a lot of support material for it, even code generators like lopaka.app.
The source can be published on my github, no issue here.
So far I've been using it with encoder to control relay attenuator. I do not have MUSES chip yet for experiments but perhaps someone would be interested in big VFD for such project.
Attachments

- Home
- Source & Line
- Analog Line Level
- Programming and Coding for Putzeys Balanced Preamplifier with MUSES72323 Volume