The laserbeam has a little error, caused bij the mirror, when print it do vertical a little
out of line, and when I do then print a artwork in mirror with eagle, this error will then be doubled, when I print without mirror the artwork I have no problem, it fits precisely.
so the laserprinter has to be corrected, maybe this is possible with some but not mine samsung ML-2165
Just now it is LITTLE out of line bet get more worse when double sided pcb,s are bigger.
regards
kees
the laserprinter does not know that you mirrored something in Eagle or anywhere else, for it all printing jobs are the same.so the laserprinter has to be corrected
You can not blame the printer for that.
the laserprinter does not know that you mirrored something in Eagle or anywhere else, for it all printing jobs are the same.
You can not blame the printer for that.
No that is right, but it makes not precice squares when on is mirrored, I do now a time ago a brother did also, and the bigger the pcb how more the error is.
so when a printer prints a square and it is not precise a mirror artwork wil amplify that.
I go try some more tonight.
regards
kees
Last edited:
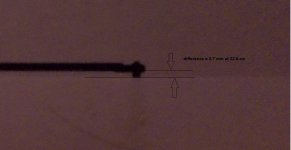
I have print a square over the whole length of the page, now you can see what happens, if I now mirror one I get two x 1.8 mm difference, to much for the pads I will say, and I hope that the quarter falls now.
A possibility to correct this error like in inktjet will help.
picture is Two surfaces perpendicular to each other.
regards
kees
A possibility to correct this error like in inktjet will help.
picture is Two surfaces perpendicular to each other.
regards
kees
Attachments
Last edited:
Hi All
After receiving the inkjet transparant sheets I did try some prints with it, an go make a film, with overlighting.
I think print yellow and black together with help block uv even when you can se through a little who wil be always the problem, maybe I have to tweet Epson smile at them, say how great there company is but that I mis a good inkjet for making transparants for pcb making, to make happy diy people who in my opinion are very important in this technical world, so take care of them.
Oke after this I let see some prints and later on I go further with uv expose.
Pictures look some low res but this is not the case, it is photocamera who is low res. Photo one is only black, photo two is photo best settings, I have to fool this printer in print transparanties, I do not understand why epson have done this I can not print transparanties thing.
regards
kees
Attachments


Last edited:
I've settled on printing to a TIFF file at 600 DPI, since I have a 600 DPI printer. This allows me to avoid things like anti-aliased lines and the like, which would make normal PostScript text print nicely, but which would reduce the contrast and resolution that make toner transfer clean with small traces. A bitmap also makes it hard to shrink or stretch without obvious artifacts.
I'm using commercial software, but it works: Eagle Pro board window, set to show only layer 1 as black traces, exported to a 600 DPI monochrome file, flipped and composited in Photoshop, and printed to an HP LaserJet M401n. I've never tried double sided, mostly because I do 100% SMT and don't want to bother with drill holes for breadboard PCBs. For anything like that, I send it out, but toner transfer is still great for working up a sub-circuit in a few hours.
Best of luck!
I have try the inkjet, and it give good results in a quick way, using the photo print setting and ORIGINAL (important) ink it is very black.
I have use positive film light it over and stil did work, so inkjet ink do block uv, if printed in photo setting.
I have a HP 4100TC printer also I can try and a samsung ml-2165.
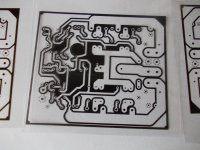
PCB traces are damaged because of it was not clean board, just a test if it did develop.
regards and thanks for advise.
kees
I have use positive film light it over and stil did work, so inkjet ink do block uv, if printed in photo setting.
I have a HP 4100TC printer also I can try and a samsung ml-2165.
PCB traces are damaged because of it was not clean board, just a test if it did develop.
regards and thanks for advise.
kees
Attachments
So, that transfer looks sorta creepy... the bottom edge looks really warped! While I don't attempt double sided alignment, my straight lines are far straighter than yours.
Either your toner 'carrier' paper slips when you laminate it to the un-etched circuit board, or your printer has massive registration problems? Not sure which, but my low end LaserJet M401n does far far better. Maybe play with the paper thickness settings in the control panel for the printer?
Or, just get happy with single sided PCBs?? ;-)
So, that transfer looks sorta creepy... the bottom edge looks really warped! While I don't attempt double sided alignment, my straight lines are far straighter than yours.
Either your toner 'carrier' paper slips when you laminate it to the un-etched circuit board, or your printer has massive registration problems? Not sure which, but my low end LaserJet M401n does far far better. Maybe play with the paper thickness settings in the control panel for the printer?
Or, just get happy with single sided PCBs?? ;-)
No No this transfers work very good, only I have overlighted on purpose to see if it then not shine through the ink, it do block for sime extense, better then laser, but need to do photosetting, I do not toner transfer because I use double sided for most project to get it small, and sometimes I need short connections etc. .
Some traces get loose because of not clean board good enough, and I have let it 30 minutes in develop solution to get try that hard way.
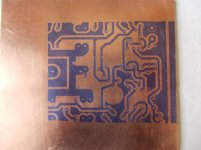
I go now do the good one, I let it see here later on.
And the picture of these artwork is taken with a camera, these are never so sharp to let see artwork properly, she are on max resolution of the printer and that is 2400 dpi. I use postcript also.
Last edited:
here you can see how I did it.
I did not use toner or ink, just negative dry film who work well when done
the proper way, thus clean board very toroughly
https://www.youtube.com/watch?v=cRCFGZxmob0
regards
I did not use toner or ink, just negative dry film who work well when done
the proper way, thus clean board very toroughly
https://www.youtube.com/watch?v=cRCFGZxmob0
regards
make bottom copper negative and positive mirror pdf from eagle
Hi all,
dont know if its the right thread, but here it goes.
I just wanted to share a simple and accurate method to generate negative mirror and positive mirror of bottom copper layer from eagle files for home etching. I have attached the cam job. when you run it, it will create postscript files in the same folder as that of your eagle files.
once the files are generated, you can import the ps files in corel and remove objects whatever you dont need (which are outside the dimension layer).
the border (dimension layer) of negative mirror will be white. hence place the frame (postscript with dimension layer) on it.
Confirm the sizes.
Another way of checking is to place pos and neg on top of each other, you should get all black area except the holes (because they are exported as white filled objects in the positive).
export as pdf and you are ready to etch.
I use this method to generate negative mirror directly for photo resist etching.
reg
prasi
Attachments
Hi All,
I may very soon be in need of a laser printer that prints PCB layouts in very high quality onto overhead film. These films are to be used with a UVA light source & subsequent etching.
Any firm recommendations for a laser printer that prints in HQ and sufficiently "dark" for this purpose? I've previously tried various laser printers but some print with "stripes", others may have tiny white dots or the like ...
I'm hoping to find a table-top size printer that will accomplish this.
Thanks for sharing any experiences & suggestions ;-)
Jesper
you could print two and place one on top of another for exposing to uv light. that way you get a very dark image. i have been using this technique for photo-resist etching.Hi All,
I may very soon be in need of a laser printer that prints PCB layouts in very high quality onto overhead film. These films are to be used with a UVA light source & subsequent etching.
Any firm recommendations for a laser printer that prints in HQ and sufficiently "dark" for this purpose? I've previously tried various laser printers but some print with "stripes", others may have tiny white dots or the like ...
I'm hoping to find a table-top size printer that will accomplish this.
Thanks for sharing any experiences & suggestions ;-)
Jesper
reg
prasi
Hi prasi,
Thanks for the tip - as it is I was just about to post once again because I've spoken with megauk.com about this and they say that their best quality prints actually are made with inkjet printers 🙄 using canon proper inks. And since I already have a Canon inkjet printer I think I will try this first.
Yet in case this doesn't work out I'll keep your tip in mind.
Cheers,
Jesper
Hi prasi,
Thanks for the tip - as it is I was just about to post once again because I've spoken with megauk.com about this and they say that their best quality prints actually are made with inkjet printers 🙄 using canon proper inks. And since I already have a Canon inkjet printer I think I will try this first.
Yet in case this doesn't work out I'll keep your tip in mind.
Cheers,
Jesper
Hi Jesper,
You are most welcome. Here is a video of the method and materials I use.
https://www.youtube.com/watch?v=cRCFGZxmob0
regards
Prasi
- Status
- Not open for further replies.
- Home
- Design & Build
- Construction Tips
- Printing PCB film on a laserprinter.