Hello everybody,
I’m new to this forum but so far I have enjoyed it a lot while browsing around what not. I posted my project description in the “Introduction” section but have now decided to move it here, feels more suitable. Since I have never wired and have never been involved with electronics at this level, I will appreciate every tip regarding the wiring, of course regarding the res too.
It’s time to describe my project more in details, if anyone is interested 🙂
The idea is to build a boombox, with speakers that I had laying around. I have 1 Technics 10” sub and a Harman kardon soundbar with a fried circuit (total of 4 mids. and 2 disc. on the soundbar). According to the technical specification, the soundbar should have 25Wx2 in total and the sub around 50W. The speakers (except the sub) are prewired to a circuit. The layout is not decided yet but I’ll bear in mind that the mids. and disc. should have their own isolated compartments from the sub. I have not tested it myself but I have read that it results in better sound.
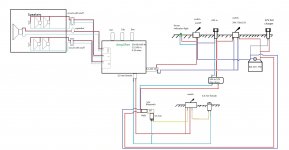
I have drawn a connection diagram for the wires but since I have never done wiring diagrams I hope you don’t lough to much at potential mistakes and screw-ups. I will post It below, attached!
My idea of the functions, switches and indicators:
- On/off switch
- Power indicator led
- 3.5 mm female jack
- Bluetooth
- A switch to select between them and cut the power to the Bluetooth at the same time when 3,5 mm female jack is selected.
- 24V jack (so I can play from the plug then at home). Maybe a step down to the Bluetooth so it doesn’t get fried. It takes 12V. The amp manages 12-24 V so no problems there.
- 12V 7Ah led acid battery
- Small voltmeter display
- 12V jack for the battery charger (don’t want to take out the battery for charging)
- Switch between 24V plug and battery.
The amplifier is a TPA3116-D2. I have tested it out today, wiring only the essential parts to obtain sound such as 24v power supply, 3,5 mm audio in and the speakers. It worked great although the base sounded shitty when it was not inside I closed compartment.
The next step:
- Assemble the box, compartments, battery holder etc.
- Decide where to have the switches and amp knobs (top or front) and the input jacks.
- Wire, solder, connect the parts
- Envelope in a fake brown leather sheet for esthetical reasons
- Fix handle, belt, stands (feet)
I’ll be glad to hear your comments, opinions and laughs.
Tale care and have a good day!
I’m new to this forum but so far I have enjoyed it a lot while browsing around what not. I posted my project description in the “Introduction” section but have now decided to move it here, feels more suitable. Since I have never wired and have never been involved with electronics at this level, I will appreciate every tip regarding the wiring, of course regarding the res too.
It’s time to describe my project more in details, if anyone is interested 🙂
The idea is to build a boombox, with speakers that I had laying around. I have 1 Technics 10” sub and a Harman kardon soundbar with a fried circuit (total of 4 mids. and 2 disc. on the soundbar). According to the technical specification, the soundbar should have 25Wx2 in total and the sub around 50W. The speakers (except the sub) are prewired to a circuit. The layout is not decided yet but I’ll bear in mind that the mids. and disc. should have their own isolated compartments from the sub. I have not tested it myself but I have read that it results in better sound.
I have drawn a connection diagram for the wires but since I have never done wiring diagrams I hope you don’t lough to much at potential mistakes and screw-ups. I will post It below, attached!
My idea of the functions, switches and indicators:
- On/off switch
- Power indicator led
- 3.5 mm female jack
- Bluetooth
- A switch to select between them and cut the power to the Bluetooth at the same time when 3,5 mm female jack is selected.
- 24V jack (so I can play from the plug then at home). Maybe a step down to the Bluetooth so it doesn’t get fried. It takes 12V. The amp manages 12-24 V so no problems there.
- 12V 7Ah led acid battery
- Small voltmeter display
- 12V jack for the battery charger (don’t want to take out the battery for charging)
- Switch between 24V plug and battery.
The amplifier is a TPA3116-D2. I have tested it out today, wiring only the essential parts to obtain sound such as 24v power supply, 3,5 mm audio in and the speakers. It worked great although the base sounded shitty when it was not inside I closed compartment.
The next step:
- Assemble the box, compartments, battery holder etc.
- Decide where to have the switches and amp knobs (top or front) and the input jacks.
- Wire, solder, connect the parts
- Envelope in a fake brown leather sheet for esthetical reasons
- Fix handle, belt, stands (feet)
I’ll be glad to hear your comments, opinions and laughs.
Tale care and have a good day!
Attachments
Hello,
Time for an update. Mainly wiring related.
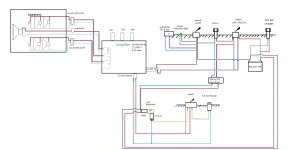
It seems that every time I sit down to overview the chart, I stumble upon multiple dilemmas and challenges. What I want and what it will do are not in line, and that’s frustrating.
So here is one of my dilemmas. It’s related to the switching of Bluetooth.
What I want:
- To power on Bluetooth when the Bluetooth switch is selected. It should also select the Bluetooth audio connection for the amp. This regardless of the type of power supply (24v or 12 v, aka at home or outside). Switch connection to 3,5mm female jack should power off the Bluetooth and relocate the audio connection to the amp.
- The battery should charge (then charger is connected) regardless of the status of the main power switch. They should not be connected.
- The power indication led to work with both 24v (when supplied) and 12v when supplied. I have not drawn resistors but I am aware of their necessity. The voltmeter on the other hand will manage the volts.
- It looks like I will be charging my battery when the 24 DC power supply is connected, via the step-down, or am I wrong? Don’t know if that’s good for the battery. It is not my intention anyway. I have to solve this.
I think I can simplify a lot by using a switch DPDT? that performs 2 tasks at 1 click(direction) and 2 tasks at the oposit. I have not integrated this into the chart yet. Must read more about it first.
I will upload the newer version of the wiring chart.
So yet again, I must inform you that I am new to this, electronics, wiring etc. Building and crafting it another story.
I would very much like to hear your opinions, ideas and what not!
Take care!
Time for an update. Mainly wiring related.
It seems that every time I sit down to overview the chart, I stumble upon multiple dilemmas and challenges. What I want and what it will do are not in line, and that’s frustrating.
So here is one of my dilemmas. It’s related to the switching of Bluetooth.
What I want:
- To power on Bluetooth when the Bluetooth switch is selected. It should also select the Bluetooth audio connection for the amp. This regardless of the type of power supply (24v or 12 v, aka at home or outside). Switch connection to 3,5mm female jack should power off the Bluetooth and relocate the audio connection to the amp.
- The battery should charge (then charger is connected) regardless of the status of the main power switch. They should not be connected.
- The power indication led to work with both 24v (when supplied) and 12v when supplied. I have not drawn resistors but I am aware of their necessity. The voltmeter on the other hand will manage the volts.
- It looks like I will be charging my battery when the 24 DC power supply is connected, via the step-down, or am I wrong? Don’t know if that’s good for the battery. It is not my intention anyway. I have to solve this.
I think I can simplify a lot by using a switch DPDT? that performs 2 tasks at 1 click(direction) and 2 tasks at the oposit. I have not integrated this into the chart yet. Must read more about it first.
I will upload the newer version of the wiring chart.
So yet again, I must inform you that I am new to this, electronics, wiring etc. Building and crafting it another story.
I would very much like to hear your opinions, ideas and what not!
Take care!
Attachments
Just curious but is the 24v absolutely needed? It seems to me it would be easier to build the charger into the case. A current limited charge setup would max out around 13.8 - 14v for your battery simplifying things a little. You could then use the physical connection for the charge cord as the switch. ie recycle a computer power plug housing into the case. As far as the Bluetooth 1/8" jack swap I think a slide switch would work.
Hello,
Thanks for the answer and the suggestions. I appreciate it.
I see your idea, and have taught about it but the reason to include 24V jack is for the increased power output when at home. P=V^2/R. Correct me if I am wrong or have misunderstood something.
Then comes the question, why not 2 batteries in series to get the same voltage and thus power outside as inside. I have taught about it too but the battery drain will be much larger compared to 12V (several times). (PS. I have read about all this in the forum. It helped me to exclude 2 battery solution and accept the fact that the power will be less when outside on batteries).
I have taken into account your suggestion regarding the selection of Bluetooth/3,5mm female. I have also included a separate on/off switch for the Bluetooth itself. Don’t want it to be standby when 3,5mm audio is used.
I have now researched the option to charge the battery with 24V when connected at home. It’s no go! Apparently it could boil my battery.
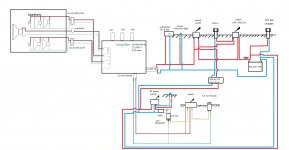
I have now repainted the cables since they were wrong colors before (in the schematichs drawing).
I still need suggestions regarding the schematics. I feel that the chart can be simplified a lot. For instance, as it looks now, I will have 4 toggle switches, 2 of which are only on off (SPST).
Do you guys think the schematics looks OK now or are some connections doubtful?
I will upload the corrected schematics below.
Thanks a lot!
Take care and please write if you can. The parts are arriving and I’m about to start the wiring part.
Thanks for the answer and the suggestions. I appreciate it.
I see your idea, and have taught about it but the reason to include 24V jack is for the increased power output when at home. P=V^2/R. Correct me if I am wrong or have misunderstood something.
Then comes the question, why not 2 batteries in series to get the same voltage and thus power outside as inside. I have taught about it too but the battery drain will be much larger compared to 12V (several times). (PS. I have read about all this in the forum. It helped me to exclude 2 battery solution and accept the fact that the power will be less when outside on batteries).
I have taken into account your suggestion regarding the selection of Bluetooth/3,5mm female. I have also included a separate on/off switch for the Bluetooth itself. Don’t want it to be standby when 3,5mm audio is used.
I have now researched the option to charge the battery with 24V when connected at home. It’s no go! Apparently it could boil my battery.
I have now repainted the cables since they were wrong colors before (in the schematichs drawing).
I still need suggestions regarding the schematics. I feel that the chart can be simplified a lot. For instance, as it looks now, I will have 4 toggle switches, 2 of which are only on off (SPST).
Do you guys think the schematics looks OK now or are some connections doubtful?
I will upload the corrected schematics below.
Thanks a lot!
Take care and please write if you can. The parts are arriving and I’m about to start the wiring part.
Attachments
Hello,
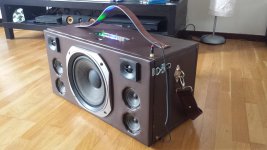
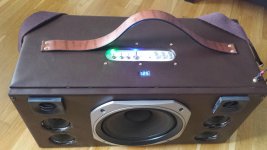
I thought I should share the results of my work with you guys. I have attached some photos below. There have been a few modifications to the connection diagram but overall it’s the same.
The boombox is (and has been for 3 weeks) basically finished. The only remaining thing is to cover the mids edges on the boombox, somehow. If you have any suggestions I would be pleased to hear them. I have tried with black electrical tape but it was quite ugly so I removed it.
Now I have started to work on my ammo can boombox and progress is good. I will post info and images about it later.
Take care!
Attachments

- Status
- Not open for further replies.