Got another power supply problem this time on a PPI 2300.2
Trying to draw excessive current and the transformer is singing to me.
I had replaced 3 blown outputs and the drivers seemed good. The power supply was blown up and I didn't have any IRFz44's so I replaced them with IRFZ44R (supposed to be a drop in replacement according to the datasheet). Gate resistors are good.
No drivers for the power supply fets this time, driven directly by the PWM chip through 2.2K ohm but I suspect it is something on the non-inverting input.
SG3525
1=2.63
2=4.95
3=0
4=0.36
5=2.09
6=3.80
7=2.04
8=0.67
9=6.08
10=0
11=0.17
12=0
13=6.77
14=0.18
15=7.48
16=5.25
I traced pin 2 back a bit, I think there was a MPSA06 connected there somewhere but it seemed to check ok. I didn't attempt to measure voltage there yet though.
Double-check the outputs to make sure that one hasn't failed.
If you don't find any defective outputs, remove the rectifiers to see if it will power up without drawing excessive current.
If you don't find any defective outputs, remove the rectifiers to see if it will power up without drawing excessive current.
Pulled rects power up was ok. Checked the channel I repaired and I had a dead 6491 again. Pulled all the 6491's on that channel, powered on now it pulsates between ok and excessive current. Of course I didn't order any extras of these but 2 of the old ones were still good so I figured it was worth it to try. No go. Something else is boogered up.
Last edited:
Pull all of the outputs in that channel and check each one carefully for leakage. A leaky output can cause this problem and may not be detectable in the board.
Did you check the driver transistors that drive the outputs?
Did you check the driver transistors that drive the outputs?
Pulled all outptus on the channel and it powered up ok, for a few seconds I get proper rail voltage but then after the amp is fully on it strains again. Outputs check ok, pulled drivers (MPSA06) since there was a short across collector and base. Drivers are ok, currently trying to trace down what is shorted across those terminals.
With the outputs out of the defective channel, the defective channel isn't likely to cause excessive current draw. The problem would have to be in the power supply or in the other channel.
I am reading +/-32V on the rails when triggered on, then as it soft starts that is when rails drop to +/-14V. It's not a dead short across the terminals where the E an C of the driver connect, it's about 23 ohms across the board terminals with the MPSA06 removed. So you don't think there is some problem feeding that channel even though it is not allowing the driver transistors to work on half the channel? The other side does not measure like that. You don't happen to have a schematic do you?
Last edited:
I don't have a schematic diagram for this amp. The attached circuit may be close. If it is, which transistor on it corresponds to the one reading 23 ohms?
Are you sure that there are no solder bridges between pads on the board?
You need to measure the DC voltage on the other channel's emitter resistors. None should read more than ~0.001v DC as the amp tries to power up and the rail voltage begins to drop. You'll have to do this quickly if the transistors aren't clamped down.
Clip your meter probes on the emitter resistor. Power it up and read the voltage. Then power it down. Move the probes to the next resistor and go through the same procedure. Do this for each emitter resistor in the good channel.
Check the temperature of all of the heatsink-mounted semiconductors between the times when you power it up.
Attachments
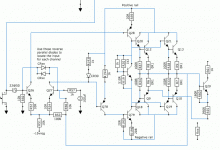
On that diagram I believe it is the ones marked Q20/Q21. There are definitely no solder bridges.
I'll have to check this tomorrow when I have a chance. I bypassed the cumbersome and impossible to troubleshoot clamping method with a pair of hand clamps and strips of wood to make it easier to troubleshoot with the rear cover removed.
I'll have to check this tomorrow when I have a chance. I bypassed the cumbersome and impossible to troubleshoot clamping method with a pair of hand clamps and strips of wood to make it easier to troubleshoot with the rear cover removed.
If you have some heavy weather-stripping material or soft rubber, apply a strip to the wood strip. Without something to evenly distribute the pressure, you're likely to have pressure on only a few components.
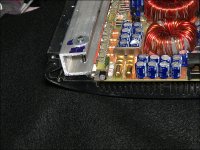
If you have some channel stock (possibly available from lowes or home depot) you can make clamps like those in the following photo.
If you have some channel stock (possibly available from lowes or home depot) you can make clamps like those in the following photo.
Attachments
Ok this is crazy, yesterday I thought I had tested it with the components removed on the bad channel and it was no go. Today it works fine with the outputs out and the drivers out of half the bad channel. However, I suspect it is a problem with the three transistors Q28, Q79 and the one between them. I'll have some measurements in a bit comparing the good channel with the bad. I think it would be Q28 is shorted since I'm reading a short/ 23 ohms across C and B of Q20/Q21 and R59 from the diagram is ~20ohms. I mistyped before about the short between E and C.
Last edited:
Yep, Q28 (MPSA56) on that diagram was bad. I replaced that guy put drivers (mpsa06) and outptus back in 2n6488 and it was ok but then slowly started to creep up in current. Found one mpsa06 going bad so I replaced those and then replaced all the 2n6488's because the one was bit off from the other two. Put back together and viola! It lives. Thanks for that schematic, it was exactly what I needed.
Last edited:
- Status
- Not open for further replies.
- Home
- General Interest
- Car Audio
- PPI PC2300.2 power supply issues