Molded PVC Portable Bluetooth speaker.
Hey forum,
I'm new here... A friend of mine said I should join this forum, so here I am.
Any ways I've been into speaker design and building for about 20 years now. I used to be a tech at Parts Express for about 8 years...heck, I've probably talked to some of you on the phone, lol.
Well, that's enough introduction for now.
I've been working on a pretty nifty little ( ha, little... Not really ) Bluetooth speaker for a couple weeks now ( I hope this is the right forum... It is a 2 way, lol). I am an electrician and I've always wanted nice sound on job sites. I recently noticed how impressive ( not great, but quite surprising ) some I the little Bluetooth speakers are ( beats pill, jawbone, etc). So , I started looking at some of the newer high excursion small drivers out there. Just glancing over the specs of some 4,5,& 6" drivers I realized with a lot of power I could build something really impressive. Well, I am finally building my version of a portable boombox.
First, I need power and a lot of it. The Lepai LP7498E amp fit the bill nicely. About 80 per channel, Bluetooth, and just 2 switches and a knob... Nice and simple. Just so you know, this is not battery powered.... Could be, but I want it to be light and run all day so no battery.
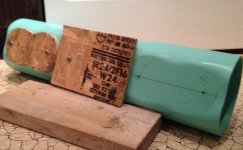
Next for the enclosure.... I chose PVC, 6" dia solid core. Light, rigid and I'm pretty good with a heat gun. First I molded a place to mount a steel plate for the amp.

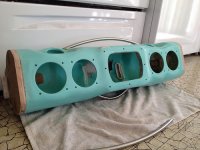
Next for the woofers... I could just get some 6" PVC 90's and do a couple of 5 or 6 inch woofers in the ends, but then the whole thing would just look like a bunch of PVC and that's no fun. I was quite surprised with the specs of a couple of 3.5" drivers ( I've never really looked into small woofers, I'm a bigger is better kind of guy when it comes to low end ). So, I molded spots for 2 3.5" woofers on each side of the amp... Just enough room, the frames will be 1 mm apart.

Now for the tweeters. I've always wanted to try out the Vifa/ peerless XT ring tweeters, I just never got around to it. I wanted something small but a low FS. I want a low FS because high excursion= intermodulation at higher frequencies ( and other issues, I'm not a huge fan of true full range systems ). Well, the Vifa XT25SC90 fit the bill perfectly. 2.5" overall and an FS of 830 ( wow that's low, I gonna need to test that, lol). So, I went ahead and molded a couple spots for the tweeters centered above the woofers about 50 degrees off axis from the woofers. I know, 50 degrees is a lot but when this is on the floor standing about 10 feet away the woofers and tweeters will both be about 25 degrees off axis, should help overall dispersion quit a bit.

Finally to make it a box, I'll need some end caps. I just cut the end out of some 1/2 plywood I had. The end are also going to be the legs when it's finished so they will have to support a little bit of weight. To help support the weight I ran a few 1 1/4" dowels through the ends into the pipe.

Well it's starting to look like a box, I'll post a little more later.
Hey forum,
I'm new here... A friend of mine said I should join this forum, so here I am.
Any ways I've been into speaker design and building for about 20 years now. I used to be a tech at Parts Express for about 8 years...heck, I've probably talked to some of you on the phone, lol.
Well, that's enough introduction for now.
I've been working on a pretty nifty little ( ha, little... Not really ) Bluetooth speaker for a couple weeks now ( I hope this is the right forum... It is a 2 way, lol). I am an electrician and I've always wanted nice sound on job sites. I recently noticed how impressive ( not great, but quite surprising ) some I the little Bluetooth speakers are ( beats pill, jawbone, etc). So , I started looking at some of the newer high excursion small drivers out there. Just glancing over the specs of some 4,5,& 6" drivers I realized with a lot of power I could build something really impressive. Well, I am finally building my version of a portable boombox.
First, I need power and a lot of it. The Lepai LP7498E amp fit the bill nicely. About 80 per channel, Bluetooth, and just 2 switches and a knob... Nice and simple. Just so you know, this is not battery powered.... Could be, but I want it to be light and run all day so no battery.
Next for the enclosure.... I chose PVC, 6" dia solid core. Light, rigid and I'm pretty good with a heat gun. First I molded a place to mount a steel plate for the amp.
Next for the woofers... I could just get some 6" PVC 90's and do a couple of 5 or 6 inch woofers in the ends, but then the whole thing would just look like a bunch of PVC and that's no fun. I was quite surprised with the specs of a couple of 3.5" drivers ( I've never really looked into small woofers, I'm a bigger is better kind of guy when it comes to low end ). So, I molded spots for 2 3.5" woofers on each side of the amp... Just enough room, the frames will be 1 mm apart.
Now for the tweeters. I've always wanted to try out the Vifa/ peerless XT ring tweeters, I just never got around to it. I wanted something small but a low FS. I want a low FS because high excursion= intermodulation at higher frequencies ( and other issues, I'm not a huge fan of true full range systems ). Well, the Vifa XT25SC90 fit the bill perfectly. 2.5" overall and an FS of 830 ( wow that's low, I gonna need to test that, lol). So, I went ahead and molded a couple spots for the tweeters centered above the woofers about 50 degrees off axis from the woofers. I know, 50 degrees is a lot but when this is on the floor standing about 10 feet away the woofers and tweeters will both be about 25 degrees off axis, should help overall dispersion quit a bit.
Finally to make it a box, I'll need some end caps. I just cut the end out of some 1/2 plywood I had. The end are also going to be the legs when it's finished so they will have to support a little bit of weight. To help support the weight I ran a few 1 1/4" dowels through the ends into the pipe.
Well it's starting to look like a box, I'll post a little more later.
Last edited:
Looks brilliant so far. Would love one of those for the workshop!
Thanks ShinOBIWAN, once it's all done I'll have to figure out how much I could sell it for. It should actually be pretty easy for me to duplicate it now that I've made the molds. Almost $300 in parts so far though and I haven't even started on the cross overs yet.
That looks fantastik. Looking forward to seeing the results 🙂
How hard is it to mold and how thick is the tube?
How hard is it to mold and how thick is the tube?
Well, I got a box. Now I need some woofers...
Right now the enclosure is about .35 cubic feet, and I'm going to glue a half pice of 4" PVC to the back to make room for the amp ( 8" deep amp, PVC doesn't stretch well, it tears ) which will add another .05 cu ft. So, after running some numbers I decided to use 4 Dayton Audio ND91-8 3.5" woofers ( PE # 290-226 ). One piece aluminum cone/ dust cap ( cool ), rubber surround ( this may be used in some harsh conditions ), good excursion ( 5.1 mm underhung voice coil, gotta love neodymium ), and the price is right. I REALLY wanted to try the new Tang Band W3-2088SOF RBM woofer, but the price was right on the Dayton's, maybe next time.
At this point I realized that this thing is going to look pretty cool, so I decided to rear mount the woofers. So, I made a back plate out of 1/4" hardboard to help distribute the pressure on the stamped frame when I mount the woofers. It was a little tricky getting all 24 mounting holes ( on each side, 48 total ) for the woofers lined up just right, remember woofers are 1 mm apart. Time for a test fit to see how everything is going...
Pretty good fit, pain to put together, but it works. Here's a peek inside.
While I had everything together I went ahead and temporarily sealed up the ends and hooked up the woofers. Just playing around, I ran them strait off the amp, full range. I started off just playing some randomness from Pandora. First impression is quite surprising. The Dayton woofers sound quite good by themselves really. They have excursion to boot too... I made this video...
ND91-8 Excursion - YouTube
I went ahead and figured out the tuning at this point. 1.5" pipe fit perfectly in the tweeter hole. I started off at 45hz which sounded OK ( f3 around 50 Hz,f10 around 40 ) but not " big " enough ( dang small drivers ). So as planned, I tuned it lower. 30Hz did the trick, F3 moved up to 115Hz, but F10 moved down to 28. I got these little speakers to sound "big". However, at this point the vents were 1.5" diameter by 23" long. Too big, I need all the space I can get just to mount the woofers. So, I needed to get the length down to 9.5" which give me a surface area of .74 square inches. I could just use some 1" PVC but again, where's the fun in that? So I took some 1.5" PVC and smashed it down to what I need.
Time to glue everything together. Here's a pic of all the parts so far laid out and ready to go.
Well that's enough for now. I'll give you another update later.
Right now the enclosure is about .35 cubic feet, and I'm going to glue a half pice of 4" PVC to the back to make room for the amp ( 8" deep amp, PVC doesn't stretch well, it tears ) which will add another .05 cu ft. So, after running some numbers I decided to use 4 Dayton Audio ND91-8 3.5" woofers ( PE # 290-226 ). One piece aluminum cone/ dust cap ( cool ), rubber surround ( this may be used in some harsh conditions ), good excursion ( 5.1 mm underhung voice coil, gotta love neodymium ), and the price is right. I REALLY wanted to try the new Tang Band W3-2088SOF RBM woofer, but the price was right on the Dayton's, maybe next time.
At this point I realized that this thing is going to look pretty cool, so I decided to rear mount the woofers. So, I made a back plate out of 1/4" hardboard to help distribute the pressure on the stamped frame when I mount the woofers. It was a little tricky getting all 24 mounting holes ( on each side, 48 total ) for the woofers lined up just right, remember woofers are 1 mm apart. Time for a test fit to see how everything is going...
An externally hosted image should be here but it was not working when we last tested it.
Pretty good fit, pain to put together, but it works. Here's a peek inside.
An externally hosted image should be here but it was not working when we last tested it.
While I had everything together I went ahead and temporarily sealed up the ends and hooked up the woofers. Just playing around, I ran them strait off the amp, full range. I started off just playing some randomness from Pandora. First impression is quite surprising. The Dayton woofers sound quite good by themselves really. They have excursion to boot too... I made this video...
ND91-8 Excursion - YouTube
I went ahead and figured out the tuning at this point. 1.5" pipe fit perfectly in the tweeter hole. I started off at 45hz which sounded OK ( f3 around 50 Hz,f10 around 40 ) but not " big " enough ( dang small drivers ). So as planned, I tuned it lower. 30Hz did the trick, F3 moved up to 115Hz, but F10 moved down to 28. I got these little speakers to sound "big". However, at this point the vents were 1.5" diameter by 23" long. Too big, I need all the space I can get just to mount the woofers. So, I needed to get the length down to 9.5" which give me a surface area of .74 square inches. I could just use some 1" PVC but again, where's the fun in that? So I took some 1.5" PVC and smashed it down to what I need.
Time to glue everything together. Here's a pic of all the parts so far laid out and ready to go.
An externally hosted image should be here but it was not working when we last tested it.
Well that's enough for now. I'll give you another update later.
Hmmmm, let me try those pics again... I can't seem to edit my last post either...
Test fit:

Peek inside:

And a bunch of parts:

Hope this works, lol
Test fit:
Peek inside:
And a bunch of parts:
Hope this works, lol
Hi Chris,
You have 30 minutes in which to edit your post. After which, hit the report post button and a mod will do it for you.
For pics, just attach it rather than through a site.
You have 30 minutes in which to edit your post. After which, hit the report post button and a mod will do it for you.
For pics, just attach it rather than through a site.
Awesome use of PVC. Love it! I made remotely controlled submersible with PVC sewer pipe like this once - wish I knew of heat gun forming large pipes like this.
Very cool.

Very cool.
That looks fantastik. Looking forward to seeing the results 🙂
How hard is it to mold and how thick is the tube?
It not that hard really, I just use a heat gun when working with smaller areas. Takes a little practice, it's a fine line between softening it and burning it ( smoke is bad, chlorine in the smoke... Burnt PVC cracks when it bends ). For large areas a PVC heating blanket works best. I actually softened the ports in the oven ( not exactly recommended, but 250 for 7 min or so ).
Oh, and the tube is PVC d3034, .25" thick wall. It's pretty thin, light , but surprisingly rigid. All the added curves help to stiffen it up a bit too.
Awesome use of PVC. Love it! I made remotely controlled submersible with PVC sewer pipe like this once - wish I knew of heat gun forming large pipes like this.
Very cool.
Ha, a PVC sub, now that sounds cool!
Hi Chris,
You have 30 minutes in which to edit your post. After which, hit the report post button and a mod will do it for you.
For pics, just attach it rather than through a site.
Thank you for the info Cal.
Check this one : they're too thin !
You can try that expensive aluminum layered combo for car
........
How about the tw ? Do they perform lower than 1 k ?🙂
Maybe you can try some 2"....
You can try that expensive aluminum layered combo for car
........
How about the tw ? Do they perform lower than 1 k ?🙂
Maybe you can try some 2"....
Chris Perez,
Can you show us how you make the great forms on your PVC? It almost looks like you had a rectangular form pushing on the inside of the soft PVC to make those box like shapes. It looks very clean and professional looking - like it was molded in a $200k tooling mold. 🙂
Detailed photos of the process would be very helpful.
Thanks,
X
[special=]%[/special]
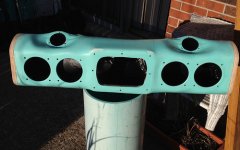
Nothing that special really, the molds are just 1/2" particle board. I cut out two pieces in the shape of the flat spots, one on the inside one on the outside. Just heat up the PVC ( heat gun or blanket ) and use the molds to smash the PVC flat by running long screws through everything to pull the molds together. It takes a little practice to figure out what the PVC will let you do without tearing or cracking.
Here's a ( big blurry )pic with the woofer mold still in place while the tube was cooling...

So how did you do the molding? You could probably sell custom molded tubes alone!
Nothing that special really, the molds are just 1/2" particle board. I cut out two pieces in the shape of the flat spots, one on the inside one on the outside. Just heat up the PVC ( heat gun or blanket ) and use the molds to smash the PVC flat by running long screws through everything to pull the molds together. It takes a little practice to figure out what the PVC will let you do without tearing or cracking.
Here's a ( big blurry )pic with the woofer mold still in place while the tube was cooling...
Attachments
That is a very clever technique. Thanks! I am into building speakers without power tools so alternative non table saw techniques are always welcome.
Ive been pondering a portable boombox and gad been thinking of using fiberglass.....I like the look (and ease I hope) of your pvc......
Check this one : they're too thin !
You can try that expensive aluminum layered combo for car
........
How about the tw ? Do they perform lower than 1 k ?🙂
Maybe you can try some 2"....
Sorry picowallspeaker, I'm not sure what you mean. What's too thin? I know the box is thin, but I don't expect this to be audiophile quality, just impressive, 🙂 .
I haven't even actually tested the tweeter yet. However, I don't expect them to do much below 1k, at least not with much output.
Well, I glued everything together and now I have a box. I mounted everything back into the box to make sure there were no leaks. Oh, did I mention that it is a pain to mount the woofers in this thing. Each side has one back plate, two woofers, and 8 screws all working through the amp hole. Man, I tell you what, those first two screws...…
Anyways, no leaks( OK, a little through the amp, a gasket and maybe glue gun will take care of that ). Actually, it is a pretty solid box. I can feel the flat spots on the top and bottom vibrating a little bit, but other that that it feels rock solid. I was also concerned with port noise, I only tested with 1.5" PVC but my smashed vent was only .74 square inches, less than half the size. Well, it worked out fine, lots of air moving but I can't hear it.
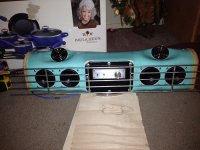
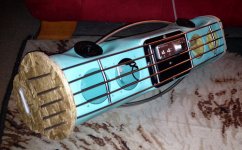
Now for a little cosmetic stuff.... First I need some way to protect the drivers. I really didn't have enough room to mount any sort of small car speaker grills. I didn't want to use cloth, it would just get so dusty plus I want to see the woofers ( they are cool ). So I found an old stainless steel wire shelf and cut a grill to go across the whole thing. Cleaned it up with a wire brush, and.…..

I got a grill. The tweeter grills are cut from computer fan grills. Looking good so far.
Now for a handle... A friend of mine suggested a kitchen cabinet handle. So, after shopping a little I found this simple sleek handle. Worked out nicely for a foot to angle the box up a little. They were cheap enough, so I got a couple different sizes to play with...

Looks good. I molded the handles in place...

Next I cut out a sample end cap, just trying to figure out the final shape of it. You can also see how I'm going to mount the grill....

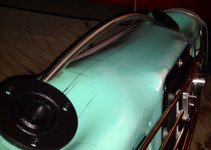
Well, that's just about it for the enclosure. I sprayed a few coats of damping materiel inside the box. I was just going to paint it with some durable textured brush on stuff... However, a buddy, who works at a body shop, really wanted to paint it,. He said he will, " make it perfect "... 🙂 I'm talking smoothing, primer, base, paint, few coats of clear, wet sanding... The works, I just couldn't say no😀 ( only problem is I won't want to take it to work, it’ll be too nice, lol ) Here it is all ready for paint...

Well that's it for now.... I'm just ( imaptiently,lol ) waiting to get it back.... I'll keep you guys updated..
What do you think so far?
Anyways, no leaks( OK, a little through the amp, a gasket and maybe glue gun will take care of that ). Actually, it is a pretty solid box. I can feel the flat spots on the top and bottom vibrating a little bit, but other that that it feels rock solid. I was also concerned with port noise, I only tested with 1.5" PVC but my smashed vent was only .74 square inches, less than half the size. Well, it worked out fine, lots of air moving but I can't hear it.
Now for a little cosmetic stuff.... First I need some way to protect the drivers. I really didn't have enough room to mount any sort of small car speaker grills. I didn't want to use cloth, it would just get so dusty plus I want to see the woofers ( they are cool ). So I found an old stainless steel wire shelf and cut a grill to go across the whole thing. Cleaned it up with a wire brush, and.…..
I got a grill. The tweeter grills are cut from computer fan grills. Looking good so far.
Now for a handle... A friend of mine suggested a kitchen cabinet handle. So, after shopping a little I found this simple sleek handle. Worked out nicely for a foot to angle the box up a little. They were cheap enough, so I got a couple different sizes to play with...
Looks good. I molded the handles in place...
Next I cut out a sample end cap, just trying to figure out the final shape of it. You can also see how I'm going to mount the grill....
Well, that's just about it for the enclosure. I sprayed a few coats of damping materiel inside the box. I was just going to paint it with some durable textured brush on stuff... However, a buddy, who works at a body shop, really wanted to paint it,. He said he will, " make it perfect "... 🙂 I'm talking smoothing, primer, base, paint, few coats of clear, wet sanding... The works, I just couldn't say no😀 ( only problem is I won't want to take it to work, it’ll be too nice, lol ) Here it is all ready for paint...
Well that's it for now.... I'm just ( imaptiently,lol ) waiting to get it back.... I'll keep you guys updated..
What do you think so far?
Attachments
Last edited:
well, I would focus more on sound quality. It doesn't have to be audiophile quality, but at least it should give a correct sound projection. Yes, I'm talking about the big step between the tweeter and the woofers !
It's been established that good DIY doesn't need visual perfection, or at least, it should
be postponed to sound quality- An unfinished project is a work in evolution which might not find the word "end" in...years. Still, you know how it is made and where you can work out to correct the imperfections.
- Status
- Not open for further replies.
- Home
- Loudspeakers
- Multi-Way
- Portable Bluetooth speaker.