I'm replacing the blown pilot lamp in my amplifier but the supply is one AC wire from the transformer with the return to ground, I really don't want it to flicker so amp weighing up my options and wanted to know of I use both taps off the transformer (7.5v) for the lamp could I use a full bridge rectifier without issues, see attached.

It appears that the power supply will not function without the lamp in place.
The lamp connects the secondary windings to ground. I would not change the connections.
The lamp connects the secondary windings to ground. I would not change the connections.
It definitely works with no lamp in there, what would be the best way of replacing the lamp with an led?
With AC, you need both reverse blocking and current limiting.
Use a series 10k resistor, and then a reverse 1N4004 diode directly across the LED.
Use a series 10k resistor, and then a reverse 1N4004 diode directly across the LED.
Thanks, I want to try and minimise flickering, what about this with a current limiting resistor that I've missed off?

You won't be able to see the 60Hz flickering, but you can filter it if you want.
Movies have a frame rate of just 24Hz.
But you do need a current limiting series resistor. Diodes only use up to ~10mA.
Maybe around 2k.
Movies have a frame rate of just 24Hz.
But you do need a current limiting series resistor. Diodes only use up to ~10mA.
Maybe around 2k.
So to summarise, I can use the circuit above with a current limiting resistor, alternatively directly from ac using a current limiting resistor and a diode across the led and with this i shouldn't see 50hz ( im in the UK) flickering?
If movies don't bother you, then it should be fine without the rectification and filtering.
Just make certain that the diode is connected in reverse polarity.
That is, the diode cathode connects to the LED anode, and vice versa.
LEDs can only tolerate a very small reverse bias voltage, around 5V.
Adjust the series resistor value to make the brightness suitable.
I would guess that 3.3k would be about right.
For 220V, use 22k to 150k on one leg, and a 4007 on the other leg of LED.
Reverse diode if it does not light up.
For 7.5V, a lower value resistor is needed.
The series diode takes the rectification away from the LED, and protects it.
Capacitor is not used for LED pilot lamps.
This can be used straight from mains, so does not affect your existing circuit.
Alternately, 6V or 9V filament lamps can also be located, not as durable as LED.
Find a color that looks like the old pilot lamp.
Let's make things simple...
Add an appropriate resister in series with that diode (1N4001,2,/3etc) the capacitor across the LED being a 220uF 25V, and call it a day.
The resistor, depending on the LED, might be anything from a 2.2K up to 10K, whatever brightness you deem proper.
Add an appropriate resister in series with that diode (1N4001,2,/3etc) the capacitor across the LED being a 220uF 25V, and call it a day.
The resistor, depending on the LED, might be anything from a 2.2K up to 10K, whatever brightness you deem proper.
@Wise, that is for the existing supply, I think, not for connection to the mains?
The LED should get about 2V for red / green /yellow, 3.3V for white, and 4V or so for blue.
Use Ohm's law, and rate the resistor for voltage drop and current.
Also, bear in mind that some LEDs are way too bright at times. May need higher value to reduce brightness, or abrasion.
The LED should get about 2V for red / green /yellow, 3.3V for white, and 4V or so for blue.
Use Ohm's law, and rate the resistor for voltage drop and current.
Also, bear in mind that some LEDs are way too bright at times. May need higher value to reduce brightness, or abrasion.
@NareshBrd :
The low voltage lamp supply is what?.... 6 to 8 volts?
As I said, an appropriate 1/2W resistor, depending on the sensitivity of the LED, is easy enough to determine.
The cap will cure any flickering.
The diode insures that DC only gets to the LED and cap.
What's the issue..... none.
This is comment #12 now....how many more need to be added to discuss a simple thing like this?
You could connect the LED in series with R301. Current will be about 11mA and well filtered. No added dissipation.
😀
😀
According to notation on schematic, there's 65V present. (Maybe 71V is cap rated voltage?)
Idea is to lift either end of R301 and add wires to LED to connect in series with R301. Schematic notes R301 is 2W, already sized to handle applied voltage. No parts need other than LED.
Idea is to lift either end of R301 and add wires to LED to connect in series with R301. Schematic notes R301 is 2W, already sized to handle applied voltage. No parts need other than LED.
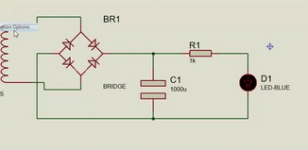
Yes. Disconnect the BLU wires, connect a (small) full bridge rectifier to these transformer taps (ac leads), connect the negative node of the rectifier to the BLU wire to the fuse, connect a resistor of 6.8kΩ - 10kΩ (2W) to the positive node of the rectifier and connect a led (A-K) in your preferred colour, the cathode to ground....and wanted to know of I use both taps off the transformer (7.5v) for the lamp could I use a full bridge rectifier without issues...
Your initial idea is ok. I'm to lazy to draw a picture, so one from the net. The cap is an option.
Attachments
@Citizen124032
If using the low voltage supply from the original lamp, a single 1n4001 diode in series with a resistor, then feeding a cap (100-220u) is sufficent for a simple LED pilot lamp.
Any cap much larger, and the LED will remain ON for a while when powered off.
If using the low voltage supply from the original lamp, a single 1n4001 diode in series with a resistor, then feeding a cap (100-220u) is sufficent for a simple LED pilot lamp.
Any cap much larger, and the LED will remain ON for a while when powered off.

@Citizen124032
If using the low voltage supply from the original lamp, a single 1n4001 diode in series with a resistor, then feeding a cap (100-220u) is sufficent for a simple LED pilot lamp.
Any cap much larger, and the LED will remain ON for a while when powered off.
Wired up this way ( like the hand drawn diagram) with a 1/2 watt 1k resistor to reduce current, working nicely now. Thanks all
- Home
- Amplifiers
- Solid State
- Pilot Lamp replacement