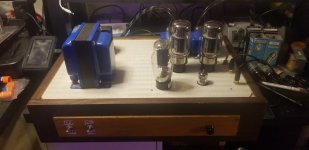

Here is my second SSE build. The inside wiring is pretty messy since initially I didn't want to trim transformer wires in case the build would go south and I'll need to re-use or sell transformers and I thought I'll tidy up the wiring later. But now I'm not sure I ever will since the amp is dead quiet as it is with my test speakers. Have yet to hear it my main system with 97dB speakers but pretty sure it'll do just fine.
Thank you Mr. Anderson once again for providing that wonderful opportunity!


Thank you Mr. Anderson once again for providing that wonderful opportunity!
That is an awesome build! I particularly like the bias adjustments you added.
Yours is neat in comparison to mine, lol, I thought the same thing, just get it done then go back and make it look nice. And like yours mine is dead quiet also! Must be beginners luck.The inside wiring is pretty messy since initially I didn't want to trim transformer wires in case the build would go south and I'll need to re-use or sell transformers and I thought I'll tidy up the wiring later.
Looked very well executed! Has a 'hewn from granite' look to it.Here is my second SSE build. ...
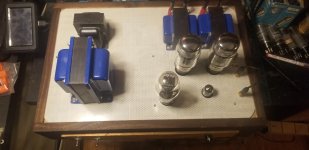
Out of interest, with the switches for the different modes of operation, do you find you settle on one sweet spot, or do you often change the settings, maybe based on the volume you are listing at or the music sources?
Love this sign plate. Where did you get it made?Here is my second SSE build.
I haven't had a chance to set the amp in my system yet, just finished it yesterday and was so excited there were no smoke or sparks on power up this time that I posted pictures right away 🙂 Will report back when I give it a proper try in my main (and atually the only one) system with a variety of tubes and in different modes. About 10 years ago I've built another SSE using Edcor GXSE15-8-5K OPTs and with that amp I mostly listened in triode mode and when in UL I haven't heard much difference in sound with or without CFB (but I've only used it with one set of 6550).Looked very well executed! Has a 'hewn from granite' look to it.
Out of interest, with the switches for the different modes of operation, do you find you settle on one sweet spot, or do you often change the settings, maybe based on the volume you are listing at or the music sources?
In a hindsight, I think it would be better to have TRD/UL and CFB switches (if you need them at all) on the back which would make for a cleaner wiring - whatever mode you prefer it would be unlikely you'll switch modes frequently.
Where did you get it made?
In my garage 🙂 It's pretty easy - make a design in a graphic editor, print it as a mirror image on a "Blue Press-n-Peel" transfer film, heat transfer to a brass plate, dip the plate in ferric chloride for etching for about 3,5-4 hours, wash, apply several coats of some dark paint, let it dry, carefully wet-sand the paint from the top surface using 1000 or finer grit sandpaper and finally hand-polish with some soft metal polisher. Even easier with copper plates - takes only 15-20 min to etch, etched plate can be then blackened in water solution of liver of sulfur and polished.
Thanks a lot for the detailed write up. A few questions if I may:dip the plate in ferric chloride for etching for about 3,5-4 hours
- How do you prevent the backside from being dissolved? Colour it with a waterproof black marker pen?
- Paint does not adhere well to brass. Did you spray it with etch primer first?
I'm not very good with instructions and there should be plenty of detailed step-by-step guides online but I'll gladly share some tips from my personal experience:
1. Make sure the plate is absolutely flat (unless using copper and hand-writing the content) or it won't transfer properly and would be difficult to sand later.
2. Whether using a transfer film or a paint pen first de-grease (with acetone or alike) and wash the plate with a dish soap, scuff it lightly with steel wool or a very fine grit sandpaper, wash again and air dry (a heat gun will do just fine). It's got to be sparkling clean and dry before the transfer.
3. If using a transfer film print (on a laser printer) as many copies of your design as will fit on a sheet - there is a good chance you'll need more than one. Keep your plate slightly oversized - it's very difficult to position film precisely. On my first attempt the border on one side was just 0.7mm higher that on the other and on the finished plate it was unbelievably noticeable making the whole plate looks like it's not square. Had to scrap that one and started all over again with an oversized plate and filed it to the proper size after the etching.
4. If using a paint pen do a test run - some "waterproof" inks will start dissolving in ferric chloride way before the material is etched enough plus it will give you an idea of optimal etching time at a given temperature.
5. You can use a paint pen on the edges of the plate and cover the backside with just about any kind of masking tape or electrical tape. I also tapeed some strings to the back to suspend the plate face down in ferric chloride so it won't touch the bottom of the container. Lift the plate and gently stir the ferric chloride every 15-20 min - that will speed up the etching. You want to stop when it's etched deep enough (a test run will help with that) and before the masked elements will start loosing shape which means they've been etched through from the other side.
5. Wash the plate under running water but do not wipe it - with brass there is a good chance the edges of the not etched surfaces are razor sharp - just air dry or use a hairdryer or a heat gun. Do not try to remove the mask at this time, if some of it will wash off with water - that's OK, the rest will help in the next step.
6. The etched areas are not smooth and in my experience paint will stick to it just fine without any additional preparation but once again you can test the paint beforehand. On my first attempt I used a clear coat at the very last step - the same brand and type as the base coat and nevertheless it lifted up the base coat so I had to repaint with just a base coat using glossy paint and it holds just fine. The goal here is to fill up the etched areas with paint as close to the top surface as possible. In my case it took about 5 or 6 coats of spay paint. Since the paint coat will be pretty thick give it an extra time to thoroughly dry, I kept mine close to the furnace for several days.
7. Place some 1000 grit or finer wet sandpaper on a sturdy flat surface, spray it with water and gently slide the plate until he paint and the remnants of the mask material comes off the previously masked surfaces. Ideally the paint in recesses had shrank enough to not be affected but in practice more likely there will be some scuffs here and there so as a final step I've hand polished the whole plate with soft metal polish paste on a soft cloth and it smoothed out the sanded brass surfaces and scuffs in the paint.
It is much easier process with copper plates - since the etching time is much shorter the etching will go deeper without creating razor harp edges so there is no need to fill it up with paint. Copper plate can be machine polished after the etching, then dipped for 15-20 seconds in a liver of sulfur solution which will turn it almost black and then hand polished to make raised surfaces bright while keeping the background dark.
- Home
- More Vendors...
- Tubelab
- Pictures of your Tubelab amp