I'm looking for inspiration for my amp case 😀
Can you post some picture of yours, or nice ones you've seen?
I mean DIY ones 🙂
Can you post some picture of yours, or nice ones you've seen?
I mean DIY ones 🙂
Peter Daniel said:Did you see this site?
http://www.passdiy.com/gallery.htm
I know this one 🙂 but I posted here to have more results that only pass clones
I especially like your realisations 😉
Here's one of my soon to be Aleph 2+
10.5" high before adding feet
17.5" wide
14" deep
I plan to sand blast face, top and back then clear anodize.
10.5" high before adding feet
17.5" wide
14" deep
I plan to sand blast face, top and back then clear anodize.
MRehorst said:
I'd rename my topic to "NICE Looking Amp! - but also good working" ;D
pinkmouse said:My (currently, it keeps changing!😉 ) OPA 548 Klone...
So you can be of some use! 😉 Great piece of work!
At risk of thread-jacking can we see the inner workings?
Thanks chaps🙂
Grataku... How could you doubt me😀
It is on loan to a mate in a recording studio at the moment, (he blew up his Quad II he used for N/F monitoring), but I should get it back at the weekend so I will post some "Naked" pics then!😉
Jam- the volume Knob of course😉
It is made out of reclaimed and polished 19" rack mount 3U blanking panels and flamed sycamore for the timber.
The knob is the same wood, inlaid with rosewood for the indicator strip. and is actually backed with perspex. Though you can't see it in the pics, the mounting plate behind the knob is polished ally as well, and the plan is to use the perspex with blue LEDs to backlight the knob as a power on indicator...
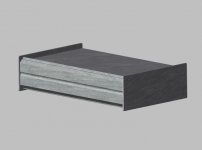
While it's not an amp I built the case out of 1/2" mdf and cut the front and back from a piece of 1/8" aluminum sheet that I had. The case is painted with black stone paint and a final coat of clear. The three knobs are from an old Yamaha receiver that I scrapped.
[/URL]
[/URL]
An externally hosted image should be here but it was not working when we last tested it.
here´s mine JLH-type amplifiercase, made out of 3 large heatsinks with top, bottom and front by polished Dur-aluminium
sorry for the bad picture...
http://home.swipnet.se/sm6xun/Image2.JPG
sorry for the bad picture...
http://home.swipnet.se/sm6xun/Image2.JPG
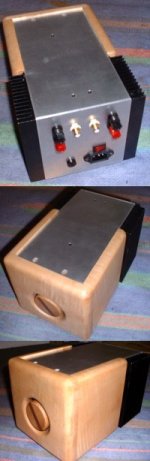
Mmmm. Don't have a digital camera so a CAD drawing will have to do.
<center>
<img src="http://www.q-audio.com/images/littlechassis.jpg">
</center>
Click here for a <a href="http://www.q-audio.com/images/bigchassis.jpg">larger view</a>
It's designed around the <a href="http://www.accelindustrial.com/model79.gif">Model 79</a> extrusion from <a href="http://www.accelindustrial.com/">Accel Thermal.</a>
Except for the heatsink and screws, the chassis is all wood.
The fins are facing outward from the front and the heatsink is gold plated (purely for aesthetics, and the reduced heat capacity isn't a problem for this little 6 watt amp).
The outside open-ended box is made of 3/8" cherry with a 1/16" chamfer around the front and rear outside edges. The four inside surfaces are covered with 1/16" natural cork.
The strip down the middle between the groups of fins is 1/4" birdseye maple with a 1/8" chamfer around all four edges. The hole near the bottom is a power indicator LED.
The strip mounts to the heatsink using four 7/8" brass standoffs and 4-40 thread brass machine screws (yes, you can use machine threads in certain hardwoods like hard maple).
The rear panel is 1/4" birdseye maple with a 1/8" chamfer around the outside edge. The screws are all 4-40 thread brass fillister head machine screws in 1/4" diameter by 1/8" deep counterbores (the counterbores on the outside edges were done on a router table using a simple jig so that the piece could be slid square on into a 1/4" straight cutting bit).
The groups of 1/8" holes at the top and bottom of the rear panel are ventilation holes.
The rear panel is attached to the heatsink via the four inner screws and 3/4" standoffs. The rear panel/heatsink assembly act as one unit and are slid in trough the back of the open-ended box and the rear panel seats into a 1/4" wide by 1/8" deep rabbet in the open-ended box.
The heatsink fins and center strip stand 1/8" pround of the front edge of the open-ended box.
The spacer block is hard maple and the base is a solid block of big leaf maple burl.
Countersunk inside the bottom side of the open-ended box are two 6-32 stainless steel T-nuts to receive the mounting screws which run up through the bottom of the base.
The feet are made of 3/8" natural cork.
The chassis isn't limited to a vertical configuration. I just preferred it and I liked the smaller footprint. You could just as well route your connectors through one of the sides of the open-ended box, dispense with the base and lay it on its back.
Feel free to use any or all of these ideas.
se
Koy said:
sweet 🙂
what's this nice looking button, with the red light?
KenP said:While it's not an amp I built the case out of 1/2" mdf and cut the front and back from a piece of 1/8" aluminum sheet that I had. The case is painted with black stone paint and a final coat of clear. The three knobs are from an old Yamaha receiver that I scrapped.
[/URL]An externally hosted image should be here but it was not working when we last tested it.
I like it... I copy it.. 😀 now.. 😀 2 of them, one for my homeless computer, one for my future amplifier... MATCHING PAIRS!! Hmm.. 🙂 I was going to buy rack cases, too expensive, too small, now I have another option!! THANKYOU!!
I also plan to use this design for my gainclone, all metal with those cute screws 🙂
A 5mm front pannel made of glass, over the metal front, would look nice imho
A 5mm front pannel made of glass, over the metal front, would look nice imho
something that would look like this computer case, but with the glass that maches the front pannel's dimentions
An externally hosted image should be here but it was not working when we last tested it.

- Status
- Not open for further replies.
- Home
- Amplifiers
- Solid State
- Pictures of your amplifier's case