I am looking into building a small preamp so I can connect my turntable (Project Debut) through the Line In of my stereo.
Project and Nad both sell the exact thing for £40, which isn't much. But I was just wondering how to make my own. At uni our amplifier lectures were fairly generic and I don't have any of those notes to refer to anyway.
Matt
Project and Nad both sell the exact thing for £40, which isn't much. But I was just wondering how to make my own. At uni our amplifier lectures were fairly generic and I don't have any of those notes to refer to anyway.
Matt
You need an amplifier with a specially shaped frequency characteristic, known as a RIAA amplifier. If you search for RIAA, moving-magnet (MM) or moving-coil (MC) on this forum or on Internet, you should find lots of information about the subject. If you want to know my approach to the problem, read Electronics World October 2003.
Thanks for the reply, I didn't know what RIAA was all about before. My search led me to the following circuit which seems to be quite good. I am only interested in the MM stage so could someone please advise me how to remove (and what to remove) the MC circuitry.
For the caps/resistors should I make sure I have more than the required amount then value match them on a multimeter?
A bit more background on me, I am a digital electronics engineer and my analogue knowledge is crap! I'm good with VHDL and Verilog but that ain't much use here!!
Matt
For the caps/resistors should I make sure I have more than the required amount then value match them on a multimeter?
A bit more background on me, I am a digital electronics engineer and my analogue knowledge is crap! I'm good with VHDL and Verilog but that ain't much use here!!
Matt
Attachments
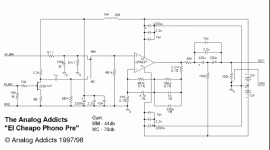
The attachment got lost somewhere, is this because my posts are moderated still? Anyway, the circuit was Thorsten's "El Cheapo" (possibly with OPA604s) which is why I asked about which components can be removed for MM only operation. Any help much appreciated!
I have seen some other designs (Pacific, Creek and a Tube design) under the Source/Analogue forum so am makling progress. But El Cheapo seems to be a recommended budget design.
Matt
I have seen some other designs (Pacific, Creek and a Tube design) under the Source/Analogue forum so am makling progress. But El Cheapo seems to be a recommended budget design.
Matt
Here's somthing
http://sound.westhost.com/project06.htm
http://sound.westhost.com/project25.htm
P.C.B's are available for progect 06
http://sound.westhost.com/project06.htm
http://sound.westhost.com/project25.htm
P.C.B's are available for progect 06
If you don't need the moving coil part, just remove the 100 ohm resistors, the 2SK147, the 2.2kohm, 68 ohm and 681kohm resistors, the 1uF capacitor and the supply filter circuit consisting of a 10H inductor and 2200uF, 2.2uF and 10nF capacitors.


That Elektor amp does look nice but the PCB is not available, I am put off a valve design at the moment because of the cost of the transformer required to get the 200-400VDC.
Back to Thorsten's, can anyone tell me if the following circuit is correct, or if i've hacked out too much!!
Also looking for some tips on what kind of wire I should be using for the signal in/outs and the power supply to board?
Thanks in advance, hopefully i'll start picking this analoguey stuff up again soon, shame you can't make a phono preamp on an FPGA using Verilog 😀
Matt
Attachments
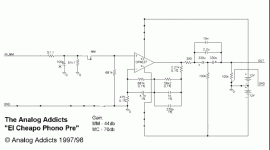
looks OK, i wouldn't sweat the component tolerance for several reasons:
1% cap tolerance dominates RIAA curve accuracy so 0.1% resistor tol is more because they can be had without much difficulty
RIAA curve accuracy is a easily pursued numbers game but in fact the cutting room engineer re-equalizes the master tape source on his own monitor system (different from the mastering monitor setup) to his own taste (hopefully with the goal of reproducing the master eq on the produced vinyl) there is no reason to expect even skilled recording engineers to exceed 0.1 dB accuracy (~= 1%) in such a scenario
while tweaking and component selection knows no limits, i would consider using bipolar (sometimes called non-polar) electrolytics in the output coupling long before considering exotic wire (a buffer in the op amp feedback loop would probably be next on my list) and if extreme approaches to power have any utility, a phono pre has to be the place to start (batteries anyone?)
jcx said:while tweaking and component selection knows no limits, i would consider using bipolar (sometimes called non-polar) electrolytics in the output coupling long before considering exotic wire (a buffer in the op amp feedback loop would probably be next on my list) and if extreme approaches to power have any utility, a phono pre has to be the place to start (batteries anyone?)
Can you (or someone else) explain a bit more about those two 330u caps on the output, i've never seen that layout before with 2 caps in opposite polarity directions, are these the caps you would change for non-polar?
You mention about the power supply, is this really the important part of a phono-pre, I was planning to use batteries because if you look at the link in one of my earlier posts that is how another guy built this stage. If I was to use a cheap multi-voltage adaptor for this would it really ruin the sound? I have never looked at these cheap power supplies on a scope.
I may bring up the previous thread for this one, someone said that using OPA604 instead of OPA637 gave good results at a fraction of the cost, is this a direct replacement, I know the pinouts are the same but does this affect any other component values?
Matt
the 300uF caps are DC blocking caps, most designers would have put a decoupling cap in series with the 475 Ohm feedback resistor to ground to reduce the DC gain of the circuit, instead this circuit has ~ 1400 DC voltage gain which amplifies the OPA637’s sub mV level input offset to near a volt at the op amp output - watch out for the offset V spec on substitutes!
the reversed polarity series connection was previously considered the best that could be done to minimize aluminum electrolytic capacitor voltage dependent dielectric distortion, in the past few years Cyril Bateman has explored capacitor distortion mechanisms and recommends the use of bipolar electrolytics as measuring very much lower in distortion than polarized caps, the series connection is still helpful, i would guess 25-50 V rating would be fine
a major limitation on substitution is if you are limited to standard DIP-8 package or if you can use smt devices, the AD8610 is 1/2 the OPA637 price but only available in smt (as is the AD745 which is the lowest noise FET op amp i know of), the OPA637 is probably still the best choice on gain-bandwidth grounds, OPA604 could work but the offset may require external trimming, certainly consider building and debugging with a lower cost device and upgrade after you’ve satisfied yourself that the system is basically working
(buffer in the loop with gain is definitely an advanced complexity approach but could improve on the OPA637's performance with cheaper devices)
powering phono preamps from the line is a real challenge in hum reduction, my first diy phono preamp hummed and detected AM radio stations
Thanks to the people who replied for your help, I have ordered the parts and will hopefully start building next week. I am going to use OPA604's for now.
Final question, I went out and bought a metal box to put the project in, should the box be connected to ground or isolated from all the circuitry? or should I have bought a plastic box! Not sure if it's important but I am going to be using a battery power supply.
Cheers,
Matt
Final question, I went out and bought a metal box to put the project in, should the box be connected to ground or isolated from all the circuitry? or should I have bought a plastic box! Not sure if it's important but I am going to be using a battery power supply.
Cheers,
Matt
Bear in mind if you are still thinking about using a 'wall wart' PSU that most of them only supply single-ended, i.e. ground and say 12v. That circuit you are looking at is split rail and so requires positive and negative as well as ground.
As you are using a different op-amp, heed jcx's advice and put a (bipolar) DC-blocking cap between the 475 ohm and ground. 100uF should do the trick.
As for cases and earthing, connect the mains earth to your case then at the same point take off a connection to your board via 100 ohm resistor in parallel with a 100nF capacitor. This isolates the earth a bit.
richie00boy said:Bear in mind if you are still thinking about using a 'wall wart' PSU that most of them only supply single-ended, i.e. ground and say 12v. That circuit you are looking at is split rail and so requires positive and negative as well as ground.
Yes, I realised that after I had posted, will be going with batteries for now, maybe build a PSU in the future.
richie00boy said:As you are using a different op-amp, heed jcx's advice and put a (bipolar) DC-blocking cap between the 475 ohm and ground. 100uF should do the trick.
Can I check for DC with a meter, will it be constant or could it appear at various random times? I have not got one of those caps and if I ordered one before i'm ready for more components I would have to pay P+P on top of it.
richie00boy said:As for cases and earthing, connect the mains earth to your case then at the same point take off a connection to your board via 100 ohm resistor in parallel with a 100nF capacitor. This isolates the earth a bit.
As I said above, I will just be using batteries for now. what should I do? ( will have a look around at other peoples photos)
Matt
Konnichiwa,
You hacked out too much. You need the powersupply bypassing. It might be good if you had read the article text that was along with the schematic, it might have answered a few of your questions.
Sayonara
matt_uk said:Back to Thorsten's, can anyone tell me if the following circuit is correct, or if i've hacked out too much!!
You hacked out too much. You need the powersupply bypassing. It might be good if you had read the article text that was along with the schematic, it might have answered a few of your questions.
Sayonara
- Status
- Not open for further replies.
- Home
- Amplifiers
- Solid State
- Phono to Line preamp?