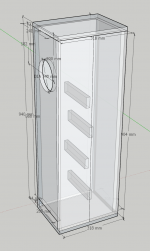
I just built my first full range from this plan:
http://frugal-phile.com/boxlib/pensils/Pensil10p-plan-140613.pdf
and I must say I'm quite impressed already. I just could not find details about placement of stuffing, only the amount which has to be adjusted anyway.
Also, if I go for the larger volume box, how much more lower extension can I expect?
http://frugal-phile.com/boxlib/pensils/Pensil103-plan-300114.pdf
How about adding another driver in the same box?
I just built my first full range from this plan:
http://frugal-phile.com/boxlib/pensils/Pensil10p-plan-140613.pdf
and I must say I'm quite impressed already. I just could not find details about placement of stuffing, only the amount which has to be adjusted anyway.
I'm glad you're happy, although it should be noted that the aforementioned was technically designed for the paper cone 10P, not the metal cone 10.3 (10M) which has slightly different loading requirements. As you can see, it works, but won't quite track the target alignment. Since they were intended to be flexible (within reason) you can trim the damping as desired to assist with this.
Also, if I go for the larger volume box, how much more lower extension can I expect?
A few Hz, although these differences are usually swamped by the room; it's more a question of alignment.
How about adding another driver in the same box?
You would need to double the cross sectional area of the enclosure and the vent to maintain the alignment and avoid loss of LF output. Two drive units require twice the cabinet volume as a single unit for a given alignment.
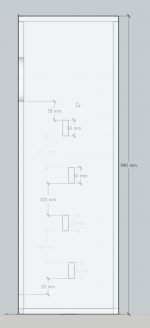
Thanks! So what about damping location? Where should it be placed exactly for a start? For now I have only top 3rd of the box stuffed with foam and nothing on the back, while waiting for poly to arrive.


zdr,
The area that you have lined looks ok. You can add a similar layer on the inside of the back panel.
Looks like you do not have any bracing? It will probably help if you put in some simple bracing - like 2-3 pieces of 3/4"x 2" (or roughly similar size) wooden slats joining the two sides on the cabinet.
Once you receive the poly-fill material, the idea is to fluff it up and distribute evenly throughout the box.
Last edited:
zdr,
The area that you have lined looks ok. You can add a similar layer on the inside of the back panel.
Looks like you do not have any bracing?
No bracing yet, is it worth it?
No bracing yet, is it worth it?
Yes, bracing makes the cabinet more rigid. I edited my post and ave suggested a very simple and easy to implement bracing scheme.
Yes, bracing makes the cabinet more rigid. I edited my post and ave suggested a very simple and easy to implement bracing scheme.
I can imagine that it will be more rigid, but how it should affect the sound? It would be good to hear actual experiences if anyone tried it, before and after.
Old post on Pensil cabinet bracing:
https://www.diyaudio.com/forums/planet-10-hifi/199211-pensil-10-2-brace-brace.html#post2757977
https://www.diyaudio.com/forums/planet-10-hifi/199211-pensil-10-2-brace-brace.html#post2757977
Something like this, if I understood correctly:
Yes you are right.
Make sure you space them so that they are not too close, and no need to keep them exactly in one line. 🙂
Yes you are right.
Make sure you space them so that they are not too close, and no need to keep them exactly in one line. 🙂
How's this:
Attachments
Should do fine.
Optimum bracing scheme is that shown in the [super]Pensil 12P CAD file; note 3/ in the Pensil 10.3 pdf directs builders to that drawing for a visualisation.
Personally I almost never recommend acoustic foam but the minimal quantity shown shouldn't be a significant issue. Stuffing is evenly distributed throughout the enclosure, apart from immediate proximity to the drive unit. Adjust as you see fit from there: one of the points of these boxes is for builders to do so to suit their particular requirements or preferences.
zdr,
Probably you can start without the magnet brace.
I'm already finished with lateral ones, and also added more foam behind the magnet, same height as the rest 🙂 Can't say I hear any improvement though. Seems that mpx is already quite stiff.
zdr,
Good that you have a stiff box, and the additional bracing you just put in won't hurt. 🙂
To think of it, you probably have some longitudinal support also, from the structure to attach the back panel.
Looks like next step in your project is to put in the poly fill.
Good that you have a stiff box, and the additional bracing you just put in won't hurt. 🙂
To think of it, you probably have some longitudinal support also, from the structure to attach the back panel.
Looks like next step in your project is to put in the poly fill.
Is this the correct way of stuffing poly:
https://www.kjfaudio.com/wp-content/uploads/2016/10/untitled-86.jpg
https://www.kjfaudio.com/wp-content/uploads/2016/10/untitled-86.jpg
That bracing will help but best is the kind ofbrace shown in the Pensil A12 plans.
These are Chris’ A7 Pensils, and this is the simplest scheme i would use. Might be a bit difficut to implement afterthe fact. You want all the panels braced and any behind the driver need to be perpendicular, Braces should be placed asymmetrically. In most cases the brace is “tight” to the magnet and allows for sharing the vibratinal energy across more panels (increasing resolution and reducing the likelyhood of potential resonances being excited..
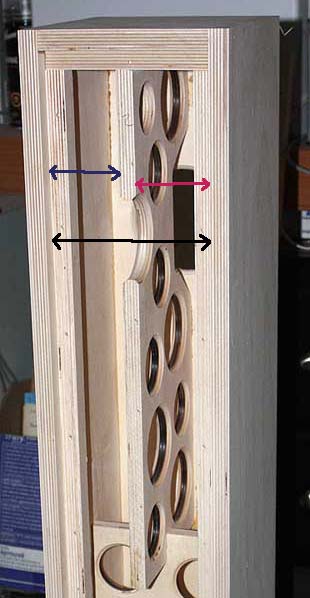
Well teased poly fluff damping should fill the entire enclosure. Damping around the driver to reduce reflections thru the come is beneficial, but the foam you have shown is not very good for the application.
dave
These are Chris’ A7 Pensils, and this is the simplest scheme i would use. Might be a bit difficut to implement afterthe fact. You want all the panels braced and any behind the driver need to be perpendicular, Braces should be placed asymmetrically. In most cases the brace is “tight” to the magnet and allows for sharing the vibratinal energy across more panels (increasing resolution and reducing the likelyhood of potential resonances being excited..
Well teased poly fluff damping should fill the entire enclosure. Damping around the driver to reduce reflections thru the come is beneficial, but the foam you have shown is not very good for the application.
dave
Is this the correct way of stuffing poly:
That is prety good and gives a hint of the braces. I would take the fluff all the way to the top, and none at the bottom is more so you can’t see it thru the terminus.
dave
- Home
- Loudspeakers
- Full Range
- Pensil 10.3 first build questions