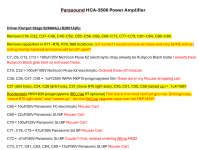
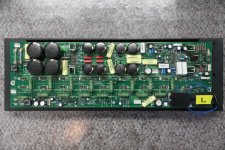
I just got this amp up and running thanks to this thread and a group of members that helped me find a bad resistor. While the unit is still on my work bench I wanted to complete some quick modifications that BigSkyAudio shared.
The attached word document below has all my notes in RED with some questions I have highlighted in Yellow.
- I know a lot of the bypass caps are removed and some are replaced with other caps, but I would love to know if anyone completed these mods and has pictures or a list of all the cap locations where nothing will be replaced there.
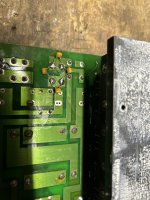
- There are also a few steps that are confusing to me - C21 (drill hole), C24, C28 (drill hole), C31 (move R70 right side), C50, C51, C55, C58 (raised up) = .1uF/160V
The drill hole, Move R70 right side, and raise up specifically confuse. I figured maybe because of the spacing of the caps holes need to be drilled to fit the lead spacing?
- The 4 Kemet capacitors across D8. Do i just take all 4 capacitors and solder them leg to leg so all 4 of them connect the legs forming a square?
- Could not find the replacement Diotec D53 and D57. Any other recommendations here?
- The capacitor replacement on the PSU board is a bit confusing. I am removing all bypass and the original caps and replacing with only these 4 caps in locations C150, C151, C158, C159?
I have been in communication with Michael Percy ordering resistors and the Rel RT caps. He does not have any more Holco H4 but recommended PR9372 for R44. I am in talks @RM about some H2 resistors (need to buy minimum of 50) and also see an ebay listing for 20 pieces of H4 from West Florida Components.
I am also open to some other easy upgrades or modifications. This amp may potentially go back to my friend that traded it to me so I am going to try to do as many helpful mods as possible.
The attached word document below has all my notes in RED with some questions I have highlighted in Yellow.
- I know a lot of the bypass caps are removed and some are replaced with other caps, but I would love to know if anyone completed these mods and has pictures or a list of all the cap locations where nothing will be replaced there.
- There are also a few steps that are confusing to me - C21 (drill hole), C24, C28 (drill hole), C31 (move R70 right side), C50, C51, C55, C58 (raised up) = .1uF/160V
The drill hole, Move R70 right side, and raise up specifically confuse. I figured maybe because of the spacing of the caps holes need to be drilled to fit the lead spacing?
- The 4 Kemet capacitors across D8. Do i just take all 4 capacitors and solder them leg to leg so all 4 of them connect the legs forming a square?
- Could not find the replacement Diotec D53 and D57. Any other recommendations here?
- The capacitor replacement on the PSU board is a bit confusing. I am removing all bypass and the original caps and replacing with only these 4 caps in locations C150, C151, C158, C159?
I have been in communication with Michael Percy ordering resistors and the Rel RT caps. He does not have any more Holco H4 but recommended PR9372 for R44. I am in talks @RM about some H2 resistors (need to buy minimum of 50) and also see an ebay listing for 20 pieces of H4 from West Florida Components.
I am also open to some other easy upgrades or modifications. This amp may potentially go back to my friend that traded it to me so I am going to try to do as many helpful mods as possible.
Attachments

Then why are you here posting?Without posted schematics - why would anybody invest time going through the uploaded files?

Very helpful! @bigskyaudio
Thank you! Should be an easy add just wanted to confirm I understood it correctly.
Thank you! Should be an easy add just wanted to confirm I understood it correctly.
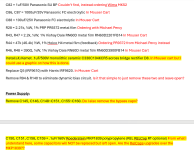
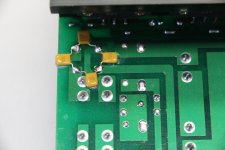
Approximate locations for new RELCaps - use the photos as a guide for placement and drill holes where necessary to replace the original shorter caps. The RELCaps are much longer and sometimes you will have to bend the leads around to the underside of the cap to fit the original pcb holes. Be sure to use some Teflon sleeving. I always used a dab of GE Silicon II to hold them to the board. Use only a non-acidic adhesive for that purpose.
The Vishay Roederstein caps are excellent and what I used as standard upgrade over Parasound originals. The RELCaps were offered as an upgrade. However, Reliable Capacitor was purchased by Wilson Audio a few years ago and I do not know if they are manufacturing capacitors these days.
The red caps are the WIMA MKP10 polypropylene.
Attachments
This is great! Thank you.
Definitely gives me a better visual of what to start removing and how the caps need to be installed.
I see that Mouser has the Vishay Roederstein. Michael mentioned that he has the new production Relcaps. I think I’ll go with the Vishay instead.
Definitely gives me a better visual of what to start removing and how the caps need to be installed.
I see that Mouser has the Vishay Roederstein. Michael mentioned that he has the new production Relcaps. I think I’ll go with the Vishay instead.
During a phone call with John Curl, he once told me that he never specified all of the bypass caps found in the 3500 and others. This is something that the factory in Taiwan did on their end. I remember taking the lid off of my HCA-2200II amp to upgrade it and was astounded by all of the unnecessary bypass caps, some of them paralleled like a polypropylene across a polycarbonate (probably done to lower impedance).
I always remember what Nelson Pass once said and it has stuck with me. KISS = Keep It Simple ...... .
This applies to power supply rail bypassing too. Simple and effective bypassing works just fine. Multiples of caps and a lot of paralleling just introduces more noise to audio ground which can congest and muddy the sound. Use of a really good polypropylene cap will suffice.
Attachments

Perfect. Everything starting to come together for my understanding of the mods. Thank you for the help.
Parts almost done with the exception of the bridge rectifiers. I am unable to find the Diotec FDB3506.
Is there another recommended part to use?
Parts almost done with the exception of the bridge rectifiers. I am unable to find the Diotec FDB3506.
Is there another recommended part to use?
Also, I noticed that R 94 was still installed in your picture and R140 is hiding under the larger 2.7k 5W resistor.
Is it still recommended I remove these two resistors completely?
Is it still recommended I remove these two resistors completely?
Found the bridge rectifiers on mouser.Perfect. Everything starting to come together for my understanding of the mods. Thank you for the help.
Parts almost done with the exception of the bridge rectifiers. I am unable to find the Diotec FDB3506.
Is there another recommended part to use?
We usually left the dynamic bias circuit intact (R94/R140) unless a customer requested removal.
As I mentioned in your other thread about upgrade parts, there are 2 Diotecs: Diotec Semiconductor which Mouser carries and Diotec Electronics which is the company that makes the bridge that is recommended. If you can get a soft recovery bridge in that case style in 35A/600PRV it should be fine. The 2 bridges at Mouser are standard recovery and do not appear to have soft characteristics.
As I mentioned in your other thread about upgrade parts, there are 2 Diotecs: Diotec Semiconductor which Mouser carries and Diotec Electronics which is the company that makes the bridge that is recommended. If you can get a soft recovery bridge in that case style in 35A/600PRV it should be fine. The 2 bridges at Mouser are standard recovery and do not appear to have soft characteristics.
Attachments
Last edited:
Ok. I ended up ordering the wrong ones from mouser but I’ll return them or use on another project. Sorry I didn’t see your post on the swap meet thread.
Regarding D53 and D57
Could I leave the originals in and install four .1uf 850V caps like the pic below? I couldn’t find any soft recovery bridges in the same style.
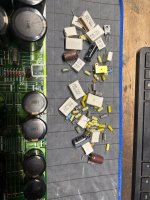
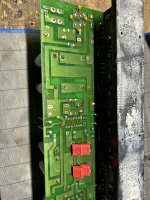
Also, good night for stripping one channel down. All caps and resistors from the mod list have been removed and solder pads and boards cleaned up. I’ll have most of the parts arriving tomorrow.
Regarding D53 and D57
Could I leave the originals in and install four .1uf 850V caps like the pic below? I couldn’t find any soft recovery bridges in the same style.
Also, good night for stripping one channel down. All caps and resistors from the mod list have been removed and solder pads and boards cleaned up. I’ll have most of the parts arriving tomorrow.
Attachments
I had a question that I posted.Then why are you here posting?
OP replied and answered my question.
That ok with you?
Good with me @madis64. We can move on.
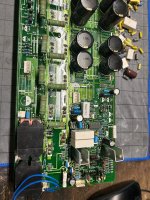
Quick update on the first amp channel. 90% of the parts arrived today from Mouser and Amazon. The Wima MKS I ordered were a bit too small so I soldered them to the bottom of the pcb board. I have about 50% of the lytics installed.
Working with Michael Percy on the PPR resistors and I ordered Holco H4 from eBay.
Still having a hard time finding upgrade Diode bridges but I did email Diotec Electronics and tried calling them. Worse case I’ll add those caps across diodes like in the post above.
Attachments

Making really nice progress. I realized I shorted myself a few caps and forgot to order the 47uf BP.
I have another mouser cart ready with some more .1uf 850V Roederstein to add around D53 and D57.
I have another mouser cart ready with some more .1uf 850V Roederstein to add around D53 and D57.
Attachments
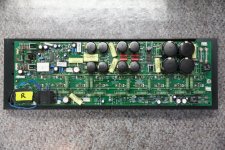
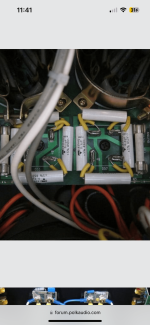
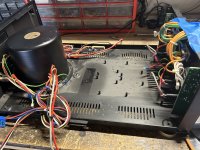
Pulled out the psu today and labeled all my wires and took pictures of all the wires. Going to use it as an opportunity to clean out all the dust while I change the caps.
Still trying to decide on the diodes. Haven’t found a soft recovery replacement.
Still trying to decide on the diodes. Haven’t found a soft recovery replacement.
Attachments


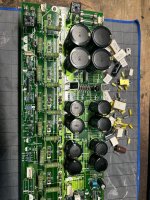
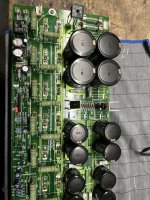
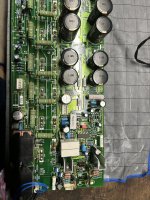
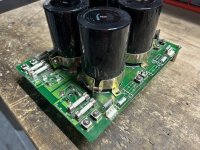
Caps replaced on the PSU board.
I’m still heavily looking for rectifier replacements that are soft recovery but all I have found are these (also attached).
https://www.digikey.com/en/products/detail/microchip-technology/APT2X60D120J/1494446
They would have to be mounted in another location on the bottom of the chassis.
I’m still heavily looking for rectifier replacements that are soft recovery but all I have found are these (also attached).
https://www.digikey.com/en/products/detail/microchip-technology/APT2X60D120J/1494446
They would have to be mounted in another location on the bottom of the chassis.
Attachments
- Home
- Amplifiers
- Solid State
- Parasound HCA-3500 Modification Thread