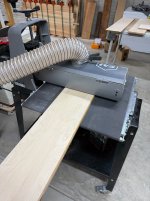
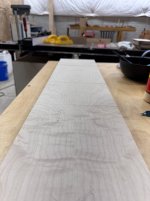
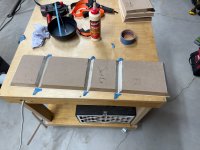
We drum sanded the veneered panels to thickness with 80 grit. In retrospect, we should have gone to 120 grit. It would have made final sanding much quicker. This was my first time using a drum sander. There’s a learning curve to getting just the right settings to keep the pieces automatically feeding without stalling. When that happens you get a nice divot, which takes many more passes to remove.
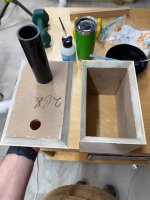
We ended up with two panels per box. One for the top, sides, and bottoms, which will be grain matched at the miters. And a second for the back.
Then we re-squared all the panels. The process was pretty simple once we figured it out. I’m not sure if this is how someone more seasoned would go about it, though.
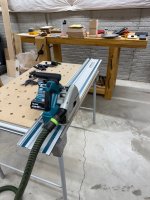
1. Use a track saw to rip parallel to the book matched glue line.
2. Use a miter sled to crosscut both small ends square to the step 1 cut.
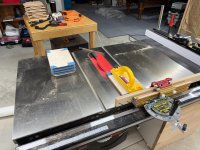
3. Use a table saw to rip the opposite side from step 1 to the final distance from the bookmatch glue line (half the total final dimension).
4. Once all panels of the same size were through step 3, set the table saw to the final dimension for that panel. Set the table saw fence to the final dimension and rip all pieces on the same side from step 1.
This means you are cutting that first side twice. First to square with the track saw. Second to perfect width with the final table rip. Maybe? Yes. But it left us with very consistent sizes.
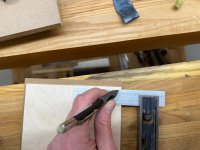
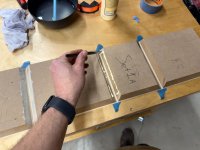
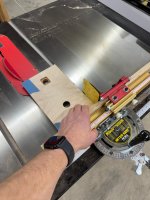
Then we mitered all pieces to final size using stop blocks. The most annoying parts of this were:
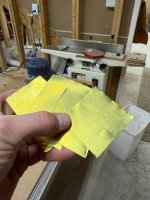
1. Having to tape all of the edges to prevent tear out.
2. Fiddling with the miter gauge to get it perfectly square.
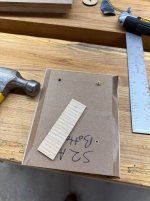
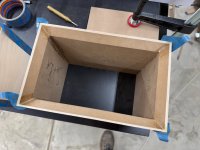
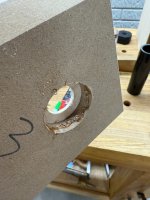
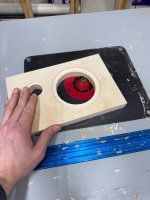
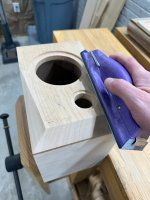
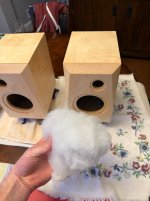
Before gluing up the sides/top/bottom, we drilled the bottom inside panels for our press fit inserts. These will hold the crossover standoffs. The inserts are knurled and made for heat pressing into plastic. But with the right size drillbit, they were great for pressing right into MDF. We didn’t even have to glue them.
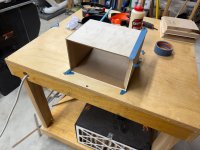
We weren’t sure if our miters were going to be perfect enough to simply tape all the joints together so we used box clamps for the first one. After that, we realized everything was pretty well aligned and simply used tape for the rest. If there was a small problem with the joint, we just used more tape to tweak and re-enforce the problem area.
While that glue up was drying, we prepared the back panels. I’ll share those details in another post.
We ended up with two panels per box. One for the top, sides, and bottoms, which will be grain matched at the miters. And a second for the back.
Then we re-squared all the panels. The process was pretty simple once we figured it out. I’m not sure if this is how someone more seasoned would go about it, though.
1. Use a track saw to rip parallel to the book matched glue line.
2. Use a miter sled to crosscut both small ends square to the step 1 cut.
3. Use a table saw to rip the opposite side from step 1 to the final distance from the bookmatch glue line (half the total final dimension).
4. Once all panels of the same size were through step 3, set the table saw to the final dimension for that panel. Set the table saw fence to the final dimension and rip all pieces on the same side from step 1.
This means you are cutting that first side twice. First to square with the track saw. Second to perfect width with the final table rip. Maybe? Yes. But it left us with very consistent sizes.
Then we mitered all pieces to final size using stop blocks. The most annoying parts of this were:
1. Having to tape all of the edges to prevent tear out.
2. Fiddling with the miter gauge to get it perfectly square.
Before gluing up the sides/top/bottom, we drilled the bottom inside panels for our press fit inserts. These will hold the crossover standoffs. The inserts are knurled and made for heat pressing into plastic. But with the right size drillbit, they were great for pressing right into MDF. We didn’t even have to glue them.
We weren’t sure if our miters were going to be perfect enough to simply tape all the joints together so we used box clamps for the first one. After that, we realized everything was pretty well aligned and simply used tape for the rest. If there was a small problem with the joint, we just used more tape to tweak and re-enforce the problem area.
While that glue up was drying, we prepared the back panels. I’ll share those details in another post.
Attachments
-
 IMG_6119.JPG457.4 KB · Views: 56
 -
 IMG_6120.JPG505.5 KB · Views: 50
 -
 IMG_6121.JPG486.8 KB · Views: 50
 -
 IMG_6122.JPG393.9 KB · Views: 55
 -
 IMG_6123.JPG394.6 KB · Views: 49
 -
 IMG_6130.JPG482.2 KB · Views: 45
 -
 IMG_6124.JPG402.2 KB · Views: 47
 -
 IMG_6136.JPG584.3 KB · Views: 48
 -
 IMG_6137.JPG451.6 KB · Views: 49
 -
 IMG_6138.JPG484.9 KB · Views: 46
 -
 IMG_6143.JPG411.4 KB · Views: 47
 -
 IMG_6142.JPG289.1 KB · Views: 46
 -
 IMG_6144.JPG316.4 KB · Views: 46
 -
 IMG_6145.JPG424.8 KB · Views: 48
 -
 IMG_6147.JPG408.6 KB · Views: 50
 -
 IMG_6148.JPG349.2 KB · Views: 51

Nice work.
And yes, green masking tape is your friend to reduce tear out (also can work as a shim when sneaking up on a cut). On something like maple though tear out shouldn't be a problem except at the end of the cut where a sacrificial fence works wonders. Use a Freud P410 saw blade and you'll be amazed at its crosscut ability.
And yes, green masking tape is your friend to reduce tear out (also can work as a shim when sneaking up on a cut). On something like maple though tear out shouldn't be a problem except at the end of the cut where a sacrificial fence works wonders. Use a Freud P410 saw blade and you'll be amazed at its crosscut ability.
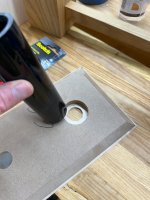
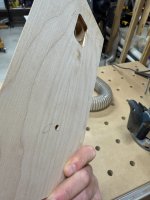
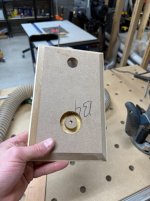
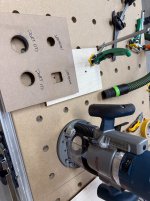
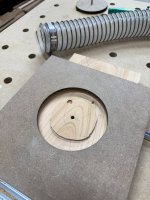
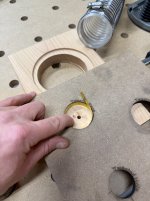
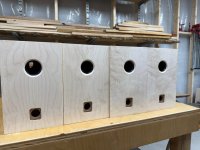
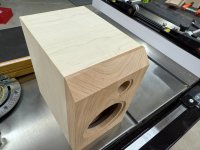
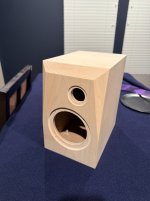
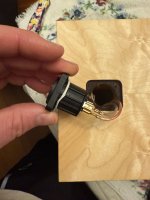
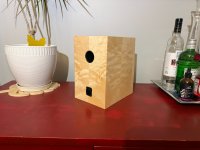
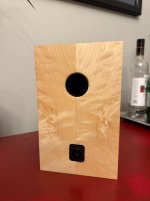
The first step for the back panels was to route the speakon terminal inset. The smallest router bit I could find was 3/16", which is a larger radius than the speakon terminal corners. To compensate, I offset the cut about 1/16" to try to make it looks good. I don't think this ended up working very well. I wish I could have found a smaller bit.
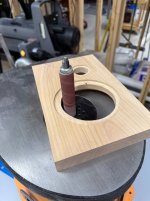
After the inset was done we routed the speakon trough hole. In hindsight, I wish we would have had a drill bit for each of the through hole sizes on these cabinets. That would have been much faster than all of the routing.
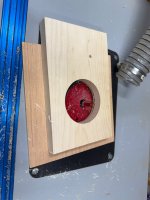
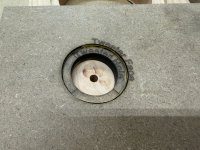
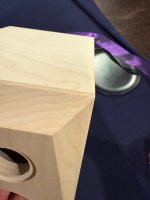
With the speakon holes done, we routed the inset for the ports from the inside face of the back panels.
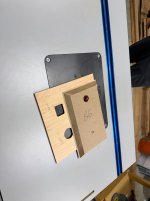
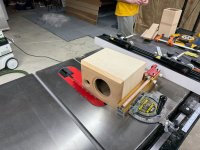
Since we glued up the sides/top/bottom first, we were able to then tweak the back panels to fit just right on the table saw. We did this by test fitting each back panel to its box, then using brass shims and the miter sled to take tiny bits off in the right spots. These shims ended up coming in very handy for a few things on the project.
After gluing the ports into the inset with CA glue, we glued up the backs to the shells.
The baffles are next up.
After the inset was done we routed the speakon trough hole. In hindsight, I wish we would have had a drill bit for each of the through hole sizes on these cabinets. That would have been much faster than all of the routing.
With the speakon holes done, we routed the inset for the ports from the inside face of the back panels.
Since we glued up the sides/top/bottom first, we were able to then tweak the back panels to fit just right on the table saw. We did this by test fitting each back panel to its box, then using brass shims and the miter sled to take tiny bits off in the right spots. These shims ended up coming in very handy for a few things on the project.
After gluing the ports into the inset with CA glue, we glued up the backs to the shells.
The baffles are next up.
Attachments
-
 IMG_6161.JPG410.8 KB · Views: 32
 -
 IMG_6162.JPG428.8 KB · Views: 35
 -
 IMG_6164.JPG371.5 KB · Views: 36
 -
 IMG_6165.JPG546.8 KB · Views: 38
 -
 IMG_6159.JPG662.4 KB · Views: 33
 -
 IMG_6158.JPG580.3 KB · Views: 32
 -
 IMG_6156.JPG434.6 KB · Views: 40
 -
 IMG_6155.JPG489.3 KB · Views: 32
 -
 IMG_6153.JPG431.6 KB · Views: 31
 -
 IMG_6151.JPG478.7 KB · Views: 33
 -
 IMG_6150.JPG568.1 KB · Views: 35
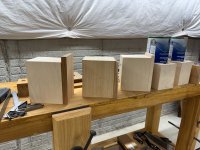
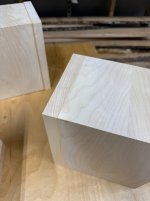
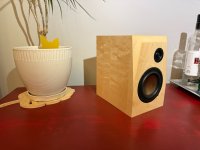
We ended up with 2 cherry and 2 maple baffles. The cherry pieces were about 1 1/8" thick. The maple was just under 1". We cut them to be about 1/8" bigger in length and width than the shells so that we could flush trim them to the perfect size after glue up. We also decided that we would cut the facets after glue up, since that would be easier. But if we made a mistake on the facets after glue up, that would be a big problem. We thought the risk was worth it, as we were pretty confident in the facet technique we were playing around with a couple weeks ago.
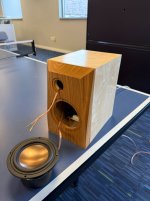
Again, we used router jigs to get the woofer and tweeter holes just right. Then put a nice big chamfer on the insides.
We had one router jig slip, but luckily it was on the through hole of the woofer, so no big deal. We cleaned this up with a spindle sander. This sander also made it really easy to open up the tweeter through holes to just the right size for a press fit.
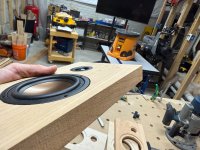
After gluing up the baffles, we bought a big 1/2" shank compression flush trim bit. It made easy work of flush trimming the baffles to the box. I wish we would have had this thing for the whole project. Not cheap, but so much better than the smaller flush trim bits.
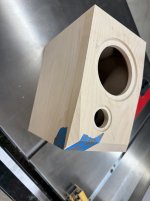
We rounded over the port opening. Unfortunately, our veneer ended up being way thinner than expected, so we couldn't do the full 1/2" round over we were hoping for. But they still look pretty awesome.
Again, we used router jigs to get the woofer and tweeter holes just right. Then put a nice big chamfer on the insides.
We had one router jig slip, but luckily it was on the through hole of the woofer, so no big deal. We cleaned this up with a spindle sander. This sander also made it really easy to open up the tweeter through holes to just the right size for a press fit.
After gluing up the baffles, we bought a big 1/2" shank compression flush trim bit. It made easy work of flush trimming the baffles to the box. I wish we would have had this thing for the whole project. Not cheap, but so much better than the smaller flush trim bits.
We rounded over the port opening. Unfortunately, our veneer ended up being way thinner than expected, so we couldn't do the full 1/2" round over we were hoping for. But they still look pretty awesome.
Attachments
-
 IMG_6167.JPG374.4 KB · Views: 49
 -
 IMG_6166.JPG533.3 KB · Views: 41
 -
 IMG_6172.JPG522.6 KB · Views: 38
 -
 IMG_6173.JPG373.2 KB · Views: 43
 -
 IMG_6177.JPG392.5 KB · Views: 36
 -
 IMG_6176.JPG535.5 KB · Views: 41
 -
 IMG_6175.JPG410.4 KB · Views: 40
 -
 IMG_6178.JPG878.9 KB · Views: 36
 -
 IMG_6179.JPG336.8 KB · Views: 37
 -
 IMG_6180.JPG401.2 KB · Views: 43
 -
 IMG_6182.JPG482.4 KB · Views: 40
 -
 IMG_6183.JPG324.5 KB · Views: 40
 -
 IMG_6184.JPG541 KB · Views: 42
 -
 IMG_6202.JPG370.3 KB · Views: 37
 -
 IMG_6200.JPG250.2 KB · Views: 42
 -
 IMG_6197.JPG367.1 KB · Views: 40
 -
 IMG_6204.JPG438 KB · Views: 48
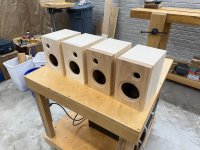
The final cuts were making the facets, which was actaully easy. But painstakingly slow, since hitting the exact marks on the start and finish of the side facets was tricky. We kept needing to microadjust the miter to sneak up on both marks with the same cut.
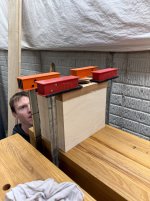
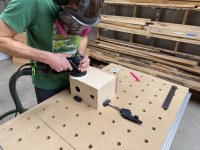
Then the real fun began. Sanding with 80/120/150/220 with the festool. That thing is a beast. The baffles only needed 150/220, and we did those by hand so that we didn't ruin the facet edges.
We really shouldn't have needed to sand with 80, but I think we were going to deep with the drum sander when making the panels. Next time, I would be much gentler with the drum and go to 120 with it. It's a pain to change the sand paper, but probably worth the time saved on the hand sanding.
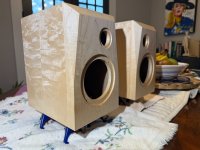
These things came out buttery smooth after the 220 grit.
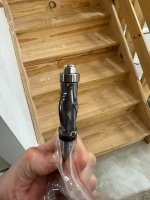
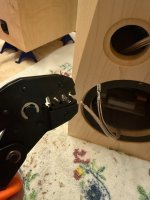
I finished my set with 2 coats of Odies Oil then installed the components. I bought a PEBA crimper kit for the spades - that worked really well. Highly recommended for $20 on Amazon. I also used some of that tacky picture hanger putty to better air seal the tweeter and speakon holes. I have no idea if this will stand the test of time, but it seems to be working well so far.
Then the real fun began. Sanding with 80/120/150/220 with the festool. That thing is a beast. The baffles only needed 150/220, and we did those by hand so that we didn't ruin the facet edges.
We really shouldn't have needed to sand with 80, but I think we were going to deep with the drum sander when making the panels. Next time, I would be much gentler with the drum and go to 120 with it. It's a pain to change the sand paper, but probably worth the time saved on the hand sanding.
These things came out buttery smooth after the 220 grit.
I finished my set with 2 coats of Odies Oil then installed the components. I bought a PEBA crimper kit for the spades - that worked really well. Highly recommended for $20 on Amazon. I also used some of that tacky picture hanger putty to better air seal the tweeter and speakon holes. I have no idea if this will stand the test of time, but it seems to be working well so far.
Attachments
-
 IMG_6208.JPG413.3 KB · Views: 40
 -
 IMG_6209.JPG543.5 KB · Views: 37
 -
 IMG_6210.JPG268.2 KB · Views: 33
 -
 IMG_6214.JPG431.9 KB · Views: 32
 -
 IMG_6212.JPG444.5 KB · Views: 31
 -
 IMG_6216.JPG559.3 KB · Views: 32
 -
 IMG_6217.JPG335.8 KB · Views: 37
 -
 IMG_6223.JPG379.4 KB · Views: 28
 -
 IMG_6224.JPG322.2 KB · Views: 38
 -
 IMG_6226.JPG403.9 KB · Views: 38
 -
 IMG_6227.JPG416.3 KB · Views: 37
 -
 IMG_6229.JPG346.1 KB · Views: 32
 -
 IMG_6236.JPG412.2 KB · Views: 37
 -
 IMG_6235.JPG337.8 KB · Views: 34
 -
 IMG_6237.JPG375.2 KB · Views: 42
 -
 IMG_6241.JPG312.4 KB · Views: 38
 -
 IMG_6242.JPG322.2 KB · Views: 43
 -
 IMG_6246.JPG252.7 KB · Views: 40
Nice work, guys.
My drum sander is presently not in service. It's a Delta - worst company on the planet for parts & service - and been more of a PIA than a help. And you're right - changing grit is a pain and sanding a slow process with miniscule removal per pass.
My drum sander is presently not in service. It's a Delta - worst company on the planet for parts & service - and been more of a PIA than a help. And you're right - changing grit is a pain and sanding a slow process with miniscule removal per pass.
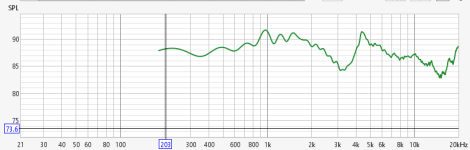
I have been too busy using my new speakers to post the mesaurements I captured. I used the quasi-anechoic technique described at ASR. I did not do the bass response, but I had a wide enough impulse window to get down around 200hz, which is cool.
I can tell from listening to sweeps that there are definitely ups and down in the response SPL, and I don't love the dips I'm getting around 3Khz, but the low end is very impressive. I've been using these at home theater mains for the time being, and I'm just shocked at how well they handle the bass end.
Even though they sound great, my measured response curve doesn't match Carmody's design much. I would love to know why. Is is the facets? The extra thick baffle? I know they are air sealed really well, so I don't think it is due to leakage. Did I mess up the crossovers? I probably won't have time to actually find out, because I'm very happy with these as they are and I'd like to move on to a bigger, active build.
I'm considering the Heissmann DXT Wave Fusion with some modifications. Ambitious for a second project? Maybe. But I have plenty of car audio experience and have had great success with DSPs. I wish I could find anyone else with a build log on the internet, but I can't. They aren't exactly cheap to build.
I haven't gotten final pics of the two-tone Overnight Sensations we built, but I do have use hooking up the speakers.
Attachments
Even though they sound great, my measured response curve doesn't match Carmody's design much. I would love to know why.
Maybe you just want to enjoy them. If you feel like investigating, I'd figure measurements of individual drivers only in-box (no XO - pick a high start freq for the tweeter!), then individual drivers with XO, then the two drivers together with XO, and maybe also a measurement with tweeter polarity flipped. That might show where the trouble starts.
They look sweet!
- Home
- Loudspeakers
- Multi-Way
- Overnight Sensations Build Log 2025