After lurking this forum for the last couple months, my brother and I are going to build some bookshelf speakers. The amount of information you all have shared makes this a lot easier to try for the first time. Thanks to everyone!
We are using the Overnight Sensations design, modeled after dgunther’s faceted cabinet build. Unfortunately, I can’t find a build plan on the internet, so it’s more of an inspiration than anything.
My brother has a woodshop with some really nice equipment, so we are going for a furniture grade finish. He has 6/4 cherry and curly maple on hand, so we will probably use that. The plan at this point is to cut our own 1/8” veneer and apply over 1/2” MDF to create 5/8” panels. These panels will be used for everything except the baffle and removable back.
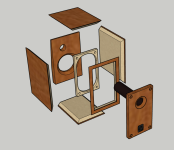
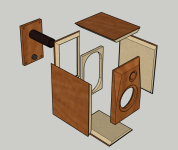
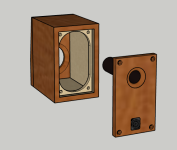
The baffle will probably be thick solid cherry, so that the facets can be cut. Probably around 1”. The removable back panel will probably be solid wood, also, so that we can build an integrated port with a nice roundover.
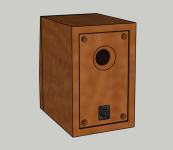
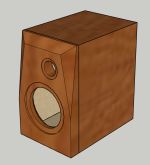
Attached are the drawings for the initial concept. Since we are using 5/8" panels with a 1" faceted baffle, some size adjustments from Paul Carmody's 1/2" and 3/4" versions needed to be made. In these drawings, the speakers have been lowered by 1/2". The internal volume is right around 278 cubic inches, which is between Paul's 3/4" and 1/2" designs (270 cu in and 280 cu in respectively). Hopefully that is good enough.
I'm hoping we can mount the crossover to the removable back panel, but I can't test fit until all the parts are delivered.
If you see any issues with this design, we are very open to feedback.
We are using the Overnight Sensations design, modeled after dgunther’s faceted cabinet build. Unfortunately, I can’t find a build plan on the internet, so it’s more of an inspiration than anything.
My brother has a woodshop with some really nice equipment, so we are going for a furniture grade finish. He has 6/4 cherry and curly maple on hand, so we will probably use that. The plan at this point is to cut our own 1/8” veneer and apply over 1/2” MDF to create 5/8” panels. These panels will be used for everything except the baffle and removable back.
The baffle will probably be thick solid cherry, so that the facets can be cut. Probably around 1”. The removable back panel will probably be solid wood, also, so that we can build an integrated port with a nice roundover.
Attached are the drawings for the initial concept. Since we are using 5/8" panels with a 1" faceted baffle, some size adjustments from Paul Carmody's 1/2" and 3/4" versions needed to be made. In these drawings, the speakers have been lowered by 1/2". The internal volume is right around 278 cubic inches, which is between Paul's 3/4" and 1/2" designs (270 cu in and 280 cu in respectively). Hopefully that is good enough.
I'm hoping we can mount the crossover to the removable back panel, but I can't test fit until all the parts are delivered.
If you see any issues with this design, we are very open to feedback.
Attachments

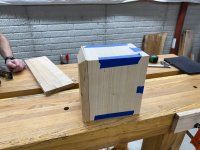
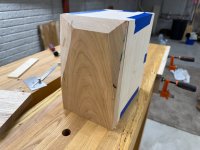
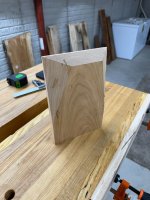
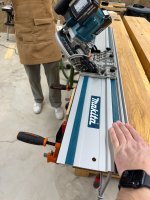
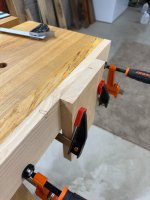
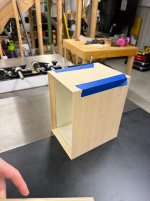
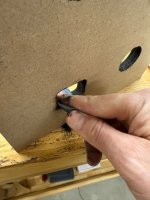
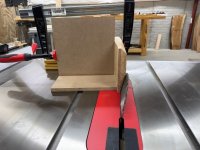
Last night we built a quick test box and tested out some facet cuts on a baffle. We were using a track saw to cut the facets. I thought this would be fairly easy, but we were struggling to hit all the marks. We are going to think about a better way over the next couple of days. Possibly by using a bandsaw with a taper jig or something.
Don't mind the box wonkiness, we were using some scraps that were pretty wavy. We were considering 1" and 1.5" thick baffles. After testing with the 1", there is no reason we see to even cut the 1.5". The 1" looks great.
We cut 2 different facet angles. I like the right-side angle better, but I also kinda like the asymmetric look. Maybe we will consider that for the final build...
My biggest takeaway from last night is that these boxes are SMALL. In a good way. They will easily fit on a desk, on a TV cabinet, anywhere, really.
Attachments
-
 IMG_6017.JPG438.8 KB · Views: 85
 -
 IMG_6015.JPG362.3 KB · Views: 91
 -
 IMG_6013.JPG412.6 KB · Views: 83
 -
 IMG_6008.JPG388.3 KB · Views: 84
 -
 IMG_6007.JPG343 KB · Views: 87
 -
 IMG_6004.JPG385 KB · Views: 85
 -
 IMG_6003.JPG397.2 KB · Views: 83
 -
 IMG_6002.JPG457.9 KB · Views: 80
 -
 IMG_6001.JPG546.8 KB · Views: 82
 -
 IMG_5999.JPG446.1 KB · Views: 85
Table saw for bevel at top of baffle (cross grain) and a good hand plane with proper blade, properly sharpened, for bevels on the sides (with the grain)
We did try to use some hand tools for the sides. It was slow, but seemed like it would work with enough practice. You are absolutely right about the table saw for the cross cut. I'm a bit embarrassed we didn't do that out of the gate. But that's why we are building a test box, Thanks a lot!
Not much progress the last few days, but I did finally receive all of the crossover parts. I've also been learning Fusion 360, so that we can use my buddy's laser cutter to quickly create router jigs for all of the cutouts.
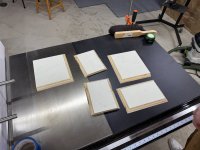
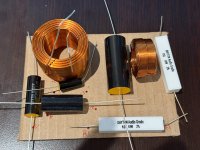
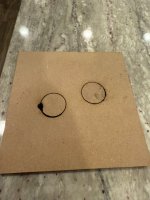
I tested the crossover layouts on a cardboard template. Once I was happy with it, I transferred the holes to some 1/4" plywood that has been sanded. board are about 3 1/2" x 4 3/4".
If anyone could help: Do I really need to hot glue all these parts down? It seems like that would look sloppy. Is there some other way to stop rattles? I assume that is the main reason people use hot glue...
Thanks for any advice.
Attachments
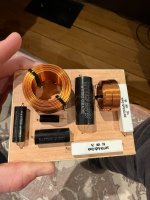
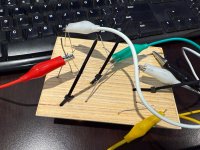
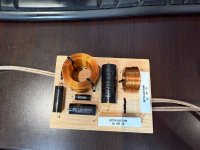
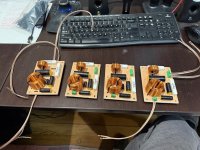
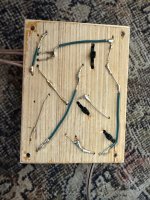
I ended up using zip ties and hot glue for the first board last night. Before soldering everything together, I use alligator clips and some test tones to make sure all my connections were right. As best I could tell, the hi pass and low pass outputs were crossing over around the proper frequencies. I didn't use a scope or anything, I just played a variety of test tones (200Hz, 1kHz, 5kHz, etc) and listened through some old computer speakers I had lying around.
I'm trying as best I can to make these look great, but it was kind of a pain to try to make the backside with the solder joints look good. I think it was more difficult because I was not using terminal blocks for everything. Instead, I connected the 16 gauge wire directly to other leads. Using zip ties as a strain relief to lock in the jacket was a late add that worked well.
Next time I'll probably try to find some through hole terminal blocks for the speaker wires.
Unfortunately, the resisters and one cap already released from the hot glue, even though I used plenty. Since everything is locked in with the leads through hole, I think it is OK. The glue is still acting as a buffer to the wood and the parts hopefully wont rattle. I can't imagine that's even a big concern in such a small build.
Attachments

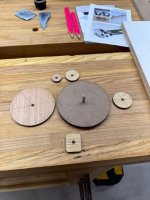
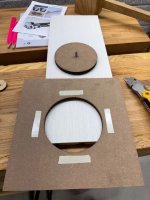
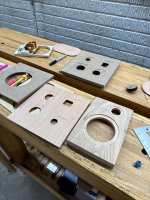
Last night we started cutting the router jigs with my buddy's Falcon 22w laser. It took some time to get the cutting speed and number of passes dialed in. You can see in one pic that we cut too slow and started a fire while figuring it out.
We used 1/2" MDF, which ended up required 4 passes. This took probably 10 minutes for each piece. I'm going to take over 1/4" ply and 3/8" MDF today to see if we can crank through the rest faster. There is a very slight taper to the cuts, since the laser loses focus the deeper the cut gets. But I don't think it's going to be an issue. Also, the thinner material should reduce the taper effect, too.
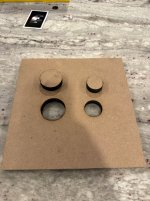
The pics attached are the test piece (burned), the tweeter hole and faceplate, and the speakon and port guides.
We used 1/2" MDF, which ended up required 4 passes. This took probably 10 minutes for each piece. I'm going to take over 1/4" ply and 3/8" MDF today to see if we can crank through the rest faster. There is a very slight taper to the cuts, since the laser loses focus the deeper the cut gets. But I don't think it's going to be an issue. Also, the thinner material should reduce the taper effect, too.
The pics attached are the test piece (burned), the tweeter hole and faceplate, and the speakon and port guides.
Attachments

The laser cutter is pretty awesome for making router jigs. The only drawback is the charred edges. They need to be cleaned up a bit so ash doesn't get everywhere. A light sand with 220 then wiping down with a damp rag mostly did the trick. Hopefully none of that black comes off on finished pieces now.
I ended up buying some cheap through hole screw terminals for the other three crossovers. This made soldering much, much easier. And I think it looks cleaner.
While I like the look of the wood board for the crossovers, I'd probably try to fab PCBs next time. It took a good amount of time drill out the holes, connect the wires on back, jumper them, etc. I bet I could install on a PCB in less than a third of the time.
I'm hoping to get to my brother's shop soon to work out a better approach for those facets this week.
Attachments


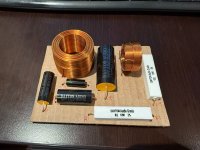
Uh oh! I came across this drawing last night. Apparently I placed the inductors in about the worst configuration possible (#4). So I need to rework the boards, which sucks because they were a pain.
That's part of the experience, though. I shouldn't make the same mistake again...

That's part of the experience, though. I shouldn't make the same mistake again...
#4 being bad is more a function of proximity than orientation. You're more likely #5. Perhaps you can turn one, as in #6?
Thanks for the advice regarding the inductors. I simply rotated the small ones 90 degrees. I had to uncoil about an inch of the winding to avoid drilling new holes in the boards and resoldering, but from what I read this shouldn't cause any audible difference.
We also tweaked some of the jigs to get a better press fit for the tweeters. The laser cutter makes that a breeze.
I'm a little worried the jigs aren't going to make it through all the sticking and removal of the double sided tape. I'm going to try to use as little as necessary and just be careful as I can removing the tape.
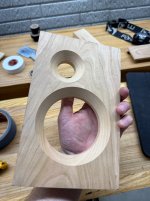
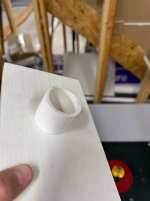
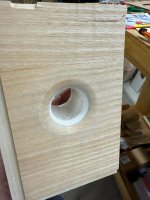
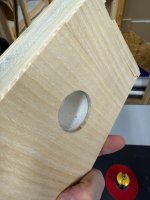
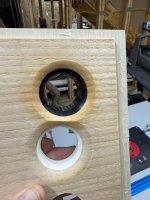
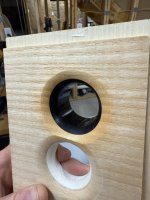
We found a way to seamlessly incorporate the port with the hardwood. We used a 1/2" round over bit and took part of the schedule 40 pipe with it. I special ordered some black "furniture grade" ABS and it looks even better.
We also tweaked some of the jigs to get a better press fit for the tweeters. The laser cutter makes that a breeze.
I'm a little worried the jigs aren't going to make it through all the sticking and removal of the double sided tape. I'm going to try to use as little as necessary and just be careful as I can removing the tape.
We found a way to seamlessly incorporate the port with the hardwood. We used a 1/2" round over bit and took part of the schedule 40 pipe with it. I special ordered some black "furniture grade" ABS and it looks even better.
Attachments
I am trying to validate the frequency response of the test box and I'm having trouble. If anyone is familiar with taking gated impulse responses, please see my post here: Help with quasi anechoic measurement
I am about to attempt something similar 😨Last night we built a quick test box and tested out some facet cuts on a baffle. We were using a track saw to cut the facets. I thought this would be fairly easy, but we were struggling to hit all the marks. We are going to think about a better way over the next couple of days. Possibly by using a bandsaw with a taper jig or something.
Don't mind the box wonkiness, we were using some scraps that were pretty wavy. We were considering 1" and 1.5" thick baffles. After testing with the 1", there is no reason we see to even cut the 1.5". The 1" looks great.
We cut 2 different facet angles. I like the right-side angle better, but I also kinda like the asymmetric look. Maybe we will consider that for the final build...
My biggest takeaway from last night is that these boxes are SMALL. In a good way. They will easily fit on a desk, on a TV cabinet, anywhere, really.
Without many of the tools available to you 🤔
@AlmaAtaKZ Good luck. I think you'll be fine with far fewer tools. We are just using all of my brothers because we can.
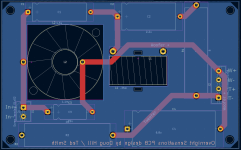
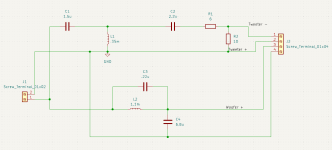
My laser cutter buddy knows how to design PCBs, so we decided to layout a new board in kicad. Even though I like the wood look that I have with the current crossovers, I thought it would be cool to learn more about the PCB process. We sent the final layout to PCBWay and should have the boards in a week or 2.
I also added all of my project files (including these build log posts) to github. You can check that out at digahill/overnight-sensations.
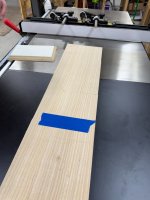
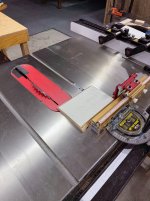
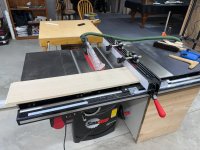
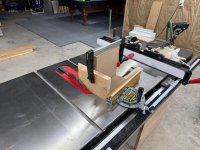
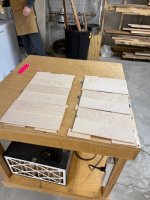
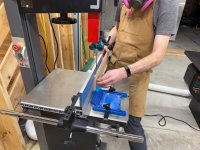
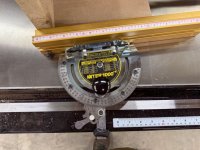
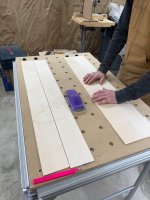
On the woodworking front, we re-sawed and bookmatched some 1/8" curly maple veneer and worked out the table saw jig to cut the facets. The table saw is working much better than the track saw for the facets, which should have been obvious from the start. Even for the sides. Thanks again @prairieboy . If you didn't know, Troels Gravesen has some good advice on faceting.
We are using a vacuum to attach the veneer to 1/2" MDF. Once I make it back to my brother's shop, we should be able to start cutting and assembling. Hopefully that happens in the next couple days.
I also added all of my project files (including these build log posts) to github. You can check that out at digahill/overnight-sensations.
On the woodworking front, we re-sawed and bookmatched some 1/8" curly maple veneer and worked out the table saw jig to cut the facets. The table saw is working much better than the track saw for the facets, which should have been obvious from the start. Even for the sides. Thanks again @prairieboy . If you didn't know, Troels Gravesen has some good advice on faceting.
We are using a vacuum to attach the veneer to 1/2" MDF. Once I make it back to my brother's shop, we should be able to start cutting and assembling. Hopefully that happens in the next couple days.
Attachments
-
 pcb-layout.png183.2 KB · Views: 51
 -
 pcb-schematic.png44 KB · Views: 48
 -
 IMG_6103.JPG94.4 KB · Views: 46
 -
 IMG_6109.JPG105.9 KB · Views: 54
 -
 IMG_6108.JPG97.5 KB · Views: 47
 -
 IMG_6106.JPG74.1 KB · Views: 44
 -
 IMG_6105.JPG104.7 KB · Views: 45
 -
 IMG_6104.JPG72.3 KB · Views: 45
 -
 IMG_6110.JPG99.3 KB · Views: 47
Incra miter gauges are great.
Are you bonding the resawn veneer to the assembled cabinet or to the MDF panels? If it's the latter, don't let them sit around - you'd be amazed how fast they can warp the panel with humidity changes (and the pva glue you use will impart moisture).
Are you bonding the resawn veneer to the assembled cabinet or to the MDF panels? If it's the latter, don't let them sit around - you'd be amazed how fast they can warp the panel with humidity changes (and the pva glue you use will impart moisture).
- Home
- Loudspeakers
- Multi-Way
- Overnight Sensations Build Log 2025