I was happy with the bass response and overall baffle size and behavior confirmed so I'm moving forward with the 6th iteration of this baffle, the final material, some nice big oak slabs I've been saving for this project. I have some large slabs that are 72" long by 16~20" wide and nearly 2" thick live edge oak that are mirror slabs cut from the same limb trunk. I'm going to strip the bark and start cleaning up the rot, voids, etc and prepare to fill the voids with epoxy before moving forward. This will take me quite a while to get through all the voids and wait for epoxy to cure.

Debarking. Chisel, hammer, draw knife.


I've got some big through and through voids and lots of cavities to fill. Got the rot out. Got the bark off. Cleaned up most big tool marks. Next thing to do is start filling the voids with epoxy.

Very best,
Debarking. Chisel, hammer, draw knife.
I've got some big through and through voids and lots of cavities to fill. Got the rot out. Got the bark off. Cleaned up most big tool marks. Next thing to do is start filling the voids with epoxy.
Very best,

Epoxy time.
I can only really do one at a time, one side at a time, and don't want to get too far ahead with it. Epoxy is tricky business. Easy to find out all the epoxy escaped through a pin hole a few hours later. So I'm going slow and doing a few voids at a time. I dam the voids with acetate sheets, hot glue and tape to prevent sag. Then pour in some epoxy and watch it to see if it starts to break out or if it tunnels into some hidden voids and channels and just see what I cannot see by the level of epoxy draining into the voids. Fill slow until it holds position, if it does.
I'm using a deep pour epoxy good enough for 2" pours. I'm mixing some ink dry that is brown and yellow in 1:1 ratio for a dark honey color that my wife decided she liked, so rolled with it.


Two big voids damed up, time to flip and try to pour.

Leveled on my bench.


I use a torch to remove surface bubbles from the epoxy after pouring and letting it rest.


Closing it up to cure till tomorrow. Then do some more.

Very best,
I can only really do one at a time, one side at a time, and don't want to get too far ahead with it. Epoxy is tricky business. Easy to find out all the epoxy escaped through a pin hole a few hours later. So I'm going slow and doing a few voids at a time. I dam the voids with acetate sheets, hot glue and tape to prevent sag. Then pour in some epoxy and watch it to see if it starts to break out or if it tunnels into some hidden voids and channels and just see what I cannot see by the level of epoxy draining into the voids. Fill slow until it holds position, if it does.
I'm using a deep pour epoxy good enough for 2" pours. I'm mixing some ink dry that is brown and yellow in 1:1 ratio for a dark honey color that my wife decided she liked, so rolled with it.
Two big voids damed up, time to flip and try to pour.
Leveled on my bench.
I use a torch to remove surface bubbles from the epoxy after pouring and letting it rest.
Closing it up to cure till tomorrow. Then do some more.
Very best,
Nobody knows like the worker just how much effort it actually takes to do this sort of thing. You certainly use a draw knife better than I ever could. The epoxy is worth it in the end, but there again, is more effort than some can imagine. How long will this take to cure in the biggest pours?
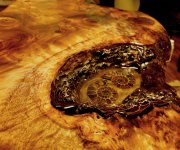
My uncle has a way with these things too. Here is a shot of his work.
My uncle has a way with these things too. Here is a shot of his work.
Attachments
Nobody knows like the worker just how much effort it actually takes to do this sort of thing. You certainly use a draw knife better than I ever could. The epoxy is worth it in the end, but there again, is more effort than some can imagine. How long will this take to cure in the biggest pours?
My uncle has a way with these things too. Here is a shot of his work.
Yessir, gonna take a while. About a day between attempts to pour. Will take me a while to get all these voids and not spill. These are not enormous deep pours, so a single day should be enough to work with it. There's no better material to fill voids in the wood though really for cost and ease.
Love those nautilus in the epoxy! Super rad.
Very best,
It is my opinion that we are too taken with the idea of making wood flat. I say, when possible let the wood have its own say about how far to go. Yup, even with a baffle, as long as you can mount the driver decently. But of course, I am not saying to just accept a truly warped slab and leave it totally alone either. I think that you have a fine slab to work with. What finish do you plan on using?
It is my opinion that we are too taken with the idea of making wood flat. I say, when possible let the wood have its own say about how far to go. Yup, even with a baffle, as long as you can mount the driver decently. But of course, I am not saying to just accept a truly warped slab and leave it totally alone either. I think that you have a fine slab to work with. What finish do you plan on using?
I agree with natural wood, it's ok to not be perfectly flat. It's not ultra flat, you can see mine has some warping. I'm going to flatten some areas via sanding just enough to be able to use my jigs to cut holes. Otherwise, I'll leave a lot of its natural curves. I will not be planing it flat on both sides.
I've done epoxy and I've done polyurethane. I'm currently doing epoxy to fill voids. But the final finish will be a few coats of polyurethane. I tested it on an extra piece and it looks the same as the epoxy did, but is a more satin/matte finish and not gloss. I prefer to not have gloss again.
Here's the natural oak with no finish.
Same oak with a single brushed on layer of poly.
I'll do 2~3 coats like this and keep the natural color of the oak, just saturated and higher contrast from the top coat.
Very best,
I pretty much agree about the finish. I have not had any issues with poly except my impatience about drying time. When I lived in AZ it was not so much of a consideration. Only recently have I tried shellac and am pretty surprised at how much I like it, but still, I don't think that it is for everything. I would go the way you are with both the epoxy and finish. Keep us updated. I want to see the result, FWIW, I tend to try and use slabs for speaker baffles. They are beautiful.
I pretty much agree about the finish. I have not had any issues with poly except my impatience about drying time. When I lived in AZ it was not so much of a consideration. Only recently have I tried shellac and am pretty surprised at how much I like it, but still, I don't think that it is for everything. I would go the way you are with both the epoxy and finish. Keep us updated. I want to see the result, FWIW, I tend to try and use slabs for speaker baffles. They are beautiful.
I use shellac on all my other enclosures, 3 coats, and then a top coat of polyurethane for durability. I really like shellac. Fast and easy. It's not ideal for things that need to be durable though. Speakers don't need to be durable really, so it works well for that.
Examples of shellac (amber) and poly topcoat on my last couple of builds:
Very best,
- Home
- Loudspeakers
- Multi-Way
- Open Baffle Adventure, Tinkering with Lii Song & GRS Drivers