Ok so, I purchased the diy kit from jdslabs about a week ago. I constructed the objective o2 and once I got ready to test the amp there was no sound initially. So, after a friend took a look and told me I had some cold solder joints I went back and reworked those. I was then able to get sound from only one channel and that being the right. Now, I no longer have control over the volume with the potentiometer. Then, I though well let me touch up on some of the solder joint again. Upon doing so, I was able to get sound from the left channel and not the right and I was also able to have control of the volume via potentiometer. However, these issues still occur, I no longer have control over the volume and I can get no sound out of wither channel. Help and/or suggestions would be much appreciated.
You should check the op-amp's if they are inserted correctly, adjust the pins if necessary with your finger and push them in harder.
Move the parts around to see if any are loose, if any are then resolder them.
After that, you can take a photo and upload it here as an attachment, if it's still not working.
Play around with the 3.5mm jack, try a different headphone.
Move the parts around to see if any are loose, if any are then resolder them.
After that, you can take a photo and upload it here as an attachment, if it's still not working.
Play around with the 3.5mm jack, try a different headphone.
pix
[/ATTACH]I have checked and made sure that the op-amps are inserted correctly. I double checked to make sure that no parts were loose, however just to be certain I did slightly touch up on the solder for each component. I have tried a pair of Marshall Monitors, my Cyber Acoustic speakers, and my pair of House of Marley positive vibrations; and I was only able to get sound from the left channel and I have volume control once more.
[/ATTACH]I have checked and made sure that the op-amps are inserted correctly. I double checked to make sure that no parts were loose, however just to be certain I did slightly touch up on the solder for each component. I have tried a pair of Marshall Monitors, my Cyber Acoustic speakers, and my pair of House of Marley positive vibrations; and I was only able to get sound from the left channel and I have volume control once more.
Attachments
Last edited:


 Moved to Headphone section.
Try different 9V batteries perhaps?
Return it to JDS for a refund if you want, then buy "The Wire" at these forums instead, it's much more advanced.
Return it to JDS for a refund if you want, then buy "The Wire" at these forums instead, it's much more advanced.
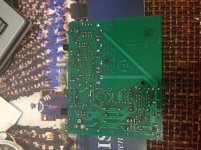
Its hard to tell from the photos due to the amount of flux and residue you have on the board, but it appears that you may have a couple of bridged traces. Your first course of action should be to clean that board. Then check for bad joints and bridges. You should never apply power to a board looking like that!
Me
Me
You do know that you just compared a full self-contained headphone amp with a circuit serving only as a buffer, right? Fruit salad, yummy.Return it to JDS for a refund if you want, then buy "The Wire" at these forums instead, it's much more advanced.
By that kind of logic I could call the O2 "more advanced" because it contains a gain stage and volume control. Good luck marrying a somewhat noisy source to sensitive IEMs with The Wire.
And yes, the OP's board looks pretty well-maligned in spots.
Last edited:
To hell with that. It's nearly there. Your board isn't great, but it's not the worst I've seen. A bit of flux is nothing. With a board that has a few fragile joints, cleaning it, which will probably involve a toothbrush and isopropyl alcohol, is not going to improve things one whit.
Solder strings are really a problem with SMT, or DIL spaced chips wave soldered on the topside, you can get shorts, but they're unlikely on an O2, which was designed for easy building. If you have problems with this, you're more likely to struggle with The WIre.
You need to learn how to fit leaded components with the minimum amount of abuse to the leads.
An idealist approach fits the devices in the order of their height, fitting all of the same height simultaneously.
Devices such as 2-lead devices are typically bent and fitted from the top while the board is supported at the edges to permit them to drop through freely.
As each height is completed a second piece of board is used to hold the components in place while the board is inverted and the leads soldered. The leads are trimmed close to the meniscus at each stage where necessary.
This makes life easier if rework is necessary, but there's no point in redoing it. Many people find bending the leads acceptable, it often becomes necessary in rework.
Anyway this won't get you anywhere, I have highlighted the most suspect joints. There may be others. I can't see the area in the bottom right clearly. (I can't see any of it clearly.)
Revisit your soldering technique. Use a tinned clean iron, wipe it between joints. Apply the iron as close as you can get it to both pad and pin so that both heat. Use an iron hot enough so the solder melts virtually without delay when applied to the iron. Do not attempt to apply solder to the iron and transfer it to the joint. Apply the multicore solder wire so that it contacts the hot iron, pin and pad virtually simultaneously. Work quickly without hesitation and withdraw any excess solder away from the component up the lead with a wiping motion.
Solder strings are really a problem with SMT, or DIL spaced chips wave soldered on the topside, you can get shorts, but they're unlikely on an O2, which was designed for easy building. If you have problems with this, you're more likely to struggle with The WIre.
You need to learn how to fit leaded components with the minimum amount of abuse to the leads.
An idealist approach fits the devices in the order of their height, fitting all of the same height simultaneously.
Devices such as 2-lead devices are typically bent and fitted from the top while the board is supported at the edges to permit them to drop through freely.
As each height is completed a second piece of board is used to hold the components in place while the board is inverted and the leads soldered. The leads are trimmed close to the meniscus at each stage where necessary.
This makes life easier if rework is necessary, but there's no point in redoing it. Many people find bending the leads acceptable, it often becomes necessary in rework.
Anyway this won't get you anywhere, I have highlighted the most suspect joints. There may be others. I can't see the area in the bottom right clearly. (I can't see any of it clearly.)
An externally hosted image should be here but it was not working when we last tested it.
Revisit your soldering technique. Use a tinned clean iron, wipe it between joints. Apply the iron as close as you can get it to both pad and pin so that both heat. Use an iron hot enough so the solder melts virtually without delay when applied to the iron. Do not attempt to apply solder to the iron and transfer it to the joint. Apply the multicore solder wire so that it contacts the hot iron, pin and pad virtually simultaneously. Work quickly without hesitation and withdraw any excess solder away from the component up the lead with a wiping motion.
- Status
- Not open for further replies.
- Home
- Amplifiers
- Headphone Systems
- Objective o2 diy no sound