I have a set of Summas, and while they're wonderful speakers, they sure do take up a lot of space.
The obvious solution is to get something smaller, but it's really hard to get directivity control without using a large waveguide.
One idea I've kicked around for a few years is to use a 3D program to make a set of large speakers, but make the speaker in such a way that it doesn't really look like a speaker.
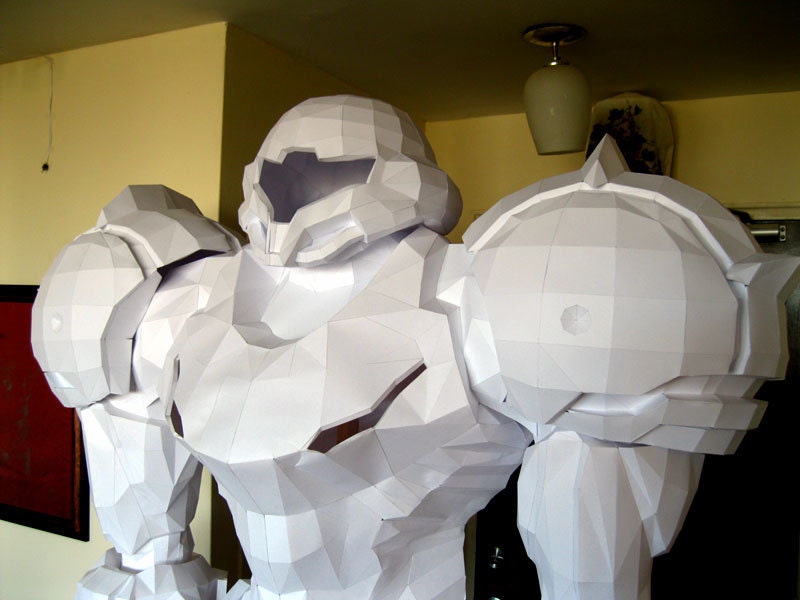
This is a goal I've had for quite a few years, and it's been hard to get there 100%. For instance, I once spent a few weeks learning Blender and Pepakura, because that combination has yielded some very crazy shapes over in the Cosplay community.
This combination had a couple problems for my projects. First, a loudspeaker tends to be one continuous shape. The cosplay projects tend to have a lot of pieces. Because a loudspeaker is one continuous shape, an error in one piece propagates throughout the entire speaker. For instance, if you're making a waveguide and one part of it is off by ten degrees, then the whole waveguide is going to be asymmetrical. It's also really easy to see the flaw with the naked eye, because speakers tend to be symmetrical.
Plus, Blender is complete p.i.t.a. to learn, with an interface that seems to be explicitly designed to be completely non-intuitive to anyone but Blender users.
So I'm not 100% certain Blender + Pepakura sucks, but it was definitely an uphill battle for me.
My tractrix horns from a decade ago were paper horns covered in fiberglass, and it's a construction method that offers a lot of advantages over the wood horns that most people build. (You can make some really complex shapes with paper and scissors.)

What I'm visualizing is something like the Jadis Eurythmie. A big horn, but clearly designed to look more like a piece of furniture than a piece of functional audio equipment.


Here's a model of a 60x40 degree horn that I made in Autodesk 123D Design.
What we have here is a functional horn, but a horn that looks more like an iMac than a loudspeaker.
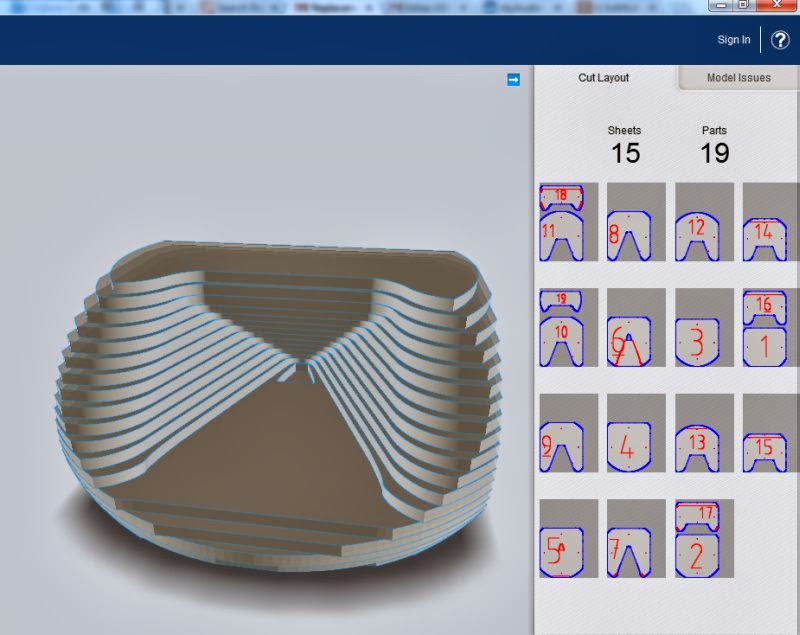
Of course, 3D programs are a dime a dozen. The magical thing about 123D Design is that you can export the file as an STL to 123D Make, and 123D Make can 'print' the speaker in slices.
So no more spending time in the garage figuring out angles on a horn, and no more turning waveguides on a lathe. Just draw the speaker in 123D Design, export it to 123D Make, then have it printed.
The obvious solution is to get something smaller, but it's really hard to get directivity control without using a large waveguide.
One idea I've kicked around for a few years is to use a 3D program to make a set of large speakers, but make the speaker in such a way that it doesn't really look like a speaker.
An externally hosted image should be here but it was not working when we last tested it.
This is a goal I've had for quite a few years, and it's been hard to get there 100%. For instance, I once spent a few weeks learning Blender and Pepakura, because that combination has yielded some very crazy shapes over in the Cosplay community.
This combination had a couple problems for my projects. First, a loudspeaker tends to be one continuous shape. The cosplay projects tend to have a lot of pieces. Because a loudspeaker is one continuous shape, an error in one piece propagates throughout the entire speaker. For instance, if you're making a waveguide and one part of it is off by ten degrees, then the whole waveguide is going to be asymmetrical. It's also really easy to see the flaw with the naked eye, because speakers tend to be symmetrical.
Plus, Blender is complete p.i.t.a. to learn, with an interface that seems to be explicitly designed to be completely non-intuitive to anyone but Blender users.
So I'm not 100% certain Blender + Pepakura sucks, but it was definitely an uphill battle for me.
My tractrix horns from a decade ago were paper horns covered in fiberglass, and it's a construction method that offers a lot of advantages over the wood horns that most people build. (You can make some really complex shapes with paper and scissors.)
What I'm visualizing is something like the Jadis Eurythmie. A big horn, but clearly designed to look more like a piece of furniture than a piece of functional audio equipment.
Here's a model of a 60x40 degree horn that I made in Autodesk 123D Design.
What we have here is a functional horn, but a horn that looks more like an iMac than a loudspeaker.
Of course, 3D programs are a dime a dozen. The magical thing about 123D Design is that you can export the file as an STL to 123D Make, and 123D Make can 'print' the speaker in slices.
So no more spending time in the garage figuring out angles on a horn, and no more turning waveguides on a lathe. Just draw the speaker in 123D Design, export it to 123D Make, then have it printed.

I haven't printed anything from 123D Make yet, but here's some waveguides I've made in the past, using the same ideas.
This paper waveguide mold was what I used for my second set of Unity horns. It's a 108x72 degree elliptical oblate spheroidal waveguide. Made this way back in 2006. To produce the layers I made the curve in MS Excel, then printed up a bunch of ellipses using Xara, then printed those ellipses on paper and cut them out with a scissors.
I tried a bunch of different things for the gaps between the layers, everything from metal washers to nuts. But in the end the thing that worked best was plain ol popsicle sticks. You can get them at a craft store.
Here's a waveguide I made with the mold.

Here's another way that works even better. Print the slices out on a printer, glue them to pink foamular insulation board, then cut the foamular.


Here's the finished product.
Right now I'm leaning towards using pink foam and 123D Make for my current project. In the pics above, the sheer size of that waveguide may seem completely ridiculous. Here's why it's so hyooge:
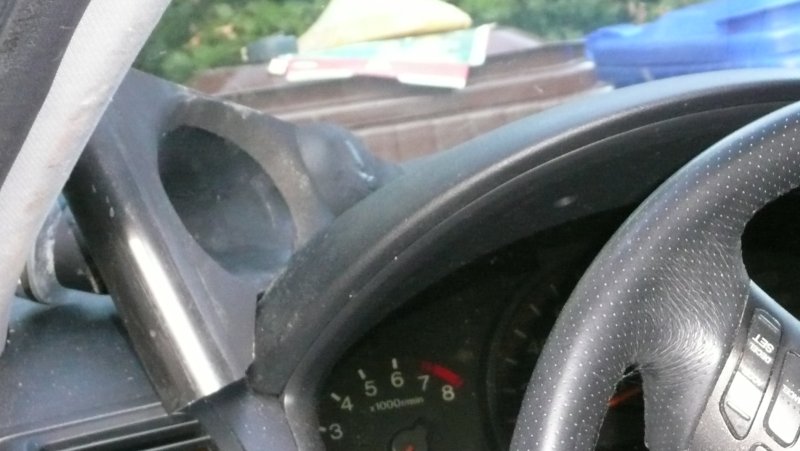
When you make a horn or a waveguide, one way to make it smaller is to shorten it. For instance, you may need a horn that's two foot deep, but you shorten it to 1.5 ft and give up some gain. BUT - there's nothing stopping you from cutting the waveguide at an angle. For instance, instead of shortening the horn down to 1.5 ft, you can definitely shorten one side to a foot, and the other side to 2ft.

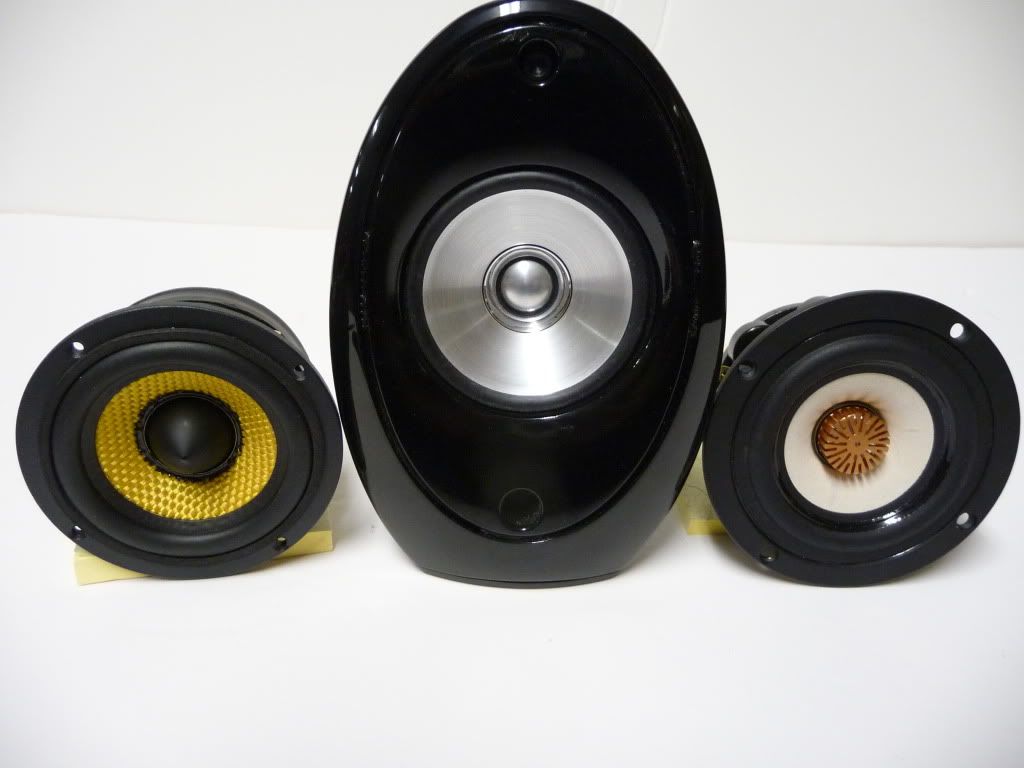
Here's an example of what I mean. On the left is a QSC waveguide. In the middle is an elliptical oblate spheroid waveguide mold. And on the right is a mold made from the QSC, but foreshortened at an angle. See how the foreshortened horn is so compact?


By cutting the waveguide at an angle, I was able to take advantage of barriers that existed in my car, and use those barriers to extend the horn.
It took a bit of experimentation to make waveguides in 123D, but here's what worked for me:
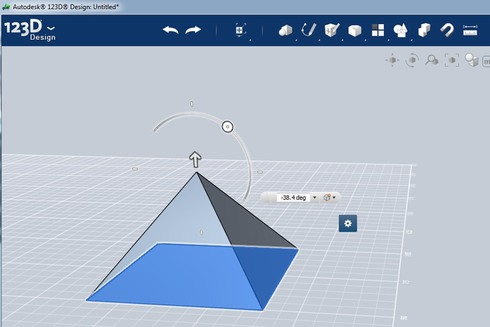
1) Make a pyramid. I stole the instructions on how to do that from here:
pyramids with 123D Design?
Note that you can set the coverage angle of the waveguide at this point. For instance, an angle of 30 degrees on the pyramid edges will yield a waveguide with a coverage angle of approximately 60 degrees.

2) In the next step, I bevel the edges of the pyramid. This gives you pyramid edges that are similar to the QSC waveguide.
An unexpected benefit of beveling the edges is that the bevel also creates the throat for you. More bevel yields a larger throat for the waveguide.
3) For my design, I took that pyramid and inserted it into a sphere. The reason that I did this was to create a loudspeaker enclosure that's low diffraction and looks cool.
To do this, you create a sphere from the primitives list. You move the sphere on top of the pyramid, so that the two are lined up on all three axes. The you click 'combine' from the top menu. When you combine, you have to select three things. The first thing is the 'target solid'. That's the sphere. The second thing is the source solid. That's the pyramid. There's a drop down where you can "join" "subtract" or "intersect". What we want is "subtract." That will "subtract" the pyramid from the sphere, basically carving our waveguide out of the sphere. If you joined them then it would be one big lump, and if you did an "intersect" you'd wind up with a pyramid that's truncated on the edges.
Last thing, hit "enter" to complete the operation.
Then export the STL file to 123D Make, and print it!
1) Make a pyramid. I stole the instructions on how to do that from here:
pyramids with 123D Design?
Note that you can set the coverage angle of the waveguide at this point. For instance, an angle of 30 degrees on the pyramid edges will yield a waveguide with a coverage angle of approximately 60 degrees.
2) In the next step, I bevel the edges of the pyramid. This gives you pyramid edges that are similar to the QSC waveguide.
An unexpected benefit of beveling the edges is that the bevel also creates the throat for you. More bevel yields a larger throat for the waveguide.
3) For my design, I took that pyramid and inserted it into a sphere. The reason that I did this was to create a loudspeaker enclosure that's low diffraction and looks cool.
To do this, you create a sphere from the primitives list. You move the sphere on top of the pyramid, so that the two are lined up on all three axes. The you click 'combine' from the top menu. When you combine, you have to select three things. The first thing is the 'target solid'. That's the sphere. The second thing is the source solid. That's the pyramid. There's a drop down where you can "join" "subtract" or "intersect". What we want is "subtract." That will "subtract" the pyramid from the sphere, basically carving our waveguide out of the sphere. If you joined them then it would be one big lump, and if you did an "intersect" you'd wind up with a pyramid that's truncated on the edges.
Last thing, hit "enter" to complete the operation.
Then export the STL file to 123D Make, and print it!
You might also consider openscad. Define your waveguides in code then export/import to 123D, or just define the whole object in code. Defining the whole object can be a bit of a pain (though not necessarily more so than "drawing" in 3D). The upside is that so long as you code appropriately from the outset using variables and relative positioning, if you decide you want the base of the thing 10% taller, you just change a variable and you're done. Want a new waveguide profile in the same object? Change out the discrete equation or set of datapoints by which you define the waveguide.
If it doesnt have to sound good , you can build anything ......
Maybe the Summas have just 'tuned me in' to the sound of diffraction.
But for me, it's unmistakable now.
It's funny, a year back I bought a set of cheap Kef home theater speakers, and I can just listen to those things all day long. I've measured them along with some other speakers I have, and their frequency response isn't perfect. For instance, I have some JBL Control Now speakers that measure flatter at the crossover point both on and off axis.
But the Kefs just *disappear*, in a way that the JBLs can't even approach. And I can listen to the Kefs for hours with zero fatigue.
My 'hunch' is that it's diffraction.
An externally hosted image should be here but it was not working when we last tested it.
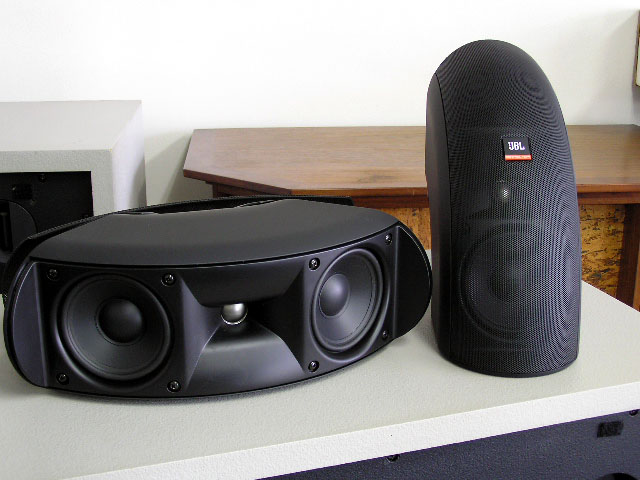
In descending order, we have a Gedlee speaker, my Kefs and my JBLs. Note how the first two have no sharp edges?
And while it's true that the JBL doesn't have a sharp edge, at these frequencies, you really need a roundover to eliminate diffraction. For instance, 1000hz is 13.5" long. So an edge with a very small roundover, say 1/2", that just won't do much at 1000hz. But a 4" roundover will help quite a bit.
So what I'm doing in 3D is basically taking that anti-diffraction approach to the extreme.
An externally hosted image should be here but it was not working when we last tested it.
I'll bet these sound nice.
I had an idea integrating speakers into classical Greek/Roman plaster pedestal.
All contemporary designs look awkward. Classical theme is timeless and fits nicely into any interior.
All contemporary designs look awkward. Classical theme is timeless and fits nicely into any interior.
This Pepakura stuff is promising, but it's kind of shocking how time consuming it is.
Work tends to slow down at the end of the year, so I've been doing my best to come up with a method to make loudspeaker enclosures in 3D.
The method that works best for me is the following:
1) I make the 3D model in Autodesk 123D (free)
2) I reduce the number of polygons in Meshlab (free). This is an important step; for instance a simple model in 123D may have 3000 'faces'. And if you try to print a model with 3000 faces, you're going to lose your mind... Meshlab can obliterate 90% of the complexity while still maintaining the shape of the model.
3) And then import the simplified model into Papercraft 3D or Pepakura.

Here's the waveguide in Autodesk 123D

Here's what the 'unfolded' model looks like

Here's the same model, but blown up in scale. (Note the books, to give you an idea of how huge this model is.) I think this is the most exciting possibility of Pepakura, the ability to make something of *any* size. Try doing *that* with a 3D printer.
Work tends to slow down at the end of the year, so I've been doing my best to come up with a method to make loudspeaker enclosures in 3D.
The method that works best for me is the following:
1) I make the 3D model in Autodesk 123D (free)
2) I reduce the number of polygons in Meshlab (free). This is an important step; for instance a simple model in 123D may have 3000 'faces'. And if you try to print a model with 3000 faces, you're going to lose your mind... Meshlab can obliterate 90% of the complexity while still maintaining the shape of the model.
3) And then import the simplified model into Papercraft 3D or Pepakura.
Here's the waveguide in Autodesk 123D
Here's what the 'unfolded' model looks like
Here's the same model, but blown up in scale. (Note the books, to give you an idea of how huge this model is.) I think this is the most exciting possibility of Pepakura, the ability to make something of *any* size. Try doing *that* with a 3D printer.
- Status
- Not open for further replies.
- Home
- Loudspeakers
- Multi-Way
- No More Monkey Coffins!