The motor
I am not going to house the motor directly underneath the plinth.
I will house the motor in it's own case then sit it on the bottom of three MDF plinths that will be sandwhiched by to layers of 4.8mm cork. So the only MDF that will touching the motor will be the base one.
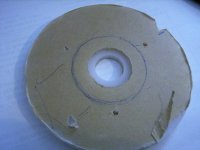
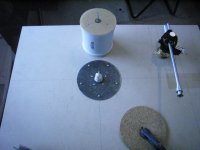
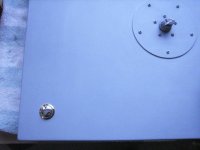
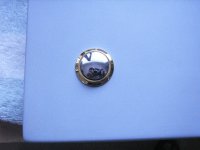
First i cut out the top of the moter housing using 5mm white perspex. i use what I have at home and try to keep things simple as I don't have a great selection of tolls. So it's a metter of making do.
It's about 95mm round. The whole is counter sunk so as to let the motor sit flush up against the underside. The whole are 20mm & 16mm
I am not going to house the motor directly underneath the plinth.
I will house the motor in it's own case then sit it on the bottom of three MDF plinths that will be sandwhiched by to layers of 4.8mm cork. So the only MDF that will touching the motor will be the base one.
First i cut out the top of the moter housing using 5mm white perspex. i use what I have at home and try to keep things simple as I don't have a great selection of tolls. So it's a metter of making do.
It's about 95mm round. The whole is counter sunk so as to let the motor sit flush up against the underside. The whole are 20mm & 16mm
Attachments
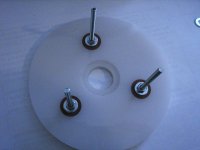
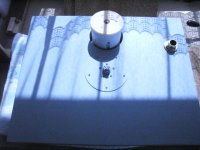
Checking the positioning of the motor before cutting whole in plinth.
I wanted the plinth to be big enough so that I was able to place the motor at the back.
I will try and post some more pics tomorrow otherwise, it won't be until next week before I have time time to work on this again...........................
I wanted the plinth to be big enough so that I was able to place the motor at the back.
I will try and post some more pics tomorrow otherwise, it won't be until next week before I have time time to work on this again...........................
Attachments
Enzedone,
What a wonderful work you have done, looking forward to see the final product.
BTW have you get a phono amp?
Best regards,
CHOW
What a wonderful work you have done, looking forward to see the final product.
BTW have you get a phono amp?
Best regards,
CHOW
Pre-amp
Yes i managed to buy an old Soundcraftsmen PE4002
I haven't really done much with it yet, but wil give a go over later when the TT is ready for use.
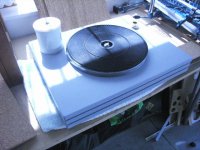
Here's some pics of where I'm at:
Finished sany and priming the three boards, may do some more work on them yet, see how impatient i become
The motor is not cut down yet, as I will be placing a wood plate to go on top so the platter doesn't sit so high and stand out above the the plinth.
Yes i managed to buy an old Soundcraftsmen PE4002
I haven't really done much with it yet, but wil give a go over later when the TT is ready for use.
Here's some pics of where I'm at:
Finished sany and priming the three boards, may do some more work on them yet, see how impatient i become
The motor is not cut down yet, as I will be placing a wood plate to go on top so the platter doesn't sit so high and stand out above the the plinth.
Attachments
construction
This week I have been thinking about joining it all up and whether or not to glue/screw the whole thing together. I am thinking about glueing the bottom layers and leaving the top MDF layer to be screwed. This will allow access to the wiring if needed, and if I ever wish to change anything around I can.

This week I have been thinking about joining it all up and whether or not to glue/screw the whole thing together. I am thinking about glueing the bottom layers and leaving the top MDF layer to be screwed. This will allow access to the wiring if needed, and if I ever wish to change anything around I can.
Cost
Something I forgot to do was keep a tally of the cost:
Second hand Thorens TD160 = NZD$175
3 x 18mm MDF NZD$30
Plumbing pipe x1,Nuts x2 NZD$5
2 x cans primer NZD$32
Something I forgot to do was keep a tally of the cost:
Second hand Thorens TD160 = NZD$175
3 x 18mm MDF NZD$30
Plumbing pipe x1,Nuts x2 NZD$5
2 x cans primer NZD$32

Started glueing some cork onto the bottom MDF as well. Debating over whether I should have waited to paint the top coat first. But as usual I got impatient......
I didn't get much done today, spent the morning at baby class learning how to breast feed..............lovely stuff, all along I was really thinking about geting this thing finished
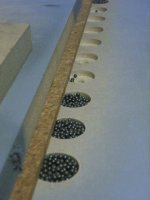
Before i placed the cork on, I drilled a whole lot of holes and filled them with shot, i had this in the garage as I was planning to something different to the TD160, but changed my mind
I didn't get much done today, spent the morning at baby class learning how to breast feed..............lovely stuff, all along I was really thinking about geting this thing finished
Before i placed the cork on, I drilled a whole lot of holes and filled them with shot, i had this in the garage as I was planning to something different to the TD160, but changed my mind
Attachments

lead shot
close up of the shot
Drilling:
I had an old spade bit that was broken at the tip. This allowd me to drilled down, otherwise I would have gone through the bottom with the tip.
I put a piece of masking tape around the spade bit to mark the depth to drill to.This worked well. Couldn't use the drill press as it wouldn't reach into the centre of the board.
Attachments
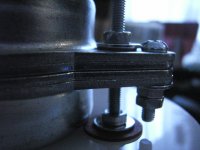
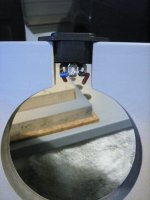
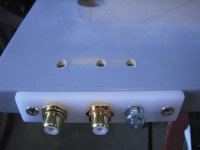
RCA connectors
Put in a Perspex plate with RCA connectors as well, today. I drilled the holes into the back and then drilled holes down to meet these, so I can thread the wires through the MDF without any showing. I will pull all these things off again before painting top coat. Just wanted to check that evrything fits before painting.
Put in a Perspex plate with RCA connectors as well, today. I drilled the holes into the back and then drilled holes down to meet these, so I can thread the wires through the MDF without any showing. I will pull all these things off again before painting top coat. Just wanted to check that evrything fits before painting.
Attachments
Hi,
you managed to drill and bolt the "perspex" (acrylic) without cracking it !!!
Are you lucky or skilled?
Where is the RIAA pre going? Inside the chassis I hope.
you managed to drill and bolt the "perspex" (acrylic) without cracking it !!!
Are you lucky or skilled?
Where is the RIAA pre going? Inside the chassis I hope.
Perspex
I have built a couple of GC amps using this stuff, as it's the only type of material I can work with. I have limited tools and this stuff allows me to build things with ease, unlike metal.
I have an old Soundcraftsmen Pre amp that I will be running this from. I haven't had time to give it a good going over. It needs the Volume pot and the likes cleaning out. But hopefully this will do for a while.
- Status
- Not open for further replies.
- Home
- Source & Line
- Analogue Source
- New plinth for TD160