I am so glad I held off on buying a chassis until I happened to read a thread here on DIYAudio about Landfall. I work as an applications engineer for a machine tool builder so I can appreciate better quality engineering and fabrication.
I'm hoping to be able to place my order for a chassis before the weekend and I have a few questions before I spend my money.
Are all the brackets and screws I need to put the enclosure together included when I place my order or do I order them separately as the accessories and parts page implies? Or are those for order extras?
What kind of a finish will the enclosure have without specifying a brushed or anodized finish? Is the finish ready for paint or am going to have to do a lot of sanding.
What kind of a lead time is there for an enclosure?
Thank you...
They hardware is all included, I think you have options for different things such as black oxide screws and such. The finish on the boxes I have got are general mill finish as I recall. I have one set painted up and another that is not and the not painted looks pretty good with some light scratching from my work.
I highly recommend them as you can spec out exactly the right size enclosure and they are not the thin boxes you get with the typical Hammond style chassis.
If you are going to paint your chassis have them undersize the top and bottom covers a bit as the fit is so perfectly tight that you will chip paint otherwise.
Worth every penny!
Sandy Not paid spokesperson 🙂
I actually considered buying aluminum plate and machining enclosure parts myself but....the CNC machines on our showroom floor are for customer demonstrations and test cuts for proving the machines capabilities to potential customers. As much as I would like I just can't use the machines for 'G' jobs.
I kinda like the hammered finish I've seen some projected painted with. I'm putting together a pair of PVC speakers and I'm painting with that type of paint. If I like what I see I will follow through on the enclosure. If not I'll pick a glossy paint.
I kinda like the hammered finish I've seen some projected painted with. I'm putting together a pair of PVC speakers and I'm painting with that type of paint. If I like what I see I will follow through on the enclosure. If not I'll pick a glossy paint.
Sprags,
As Sandy said, all HW is included. The accessories page is for extras if you want.
He's also correct about the mill finish. The parts will have light scratches from handling, cutting, drilling. The brush finish removes these marks, but you can also sand them out.
The lids are a little looser than they used to be (at customers' requests), but probably not enough for painting. You can either assemble the chassis before painting, or have us cut the lids down a bit. We did that for Sandy, so it would be best to ask him how much is enough.
Lead time for an unfinished chassis is usually 3 to 4 days. We do offer CNC machine services now as well as laser engraving. If you want a chassis machined and anodize, it takes about 2 weeks - we do most of our machine work on weekends then use a local shop for anodizing. For machining, a dxf file is best, but we can also work from a good hand sketch. We just need accurate dimensions for the hole sizes and placement. Just to give you an idea, the holes on the front, top and back of a typical tube amp will run about $50 to $75. A lot of vents, slots, and a busy chassis will be more of course, less for something very simple. Our website doesn't handle special requests so we'll quote via email and send a paypal request when it's all sorted out.
Can you do countersinks and threaded holes??
I discovered too late that on ePray you can buy "self clinching river nut fasteners". Just drill a hole of the right size for the fastener and then push them in.
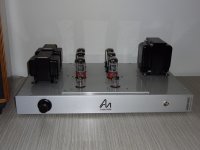
I have now completed my Ausio Note clone and used a LandFallSystems chassis for this. Rather than having the actual top plate drilled for the PCB I opted for a seperate cover plate (see pictures).
This offers two major advantages: 1) easy to make changes and/or do maintenance, no removing of the PCB is required and 2) if wanted then a new "cover plate" can be made with a toatal different layout (e.g. not using a PCB) and recycle the rest of the chassis.
I used waterbased laserjet decals that I printed in reverse. The sequence of steps is: coat the front panel with a couple of thin layers of Krylon high gloss crystal clear, let the front dry, coat the decal with a few coats of Krylon and wait until tacky and then place it on the front and push it down hard and let it settle for a while. When settled use water to disolve the paper backing and glue layer of the decal. Afterwards a few more coats of Krylon before baking the front panel in the kitchen oven. (melting point is approx 165C, wait until the front goes all glossy then remove and let cool down). Waterslide Decals Cured in Your Home Oven - The Artful Crafter
I have no affiliation with LandFallSystems except that I am a very happy customer, am extreemly impressed with the service I got and find their pricing for the work provided very reasonable (it is not mass production).
AM
Attachments


Last edited:
I discovered too late that on ePray you can buy "self clinching river nut fasteners".
Just drill a hole of the right size for the fastener and then push them in.
PEM(R) Fasteners – Penn Engineering
McMaster Carr has plenty of styles too. I use them a lot in car projects where I have a blind hole and have to get crafty. Super helpful for problem situations too.
Sandy
- Status
- Not open for further replies.
- Home
- Vendor's Bazaar
- New enclosures for DIY