Well, Im kind of in beta testing 🙂. I have some pictures of results I got using the following:
400W MH light kit from lumenlab
the 80mm lens triplet and fresnels (330/220) from lumenlab
Proview 15.4inch lcd
Bunch of MDF board, and hours of pain in the *** cutting :0.
60x60 Da-lite Video spectra screen
2 80mm fans (will be four when im done)
90mm diameter 305mm FL PCX condenser
2cm in diam. reflector
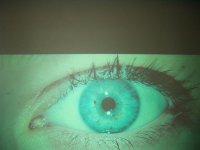
I did a test with Resident Evil Apocalypse where in the beginning it shows a picture of Alice's eye. The detail from the panel was awesome. The two 80mm fans keep the projector running really cool.
400W MH light kit from lumenlab
the 80mm lens triplet and fresnels (330/220) from lumenlab
Proview 15.4inch lcd
Bunch of MDF board, and hours of pain in the *** cutting :0.
60x60 Da-lite Video spectra screen
2 80mm fans (will be four when im done)
90mm diameter 305mm FL PCX condenser
2cm in diam. reflector
I did a test with Resident Evil Apocalypse where in the beginning it shows a picture of Alice's eye. The detail from the panel was awesome. The two 80mm fans keep the projector running really cool.
Attachments

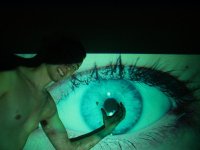
What is great about this monitor is that the montior will maintain the aspect ratio of the input signal and not stretch it out across the entire 1280x800. The image I took, the monitor was in 1024x768 and the corners looked perfect, which is good for playing computer games! You only notice un-focused corners when you are full at 1280x800, guess its the FOV of the 80mm triplet.
Attachments
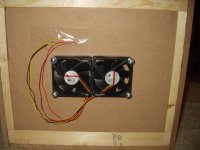
I'll eventually post pictures of the box when I have all the lenses in there permantely with keystone feature/focus movement. I give credit to Inkog for the light box setup with the fans, it works really good. The fans I have (2x80mm right now) are 3000rpm and only 25dba each.
Attachments
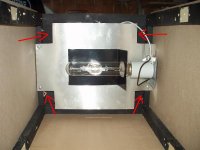
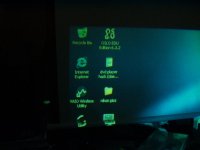
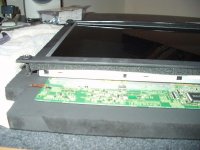
I recently put the box on the ceiling. It's a little heavy, around 35-40 pounds. I will post more pictures and more results as soon as take it down and fix the keystone problem. I hope this encouraged some people to go for this screen, it is really awesome. Here is a shot of the lcd mounted. Rubberfoam weather seal from home depot works wonders 🙂
Attachments
would you say that 30cm focal pre condensor lens does improve much the brightness? did you try it without?
it does improve the brightness of the projected image by roughly 3-6%. The way i figured that out was when i had the box open, i just held it in place with an oven mit then removed it and the light on the wall improved slightly increased with it in place. I cannot measure it exactly, just eyeball 😀. The pre-condenser was only 13$ before shipping from www.anchoroptics.com item number AX94127
ok, thnaks for the info; but maybe 30cm focal isn´t the best way to go. Try shorter focal condenser lenses... I would say the light improvement should be better,
but anyway, 15,4" and 220 rear fresnell and 400W lamp makes things really hard for a really improving condenser lens setup (in my opinion), i onder if it woth any dolar 😀.
but anyway, 15,4" and 220 rear fresnell and 400W lamp makes things really hard for a really improving condenser lens setup (in my opinion), i onder if it woth any dolar 😀.
I chose the 305mm FL because it directs the light to cover the entire condenser fresnel, with my setup.
How is the color quality?
I've got a question about the color depth on the proview.I know its using a (semi) reduced pallette/dithered bit depth,but I have a panel that claimed 16 million colors,and even if it actually wasn't quite capable of reproducing that many,it still looks good.
I am wondering if You can see any problems with it,say displaying smooth color gradients and sky or water and things?
One thing I noticed is its sometimes hard to distinguish without a test image,but with one You can see hard transitions easy.
The qa-2500 I have for example,will display a gradient with transitions similar to a photograph,but the impact 400(panel above) shows much more obvious transitions.
Its tempting to upgrade to the proview for me,so I'm curious if it handles this better.I also did some research on the different techniques manufacturers use to implement color dithering,and there are a few different approaches,so even if one works not so good,another may be unnoticable.
I have not noticed any color problems at all with the proview. I used it as my desktop monitor for a week before tearing it apart, played high def video on it and compared it to my sony vaio PCG-K45 that has the same native resolution (1280x800). Not a problem in my book.
hey, i just bought the proview from staples for 180 after Californian tax...which i think is a great deal. Can you give me the dimension of the box? I am using the exact same light engine as you and same lenses/fresnels too.
BTW, this screen is probably the cheapest DIY HD 720p capable 15.4 in you will ever find...and color and contrast is awesome on this thing. Can wait to put it in a box 🙂
BTW, this screen is probably the cheapest DIY HD 720p capable 15.4 in you will ever find...and color and contrast is awesome on this thing. Can wait to put it in a box 🙂
Hello, tims for an update. Tomorrow I am going to be making a video describing my box and I will include the dimensions. Right now, my box isn't entirely completed, it's...in beta right now 😀. The only thing I am going to change is the new fresnels coming in which I will need to trim down to size and mount in between plexi glass (lexan xl10 from home depot).
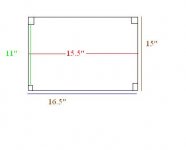
why is your box that big? From another thread, the stripped size was 13 1/4" x 8 3/8", approximately. So technically, you can build a box using 1/2 '' MDF for 14 1/4'' x 9 3/8 '' x whatever length for the lenses right?
That is a good assumption except that you need to incoporate the fresnel lens sizes which should be slightly bigger than the lcd. Then you have the mounts for the lcd and both lenses. But yes, I could make it much smaller, but that will be for a future project. I am just happy this one turned out so good. As for the video, I need to Flaskmpg it because as it stands it is ~7mins long and 150mb 
Hey guys, I got my video online for your viewing pleasure. It's short sweet and complete and forgive my repetitive use of the word alright and alrighty annoying habbit. Any questions please inquire
http://home.comcast.net/~jaws2421/Projector_results.wmv
Oh yea, the quality of the video isn't superb because I had to chop it literally into 1/8 the original file size.
http://home.comcast.net/~jaws2421/Projector_results.wmv
Oh yea, the quality of the video isn't superb because I had to chop it literally into 1/8 the original file size.
- Status
- Not open for further replies.
- Home
- General Interest
- Everything Else
- The Moving Image
- DIY Projectors
- My Proview 15.4" projector :)