Greetings Analog People,
I thought I’d share my latest DIY audio project with the world. The impetus came from my disappointment with an Ariston RD 11S I purchased on e-bay. The floating subchasis was too bouncy and wouldn’t stay level. Also, the arm board and platter were connected, but not parallel, so it was impossible to level both the platter and the arm board at the same time. I was also frustrated by my inability to find audiophile quality turntables at unreasonably low prices.
The Plan:
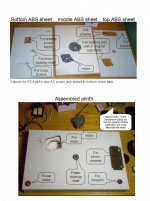
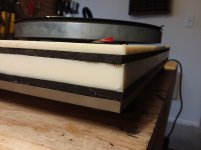
With a bit of research, I learned that most modern high-end turntables are made of some type of plastic because of its damping qualities. I further learned that many manufacturers use plinths made of layers of different materials with different resonances because this further dampens resonance of the plinth as a whole. For the plinth I chose acrylonitrile butadiene styrene (ABS) which seemed, based on a Wikipedia page, to have a nice combination of stiffness, damping, and work-ability. Also, Small Parts had big ¾” slabs marked way down! In between the ABS slabs I chose a very soft microcellular urethane foam called Poron made by Rogers Corp. Sorbothane was my 1st choice, but big sheets were too expensive. The original plan was three ¾” sheets of ABS with a sheet of Poron between each, all glued together into one thick, heavy slab. The feet would, of course, be on the bottom sheet, the platter bearing mechanism and the motor would be attached to the middle layer, and the tonearm on the top layer. The synchronous motor would further be isolated from the middle ABS sheet by rubber grommets. That is exactly what I did, with the exception that the platter axle was not long enough and I had to use a ¼” ABS sheet for the top. This, ironically, was much more expensive than were the ¾” sheets. I also put 1.5” sorbothane hemispheres under the 3 adjustable feet.
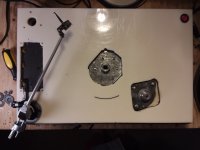
I used the motor (and capacitors) and the massive aluminum platter and axle/bearing from the Ariston. This required cutting the platter axle bearing shaft out of the subchasis leaving about a 2” diameter circle of subchasis around the bearing shaft. This was done with a benchtop vice and a sawzall. I drilled 6 holes in this ring to bolt it to the middle ABS sheet, with thin rubber washers underneath.
Another idea I had that I thought was clever at the time was to integrate the phono preamp into the turntable. This would shorten cables carrying the delicate un-amplified signal from tonearm to phono preamp to about 4 inches (not including cables inside arm tube). By removing the RCA jacks and soldering both the "in" and "out" cables directly to the board, I would remove two signal-damaging connections. I attached RCA jacks to the back of the table. Allowing the motor and the phono preamp to share a power cord would further reduce the number of wires in the back of my stereo system. I put the tonearm in the front right corner to make room for the phono preamp on the right side, away from the power cord and motor. I used my NAD PP-2 which I already had. I had read, in a few threads in this forum, that a weakness of the venerable PP-2 was the cheap, noisy wall wart power supply. I found a 24V, 100mA, regulated power supply at Digi-Key for $20.08.
The Execution:
This project quickly became bogged down with unforeseen complications and minutia. ABS is not easy to work with. When cutting with a jigsaw the plastic would melt, then close up behind the cut. Paddle bits would also melt the plastic, and the bit would rattle around inside a hole which was not round, and not quite where I started it. The Poron could not be cut cleanly. A knife blade would stretch, rather than cut the Poron, and the edges of the sheet would be ragged and not where I wanted them. To attach anything, I needed to drill and tap holes. Keep in mind I couldn’t use nuts and bolts because if a bolt spanned two or more sheets of ABS, it would couple them. If I attached a nut & bolt to a sheet before gluing sheets together, I would be unable to retrieve it later for modifications / repairs. It took several evenings of tinkering to get the motor in the correct position with the right mix of mechanical isolation and stability without touching the top or bottom ABS sheets.
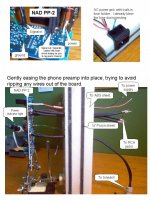
Perhaps the most frustrating part was soldering coaxial audio cable to the phono preamp board. The wires had to come up from below the board. The bottom of the board had been coated with some kind of insulating material which prevented anything from being soldered to it. I stuck the wires into the holes which used to be occupied by the RCA jacks, but somehow, the solder was very reluctant to stick to the exposed copper around the holes. I soldered and re-soldered every connection multiple times to get them connected. Also the ground or “negative” wire – the one that forms a braid around the central channel – becomes a messy, unwieldy tangle of copper strands once exposed. I could not twist the strands into a nice, neat cable without leaving broken copper strands sticking out in every direction. After several failed attempts, I actually ended up using only the inside channel of separate cables for positive and negative. The braided outer channels are not attached to anything, but they do serve as a shield, which I may ground some day.
The Results:
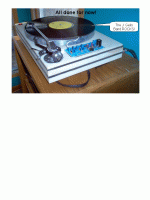
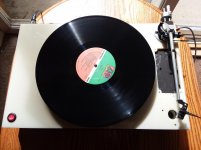
Well, it works. It is not as pretty as I was hoping for because the edges of the Poron are ragged and I accidentally got glue on the top ABS sheet. The platter is not parallel to the plinth! Remember I said that one thing I didn’t like about my Ariston was that the arm board and the platter were not parallel. I assumed that this was because the subchasis was bent. But no . . . It’s because the platter’s axle bearing was not perpendicular to the subchasis. Because I kept a 2” diameter ring of the subchasis, and used this ring to bolt the axle bearing to the plinth, the axle bearing is not perpendicular to the plinth! To make matters worse, I glued the top ABS sheet over this ring, and can not access it unless I cut a big hole in the top ABS sheet. I haven’t decided how to fix this, but it needs to be fixed. Also: there is a faint 60Hz hum, but I have ideas to fix this. Note that the phono preamp board is not shielded, and the platter, motor, and power switch are not grounded yet.
Final Thoughts:
This project was probably not worth the effort. I did not think about details like how I was going to attach RCA jacks and a power cord to the side of a ¾” sheet of plastic. I certainly didn’t foresee the soldering difficulties I would have. I was tired of this project and wanted it to end long before I was finished. And I’m still not really finished. I need to shield the preamp and some wiring, ground things better, level the platter, and build a dust cover! There is a small industry dedicated to serving the speaker builder and amplifier builder. But if you want to build a turntable, you’re on your own! I wouldn’t recommend it to anyone without a well-stocked machine shop. What kept me going was the promise to myself that I wouldn’t start my next project until this one was finished. Well, it's functional, so that’s close enough.
If anyone has any questions about how to build a turntable, feel free to ask, so I can tell you not to do it.
-Byron
I thought I’d share my latest DIY audio project with the world. The impetus came from my disappointment with an Ariston RD 11S I purchased on e-bay. The floating subchasis was too bouncy and wouldn’t stay level. Also, the arm board and platter were connected, but not parallel, so it was impossible to level both the platter and the arm board at the same time. I was also frustrated by my inability to find audiophile quality turntables at unreasonably low prices.
The Plan:
With a bit of research, I learned that most modern high-end turntables are made of some type of plastic because of its damping qualities. I further learned that many manufacturers use plinths made of layers of different materials with different resonances because this further dampens resonance of the plinth as a whole. For the plinth I chose acrylonitrile butadiene styrene (ABS) which seemed, based on a Wikipedia page, to have a nice combination of stiffness, damping, and work-ability. Also, Small Parts had big ¾” slabs marked way down! In between the ABS slabs I chose a very soft microcellular urethane foam called Poron made by Rogers Corp. Sorbothane was my 1st choice, but big sheets were too expensive. The original plan was three ¾” sheets of ABS with a sheet of Poron between each, all glued together into one thick, heavy slab. The feet would, of course, be on the bottom sheet, the platter bearing mechanism and the motor would be attached to the middle layer, and the tonearm on the top layer. The synchronous motor would further be isolated from the middle ABS sheet by rubber grommets. That is exactly what I did, with the exception that the platter axle was not long enough and I had to use a ¼” ABS sheet for the top. This, ironically, was much more expensive than were the ¾” sheets. I also put 1.5” sorbothane hemispheres under the 3 adjustable feet.
I used the motor (and capacitors) and the massive aluminum platter and axle/bearing from the Ariston. This required cutting the platter axle bearing shaft out of the subchasis leaving about a 2” diameter circle of subchasis around the bearing shaft. This was done with a benchtop vice and a sawzall. I drilled 6 holes in this ring to bolt it to the middle ABS sheet, with thin rubber washers underneath.
Another idea I had that I thought was clever at the time was to integrate the phono preamp into the turntable. This would shorten cables carrying the delicate un-amplified signal from tonearm to phono preamp to about 4 inches (not including cables inside arm tube). By removing the RCA jacks and soldering both the "in" and "out" cables directly to the board, I would remove two signal-damaging connections. I attached RCA jacks to the back of the table. Allowing the motor and the phono preamp to share a power cord would further reduce the number of wires in the back of my stereo system. I put the tonearm in the front right corner to make room for the phono preamp on the right side, away from the power cord and motor. I used my NAD PP-2 which I already had. I had read, in a few threads in this forum, that a weakness of the venerable PP-2 was the cheap, noisy wall wart power supply. I found a 24V, 100mA, regulated power supply at Digi-Key for $20.08.
The Execution:
This project quickly became bogged down with unforeseen complications and minutia. ABS is not easy to work with. When cutting with a jigsaw the plastic would melt, then close up behind the cut. Paddle bits would also melt the plastic, and the bit would rattle around inside a hole which was not round, and not quite where I started it. The Poron could not be cut cleanly. A knife blade would stretch, rather than cut the Poron, and the edges of the sheet would be ragged and not where I wanted them. To attach anything, I needed to drill and tap holes. Keep in mind I couldn’t use nuts and bolts because if a bolt spanned two or more sheets of ABS, it would couple them. If I attached a nut & bolt to a sheet before gluing sheets together, I would be unable to retrieve it later for modifications / repairs. It took several evenings of tinkering to get the motor in the correct position with the right mix of mechanical isolation and stability without touching the top or bottom ABS sheets.
Perhaps the most frustrating part was soldering coaxial audio cable to the phono preamp board. The wires had to come up from below the board. The bottom of the board had been coated with some kind of insulating material which prevented anything from being soldered to it. I stuck the wires into the holes which used to be occupied by the RCA jacks, but somehow, the solder was very reluctant to stick to the exposed copper around the holes. I soldered and re-soldered every connection multiple times to get them connected. Also the ground or “negative” wire – the one that forms a braid around the central channel – becomes a messy, unwieldy tangle of copper strands once exposed. I could not twist the strands into a nice, neat cable without leaving broken copper strands sticking out in every direction. After several failed attempts, I actually ended up using only the inside channel of separate cables for positive and negative. The braided outer channels are not attached to anything, but they do serve as a shield, which I may ground some day.
The Results:
Well, it works. It is not as pretty as I was hoping for because the edges of the Poron are ragged and I accidentally got glue on the top ABS sheet. The platter is not parallel to the plinth! Remember I said that one thing I didn’t like about my Ariston was that the arm board and the platter were not parallel. I assumed that this was because the subchasis was bent. But no . . . It’s because the platter’s axle bearing was not perpendicular to the subchasis. Because I kept a 2” diameter ring of the subchasis, and used this ring to bolt the axle bearing to the plinth, the axle bearing is not perpendicular to the plinth! To make matters worse, I glued the top ABS sheet over this ring, and can not access it unless I cut a big hole in the top ABS sheet. I haven’t decided how to fix this, but it needs to be fixed. Also: there is a faint 60Hz hum, but I have ideas to fix this. Note that the phono preamp board is not shielded, and the platter, motor, and power switch are not grounded yet.
Final Thoughts:
This project was probably not worth the effort. I did not think about details like how I was going to attach RCA jacks and a power cord to the side of a ¾” sheet of plastic. I certainly didn’t foresee the soldering difficulties I would have. I was tired of this project and wanted it to end long before I was finished. And I’m still not really finished. I need to shield the preamp and some wiring, ground things better, level the platter, and build a dust cover! There is a small industry dedicated to serving the speaker builder and amplifier builder. But if you want to build a turntable, you’re on your own! I wouldn’t recommend it to anyone without a well-stocked machine shop. What kept me going was the promise to myself that I wouldn’t start my next project until this one was finished. Well, it's functional, so that’s close enough.
If anyone has any questions about how to build a turntable, feel free to ask, so I can tell you not to do it.
-Byron
Attachments
Last edited:
Neat Post.
For the longest time I've wanted to turn a $200 table into a 2K table for $300.
No matter what I read I saw ways I'd turn it into a $500 pile of junk.
Shared failures help us all.
For the longest time I've wanted to turn a $200 table into a 2K table for $300.
No matter what I read I saw ways I'd turn it into a $500 pile of junk.
Shared failures help us all.
Yeah, turntables are hard to build unless you have access to all the necessary machinery and tooling. If I had a metal lathe and a mill it would be no problem.
Here is a picture of a plinth I made. It is made from two pieces of three quarter inch (19mm) MDF. I routed out a hollow section inside the two halves, glued the two halves together with epoxy. The hollowed out section is for adding mass. I filled the hollow section with lead shot encapsulated in epoxy. After everything was cured I trimmed the plinth to a determined size on a table saw.
Here is a picture of a plinth I made. It is made from two pieces of three quarter inch (19mm) MDF. I routed out a hollow section inside the two halves, glued the two halves together with epoxy. The hollowed out section is for adding mass. I filled the hollow section with lead shot encapsulated in epoxy. After everything was cured I trimmed the plinth to a determined size on a table saw.
Attachments
Good build !
It's similar to what I did back in the late '70s.
Then, I picked up a Technics direct drive motor and platter - new - for £25.00.
Not cheap at the time but far cheaper than the 'proper' thing.
I had to build a power supply and speed control for it , not too complicated.
The plinth was a similar layered affair, mainly plywood and mdf. It was mass weighted with lead sheet. The mdf sheets were cut in sections seperated by 0.5cm joins which were filled with bathroom sealer. The whole affair was fairly dead.Finish was teak veneer..
I weighted the platter to get rid of the 'cogging' I could see. Arm was a Hadcock 228 with Ortofon mc.
Anyway, it lasted me a good 7 years til the kids came along!!
Andy
.
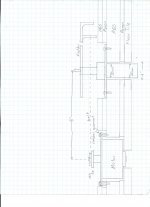
After several years I improved my home-made turntable. Problems were:
- The platter was not level with the plinth.
- The connections to the on-board phono--preamp were unreliable, and I was constantly fixing it.
- I didn't like the placement of the tonearm. I originally had it in the front right corner, to make room for the phono-preamp, which used to be on the right side of the plinth.
- I had 3 feet, for easier leveling, but there was too much weight on one of the Sorbothane feet.
- The whole thing sagged! the plastic I used was not stiff enough.
- I used thin rubber washers to level the platter.
- I removed the on-board phono preamplifier. I built a phono preamp and subsonic filter from Elliott Sound Products, and put them in a preamplifier I've built since then.
- I moved the tonearm to the conventional back-right position.
- I added a 4th foot, and have them in the corners of the turntable, like most rectangular turntables.
- I replaced the bottom piece of ABS plastic with 3/8" ceramic floor tile. Which is difficult to work with. I needed to buy diamond-embedded circular drill bits to cut holes in it.
Attachments
Last edited:
There's great satisfaction building something like that. Good for you to resurrect the project.
I've built three turntables and on my fourth right now along with wood tonearms.
I have a preference for maple laminated with purple heart or walnut, both timbers looking outstanding when finished. I've read that maple has good absorption properties which is one reason I use it, the other being it's aesthetic.
I tend to want to make the turntable more an art piece rather than just functional but in the end it needs to sound well otherwise there's no point.
Keeps us off the streets too!!
Very cool - both the original post and the followup. I can understand the frustration with a project not turning out as intended, but I also think there's a lot of value for readers in seeing what happened along the way. Thanks for sharing.
Whenever starting a turntable project i find it compulsory to have a budget, entry level turntable handy as a reality check. Several have worked well for me in this position: an old Thorens or an old Dual are just perfect.
It is surprising how hard it to improve upon the old geezers in any meaningful way. Those addressed isolation pretty well too, unlike the vast majority of today's "high end".
It is surprising how hard it to improve upon the old geezers in any meaningful way. Those addressed isolation pretty well too, unlike the vast majority of today's "high end".
I agree. I have an old technics SL-Q2 as my back up in case I need to fiddle with any new one that I've built. I won't ever pull it apart as it's a reality check for me.It is surprising how hard it to improve upon the old geezers in any meaningful way.
Hi guys...
Nice build and follow up.
Regarding backup turntables, I agree that a backup TT is always a good thing to have. I have a Kencraft (quite rare) DD as an emergency backup. Old Duals, etc. work too. I even have an old Garrard SB100Zero that is still in working condition.
There are some real standouts that can be used for backup tables. The key is to find these. Don't use a coveted item as a backup either, particularly if looking to purchase one (such as an SP10, overpriced Kenwood, or anything else that is desirable...but their smaller bros are often available for pennies on the dollar).
Turntable construction can be a lonely past-time, but the results are often worth more than the actual costs involved.
- Status
- Not open for further replies.
- Home
- Source & Line
- Analogue Source
- My mostly home-made turntable