Welp,
I guess I have the bug. I started building another guitar amp.
Heres a few pictures of the progress from the past couple days.
Pair of 6V6's, 3-12ax7's & 5U4 rect.
Im taking a break from the wiring as its shown here in these pictures to build the Oak base it will set on. All of the Pots and jacks will be mounted on seperate front and rear plates routed into the oak base.
Top View
Power End
Middle
Last Shot
Notice the blue/wht wire? Am I Setting myself up for ground issues? or just being redundant?
I wasnt sure if it was better to count on the chassis as reliable ground or better to hard wire it to just a couple points. So Now Its BOTH!!
This is my 4th project this year, After not being in this hobby for nearly 30yrs, I think I Forgot more than I'll ever relearn LOL
Gene
Oh dear...
That's going to hum like one of those words that we shouldn't post. The whole point of twisting heater wire is to minimise the size of the loops and to attempt to cancel the field, yet you've twisted your wire right up to the point where it became really important (near the small-signal valves) and then not bothered!
Yes, you really do need to keep a tight twist on the heater wire and take it from one valve base to the next. Big loops near valves are not allowed. Ideally, the heater wire should be pushed into the corners of the chassis and come up to the valves by the shortest route, which usually forces the valves to be in a line along one side of the chassis in low-hum designs. It's also useful to ensure that the sockets are mounted so that their heater pins are nearest to the edge of the chassis from which the heater wire will come.
Your wire looks to be rather thick (making it difficult to achieve a tight twist). Remember that by the time you reach the small-signal valves the heater current is reduced, so you can use thinner wire (which will take the required tight twist).
Sorry to sound so negative, but heater wiring is virtually impossible to replace afterwards, so you have to get it right first time.
Your positioning of valves isn't ideal, but it's far too late to change it now. The diagram of suggested heater wiring may help matters.
Attachments
I'm concerned that your output transformer primary wires are running so close to the low level tubes. Oscillation (squeeeeel) is certainly possible.
Nice metalwork though!
Nice metalwork though!
I would have gone with a different colored table cloth myself.
Nice positioning of sockets and stuff.
Nice positioning of sockets and stuff.
Re: Oh dear...
I hardly concider the comments negitive 🙂 , That was actually one of the reasons for posting the pictures at this stage of construction. I was actually concerned enough about the heater current that I ran a seperate set of wires for the 6V6's and the 12AX7's.
Question, Would adding a full wave solid state rectifier to the heaters help the hum issue ? If so, how big of a cap would I need? Also, Would It be wise to apply DC to all filaments or just the 12AX's? or is it better to run it to everything on the 6.3v line
I have a couple sitting around that can easily handle the duty and it wouldnt be terribly hard to install.
Thanks for the Input!!!!!
And for Frank who posted:
I'm concerned that your output transformer primary wires are running so close to the low level tubes. Oscillation (squeeeeel) is certainly possible.
OMG I Hope That doesnt happen, Recently(posted here) I built a beginner project as a warm up project that had a terrible squeeeeeeeeeeeeeel. Partly from ungrounded speaker ground, And partly from an unknown to me source.
I ended up replacing the 12AX with 12AU adding a ton of grid stoppers not present in original schematic , finally getting it under control. Mind you I had a 5u4 rect tube, A 12a?7 and a 6AQ5 + Trannies, Pots And Jacks squeezed into a 6.5x6.5x3 chassis!!
Thanks Guys,, I'll post more pics Soon!!
Gene
EC8010 said:
Your wire looks to be rather thick (making it difficult to achieve a tight twist). Remember that by the time you reach the small-signal valves the heater current is reduced, so you can use thinner wire (which will take the required tight twist).
Sorry to sound so negative, but heater wiring is virtually impossible to replace afterwards, so you have to get it right first time.
Your positioning of valves isn't ideal, but it's far too late to change it now. The diagram of suggested heater wiring may help matters.
I hardly concider the comments negitive 🙂 , That was actually one of the reasons for posting the pictures at this stage of construction. I was actually concerned enough about the heater current that I ran a seperate set of wires for the 6V6's and the 12AX7's.
Question, Would adding a full wave solid state rectifier to the heaters help the hum issue ? If so, how big of a cap would I need? Also, Would It be wise to apply DC to all filaments or just the 12AX's? or is it better to run it to everything on the 6.3v line
I have a couple sitting around that can easily handle the duty and it wouldnt be terribly hard to install.
Thanks for the Input!!!!!
And for Frank who posted:
I'm concerned that your output transformer primary wires are running so close to the low level tubes. Oscillation (squeeeeel) is certainly possible.
OMG I Hope That doesnt happen, Recently(posted here) I built a beginner project as a warm up project that had a terrible squeeeeeeeeeeeeeel. Partly from ungrounded speaker ground, And partly from an unknown to me source.
I ended up replacing the 12AX with 12AU adding a ton of grid stoppers not present in original schematic , finally getting it under control. Mind you I had a 5u4 rect tube, A 12a?7 and a 6AQ5 + Trannies, Pots And Jacks squeezed into a 6.5x6.5x3 chassis!!
Thanks Guys,, I'll post more pics Soon!!
Gene
One of the things I would be careful of are the non-inductive wirewound resistors. Although physically large, the ones pictured look like they are only good for 1/3 to 1/2 watt.
John
John
Using the Blue/White wire as a means of assuring a good ground connection is fine. I have seen many amplifiers use this method.
It assures a good ground without depending on the hardware to make a connection to the chassis.
It assures a good ground without depending on the hardware to make a connection to the chassis.
DC never hurts, but do filter it or all you'll have done is move the noise up an octave. But you can probably get away with AC if you follow EC's diagram.
OK,
I rewired the 12AX7's filaments as shown in This Picture
I have to admit, Its not perfect, But I am sure its a far cry better than the original job.
I would rather not add a SS rectifier, But, If It hums to much, Its an easy mod.
Right now Im Playing lumberjack hacking up the Oak for the wrap around base. I figure I should have it up and running by sat next week if all goes well.
If I could subtract all the Honey Dews It would be only 3 days from now HAHA
Gene
I rewired the 12AX7's filaments as shown in This Picture
I have to admit, Its not perfect, But I am sure its a far cry better than the original job.
I would rather not add a SS rectifier, But, If It hums to much, Its an easy mod.
Right now Im Playing lumberjack hacking up the Oak for the wrap around base. I figure I should have it up and running by sat next week if all goes well.
If I could subtract all the Honey Dews
It would be only 3 days from now HAHAGene
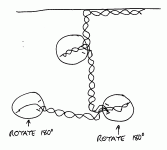
No loops!
Better, but still not quite ideal. You really, really don't want loops around valve bases. A loop like that it an aerial and you've put all your sensitive audio inside it! When the wires are twisted together, the hum field tends to cancel, so you want an absolute minimum of untwisted wire. Secondly, although it seems counter-intuitive, it's best to take the (twisted, of course) wires across the valve base than around.
Better, but still not quite ideal. You really, really don't want loops around valve bases. A loop like that it an aerial and you've put all your sensitive audio inside it! When the wires are twisted together, the hum field tends to cancel, so you want an absolute minimum of untwisted wire. Secondly, although it seems counter-intuitive, it's best to take the (twisted, of course) wires across the valve base than around.
Another way to minimize the hum from AC heaters is to build a voltage divider and "bias" the heater supply above ground by about 30v or so. It works well. If you do this you have to let the heater supply float. Don't connect it to ground!
Indeed, biasing the heaters 30V above ground helps reduce hum, but it deals with a mechanism within each valve - not with the fields produced by the heater wiring. There is no substitute for good heater wiring.
Hi there.........it's good to see nice metalwork even underneath with clean holes.
Looking at the overview.........it reminds me of so many amps like this were built in the 60's era, just sleek to fit into a gram case or whatever.
-> Don't you find the 5U4 at bit of an overkill ? a couple of 6V6's is just tickling a monster...I tend to be a bit wary about placing rect tubes close to the smoothing electrolytics.........for a doubling in temperature the life drops by half. Thought about a slimmer GZ series ?
richj
richwalters said:Hi there.........it's good to see nice metalwork even underneath with clean holes.
Looking at the overview.........it reminds me of so many amps like this were built in the 60's era, just sleek to fit into a gram case or whatever.
-> Don't you find the 5U4 at bit of an overkill ? a couple of 6V6's is just tickling a monster...I tend to be a bit wary about placing rect tubes close to the smoothing electrolytics.........for a doubling in temperature the life drops by half. Thought about a slimmer GZ series ?
richj
Hey,, It took my 6 hrs to hand file all those holes with a rat tail 1/2 inch diameter file!!! LOL
Im Not Kidding,, My arm was sore for 2 days. I have been trying to get some greenlees on ebay, But I Keep getting sniped!
EVERYTHING in this amp is recycled except the OPT. I actually bought that.
All the can caps are from the early 60's NIB NOS stuff from an auction bulk purchase.
The Chassis was actually a faceplate from a peavey monitor amp.
All the tubes are located where pots once were. lol
The PT was from a 1960s? DeVry ITT school project power supply.
I thought maybe that the 5U4 was a bit of over kill, But, I had read that rect tubes influence the sound somewhat, And It was that or 5Y3's that I have.
Im Using the smaller bottle 5U4 rect, And seeing as its not getting mounted in a cabinet, I figure heat wont be a terribly big issue.
Its just going to be sitting on an oak frame style base.
I dont mind all the extra work adapting things seeing as Im having a load of Fun With This!!!!
Gene
- Status
- Not open for further replies.
- Home
- Amplifiers
- Tubes / Valves
- My latest Project (nightmare)