I started this project as a way to get to know my router and table saw, and not out of any real desire to make a set of speakers. I had an old Kenwood reciever that I thought would be nice to have up and running down in the basement (read: my new shop).
Surfing for a cheap set of speakers, I stumbled on the parts express page for the "Topaz Monitor".. It was then that I was bitten. And bitten hard.
A week or two go by, and I start dusting off my speaker knowledge (I was MECP certified back when I was like, 18 or so, and built a fair number of subs for people, but that was like 10 years ago, and I cn't say as I was any good at it).
The more I looked at DIY plans that would fit in my limited budget, the more I kept comming back to those "Topaz" monitors. Dissapointed that the woofer mentioned in the article was no longer available, I toy'd with the idea of finding a substitute for about a day or two. I then stumbled on the creator of the Topaz's website http://www.lonesaguaro.com, and there I found Sparky.
I'd gone beyond what I wanted to use those speakers for when I started looking at the Topaz, and decided that the Sparky design wasn't too far off from the Topaz, and they'd make a great set of A/V monitors for a home system that consists of a receiver, DVD player and a TV. -- We all gotta start somewhere right?
So. I decided to use the plans for "Sparky" and off I went to order the parts. Unfortunatly, I wasn't able to get ahold of a sheilded tweet, and PE wasn't expecting anything until sometime in March. I wasn't willin to wait that long, so I selected a driver that was as close as possible to the one specd' in Lou's design -- I chose the Peerless 811966. I can't say as the swap has made a difference, but not knowing how the originals sound I can't be sure.
Attachments
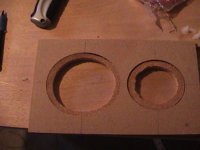
To keep things nice and sealed between the speakers and the baffle, I decided to use some cork sheets, cut to size.
Works kind of like a Gasket. The cutout for the tweets haven't been cleaned up yet.
I used a hot glue gun I got at wal-mart for 97 cents to attach the cork. I noticed that hot glue does't stick to MDF very well, which is fine since I'm only using it here to keep the cork rings in place until the drivers get mounted.
Attachments
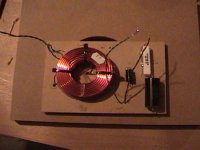
Woofer XO. I used some melamine that I found on the floor of Home Depot to mount the XOs to. The melamine was orig. used to seperate bundles of plywood or wainscotting. Since the strips were beat up pretty badly, I wasn't charged for them. I only needed a few small sections anyway.
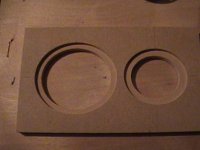
I actually used the same stuff to build a tremmell for the router to make the circle cut outs. One thing I think that the newbs ought to know is that if you plan on cutting your baffles with a router, you really ought to go out and purchase a Jasper Circle jig or similar circle cutting guide. It would have saved me so much work had I done this. Cutting circles with a home made jig is easy, it's making the jig that sucks.
I actually used the same stuff to build a tremmell for the router to make the circle cut outs. One thing I think that the newbs ought to know is that if you plan on cutting your baffles with a router, you really ought to go out and purchase a Jasper Circle jig or similar circle cutting guide. It would have saved me so much work had I done this. Cutting circles with a home made jig is easy, it's making the jig that sucks.
Attachments
Tweeter XO.
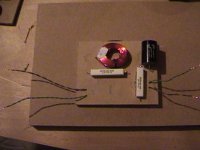
Using the info I found at TNT Audio, I decided to use CAT-5 cable as the XO and Speaker interconnects. Way I figured it, was that if Cat-5 pairs twisted together were good for speaker cable from the amp -> speaker connection, it ought to be just fine inside the speakers too.
It's hard to see here, but I used 2 strands of cable, and kept the twists. I also twisted the positive/negative leads around eachother like the would be inside the cable, trying to follow the same number of twists per inch that regular CAT-5 uses.
Since I'm not pushing more'n about 40 watts here, the wire ought to be OK. If I up my power a bit, I'll probably need to redo the whole thing and add additional wires.
Attachments
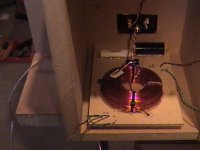
Those woofer XOs are almost too damn big. If I was thinking, I would have test fit the drivers on the enclosure before I glued the XOs down.
Of course, I wasn't thinking.
The drivers and the XO had some space issues, I ended up needing to mount the baffles on "upside down" to get everything to fit. When the speaker is complete, with the woof sitting near the floor, the XO is actually "hanging" from the top of the cabinet.
I used some small strips of 3/4" MDF to act as "Risers" that both the Woof and Tweet XOs sit on. Since I did some rather... ugly wire wrapping and soldering on the back side of the XOs, I needed a little extra clearance so the XOs would mount nicely. The MDF was perfect for this.
Attachments
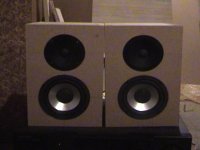
That's about it. Obviously, I need to sand/finnish the speakers. they sound great, comparable to some I've heard that cost a few hundred bucks. The cabinets aren't sealed entirely yet, as there are some small gaps that I need to close up still.
I also need to re-do the connections inside the boxes, as I used wire nuts to test fit-every thing together, and to make sure that things were sounding OK.
There are a few things I learned during this process that I think it's important for newbs to know.
1. When making your box cuts, cut all the peices on your table/compound saw at once. Er.. that is, make all your 11" cuts, then all your 7" cuts, then all your 6" cuts, etc. This ensures that all the sides of your box will be the same length. If you make cuts at 11", 6", 7" for 1 side, then go back and do it for the next side, there's no gaurentee that your saw will be setup exactly the way it was when you made that first side. You'll potentially end up with a lopsided box, or a box with a lot of gaps that will need to be filled in later.
2. If your making your driver cutouts with a router go buy a Jasper Circle Jig or find something simliar. Make lots of test circles in scrap wood too, because it's a PITA making sure things are sized just right. You don't want any large gaps between the speakers and the sides of your cutout if you can help it.
3. When your soldering... Get a good soldering iron. I picked up a cheapo iron from "MicroCenter" for about $5. By the time I was through with the 1st set of XOs, I had a huge divot in the side of the iron. Made it a pain to work with as the solder would glob up where that divot was, and then run down the tip onto the work.
4. Also when soldering, if it's not a good connection without solder, it won't be a good connection WITH it either. Make sure your connections are clean and free of saw dust or other debris (hair, glue, etc) that can get on the components during the build process.
5. Buy a good set of clamps. They are invaluable in making the boxes.
6. "Dry fit" everything. Since hot glue doesn't stick to MDF very well (it just peels right off after it's dry, taking just a teeny bit of the wood with it) the glue gun is your friend. I even used mine to hold down the wiring on the back of the XOs when I tested them. Kept me from soldering / desoldering or using wire nuts.
I think that's about it. I'm sure that some of the other folks with more experience at this kind of thing have other suggestions. But that's all I can think of off the top of my head. 🙂
- Status
- Not open for further replies.
- Home
- Loudspeakers
- Multi-Way
- My First DIY