Thanks
Thanks Madman,
I'm still writing up the step by step for the LCD strip...and will post soon...I still need to order the AC adapter for the screen before I can test it. Things are slow going right now...family and work don't leave much time. I hope by next weekend to have have it is a rough test stage...no box but to have it mapped out and have the focal measurements down....Then I can start building the box for it.
Wish me luck
madman01 said:im taggin along on this seems very interesting and will very challenging cant wait to see your results
Thanks Madman,
I'm still writing up the step by step for the LCD strip...and will post soon...I still need to order the AC adapter for the screen before I can test it. Things are slow going right now...family and work don't leave much time. I hope by next weekend to have have it is a rough test stage...no box but to have it mapped out and have the focal measurements down....Then I can start building the box for it.
Wish me luck
ya man i had to stop many after work activities for about 1 month until i finished my projector i had the wife in the back ground not to happy (until she watched the first movie) this project consumed my every spare moment but it was worth it im using brainchilds design for now ive been browsing in a couple germin diy proj. sites tons of info there im goin to try a folded design soon its more complicated then the (coffin) type
Comming Soon
Hi Folks,
Sorry I haven't posted in a while. Several factors have been to blame for me not posting...the top two are:
1) fighting a cold
2) My laptop AC adapter broke , should have a new one my the 17th. 😀
As soon as I get my AC adapter I will put a step by step for stripping a PSOne screen. 😀
I'll post soon!
Hi Folks,
Sorry I haven't posted in a while. Several factors have been to blame for me not posting...the top two are:
1) fighting a cold
2) My laptop AC adapter broke
, should have a new one my the 17th. 😀As soon as I get my AC adapter I will put a step by step for stripping a PSOne screen. 😀
I'll post soon!
Up date
Ok...I should have my AC adapter for my comp. today and should have some new posts on thursday night...
Back to the projector:
I hacked an adjustable AC 😱 and the Trav. A/C adapter that came with the screen to test it... It works!!! So it looks like this weekend I will be making a mock up projector 😀 I'll keep you all posted!!!
Ok...I should have my AC adapter for my comp. today and should have some new posts on thursday night...
Back to the projector:
I hacked an adjustable AC 😱 and the Trav. A/C adapter that came with the screen to test it... It works!!!
So it looks like this weekend I will be making a mock up projector 😀 I'll keep you all posted!!!OK
Hey everyone.
Things should be going well for this weekend. AC adapter came for my Laptop 😀 I will post the step by step for the PS One screen strip tonight. I got an angled grinder from a friend and will be cutting up the slide projector case tonight. I am using it for rough mounting, and to hold the lens and lighting system in place.
Look for more info tonight!
LCD Time
Ok time for the LCD step by step.
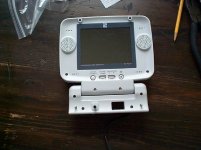
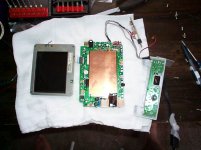
My screen was very simple to strip. A few screws, a snip of the cutters and I was done!
These instruction were for my PSOne screen, your screen may differ…This is for info only…so if you screw it up don’t blame me!
Ok time for the LCD step by step.
My screen was very simple to strip. A few screws, a snip of the cutters and I was done!
These instruction were for my PSOne screen, your screen may differ…This is for info only…so if you screw it up don’t blame me!
Attachments
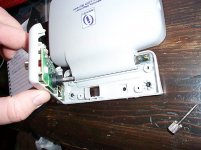
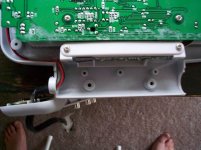
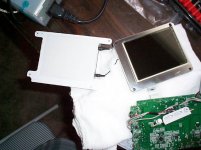
There were 6 screws holding the screen parts and 4 screws on the bottom inter-connecter.
There were 2 locking screws that attach to a PSOne.
First remove the locking screws
Then remove all the screws holding the housing together
I ended up stripping a screw head, so I had to drill it out…Oh what fun.
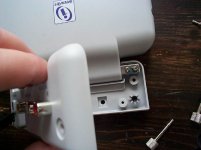
There were 2 locking screws that attach to a PSOne.
First remove the locking screws
Then remove all the screws holding the housing together
I ended up stripping a screw head, so I had to drill it out…Oh what fun.
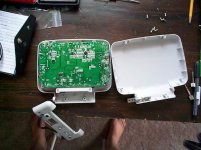
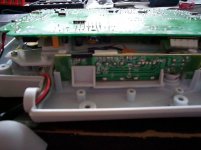
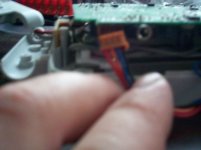
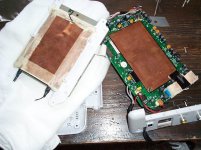
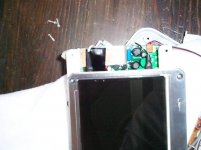
Then you will see some small screws holding the back light to the back of the LCD, remove them, there will also be a ground wire going from the LCD frame to the copper EMI shielding, you need to cut this also, now gently pull off the backlight, you might have to use a little force because of the double sided tape
Attachments
- Status
- Not open for further replies.
- Home
- General Interest
- Everything Else
- The Moving Image
- DIY Projectors
- My First DIY Projector