Well folks...I have been a lurk for some time, trying to fight off the DIY bug  But it got me. 😀 I'm starting my project using a Kodak slide projector for the lens, condensing lens, heat absorbing glass
  , and light source. The LCD is from an older PS one screen
  (I know, not hi-res...but, it is my first projector so I need to get my feet wet somewhere).
I will be adding more info and pics (yes they will come). I will be listing a step by step process for the other noob's out there. I just need to start writing it up.
Stripping everything went well (about 3 hrs.) the slide projector was the "hardest" to strip. Just a lot of screws and parts...tracing the wires, diagramming everything, taking notes, etc... The PS One screen was easy!!! 8 screws and it is apart 😀 Only had to cut 3 unused wires (2 for the backlight and one for the grounding plates (for shielding).
Now I'm in search for an AC adaptor for the screen....7.5w 2A...anyone got one? 😕
I will try a rough mock-up this week-end, to get the layout.
I'll take any help I can....This is my first so be kind 🙂
I will try to post info and pics this weekend!
Also will I need a fresnel lens if I have the glass condensing lens from the projector?
Thanks for all the help in advance
But it got me. 😀 I'm starting my project using a Kodak slide projector for the lens, condensing lens, heat absorbing glass , and light source. The LCD is from an older PS one screen (I know, not hi-res...but, it is my first projector so I need to get my feet wet somewhere).I will be adding more info and pics (yes they will come). I will be listing a step by step process for the other noob's out there. I just need to start writing it up.
Stripping everything went well (about 3 hrs.) the slide projector was the "hardest" to strip. Just a lot of screws and parts...tracing the wires, diagramming everything, taking notes, etc... The PS One screen was easy!!! 8 screws and it is apart 😀 Only had to cut 3 unused wires (2 for the backlight and one for the grounding plates (for shielding).
Now I'm in search for an AC adaptor for the screen....7.5w 2A...anyone got one? 😕
I will try a rough mock-up this week-end, to get the layout.
I'll take any help I can....This is my first so be kind 🙂
I will try to post info and pics this weekend!
Also will I need a fresnel lens if I have the glass condensing lens from the projector?
Thanks for all the help in advance
Good luck with your build JohnA... as for the AC adapter Tandys or Dick Smith (if you have them in the U.S) have them for about $AD20 bucks i guess your Wallmarts may also supply them. Page magnifyers (fresnels) can be picked up at Chemists (drug stores) or newsagents. These maybe fine to test your setup with. If you want good quality however Ace_3000 supplies cut (to suit 7" Lilliput) and uncut fresnels lenses (im sure if you ask him nicely he would cut a couple to size for the ps1 screen too 🙂 ) Very reasonable prices.
Its all very exciting though aint it JohnA hehe...im also in the process of puting together my first projector using a 7" Lilli LCD
Again good luck with it all looking forward to seeing pictures of your progress JohnA
Hope this post is of some help for you
Its all very exciting though aint it JohnA hehe...im also in the process of puting together my first projector using a 7" Lilli LCD
Again good luck with it all looking forward to seeing pictures of your progress JohnA
Hope this post is of some help for you
Thanks HillBilly
The thing about the AC adapt. is that it needs to be 7.5v (which is not a problem) but the 2A is the tough part...most only go up to 1.5. But I guess I can try a lower Amp cus the back light is gone.
I will contact Ace and see how nice I can be 😀
Thanks again for the info
HiLLBiLLY said:Good luck with your build JohnA... as for the AC adapter Tandys or Dick Smith (if you have them in the U.S) have them for about $AD20 bucks i guess your Wallmarts may also supply them. Page magnifyers (fresnels) can be picked up at Chemists (drug stores) or newsagents. These maybe fine to test your setup with. If you want good quality however Ace_3000 supplies cut (to suit 7" Lilliput) and uncut fresnels lenses (im sure if you ask him nicely he would cut a couple to size for the ps1 screen too 🙂 ) Very reasonable prices.
Its all very exciting though aint it JohnA hehe...im also in the process of puting together my first projector using a 7" Lilli LCD
Again good luck with it all looking forward to seeing pictures of your progress JohnA
Hope this post is of some help for you
The thing about the AC adapt. is that it needs to be 7.5v (which is not a problem) but the 2A is the tough part...most only go up to 1.5. But I guess I can try a lower Amp cus the back light is gone.
I will contact Ace and see how nice I can be 😀
Thanks again for the info
I agree, I doubt that you will need 2A now, but still, a 2amp adapter would be best. I think you will be able to find one easily. Just look for a PSOne adapter. The one I have (original that came with it) is 7.5v, 2a, and the metal plugs (?) fold up for more portability.
Good luck with your project
P.s. are you sure that the projection lens will capture all of the lcd screen? I tried one that was from some projector (slide/film?), and it only captured about 3 inches of a 5 inch source....
Good luck with your project
P.s. are you sure that the projection lens will capture all of the lcd screen? I tried one that was from some projector (slide/film?), and it only captured about 3 inches of a 5 inch source....
Had a hard time
I have had a hard time trying to find the AC adapter....they are harder to come by then you think as far as the lens goes I might have to use another conedser lens....we will see what happens.
ancorp said:I agree, I doubt that you will need 2A now, but still, a 2amp adapter would be best. I think you will be able to find one easily. Just look for a PSOne adapter. The one I have (original that came with it) is 7.5v, 2a, and the metal plugs (?) fold up for more portability.
Good luck with your project
P.s. are you sure that the projection lens will capture all of the lcd screen? I tried one that was from some projector (slide/film?), and it only captured about 3 inches of a 5 inch source....
I have had a hard time trying to find the AC adapter....they are harder to come by then you think
as far as the lens goes I might have to use another conedser lens....we will see what happens.Tonight
I will be posting the first part of my DIY...It will be long, have many pics, and is more-or-less step by step.
Look for it this evening.
P.S. Thanks for all of the support!😀
I will be posting the first part of my DIY...It will be long, have many pics, and is more-or-less step by step.
Look for it this evening.
P.S. Thanks for all of the support!😀
Part 1
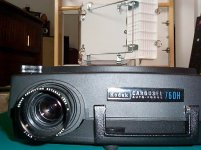
Ok…Here we go! I got the DIY bug some time ago while searching the web…I fought it for some time (no cash, no time, and the WAF). But I got a PS One screen for free…so the bug grew and took me over…I stopped by the local Salvation Army store to look for a projector of some sort. I was in luck... just what I was looking for…a nice looking Kodak 760H (with auto-focus) for $20. I plugged it in and it powered right up, bulb worked and the lens looked good, no scratches or cracks!!! So I got them home…now time for destruction…HAHAHA…
Ok…Here we go! I got the DIY bug some time ago while searching the web…I fought it for some time (no cash, no time, and the WAF). But I got a PS One screen for free…so the bug grew and took me over…I stopped by the local Salvation Army store to look for a projector of some sort. I was in luck... just what I was looking for…a nice looking Kodak 760H (with auto-focus) for $20. I plugged it in and it powered right up, bulb worked and the lens looked good, no scratches or cracks!!! So I got them home…now time for destruction…HAHAHA…
Attachments
next
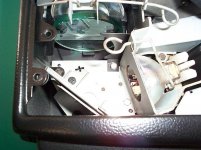
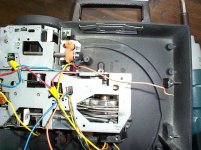
The first thing I did was to remove the light, heat absorbing glass and the condensing lens. Then I unscrewed the 4 screws (all screws are 1/4 inch hex screws) holding the bottom on (you have to remove the little rubber foot on the height adjusting foot to get the bottom off). Then I stood looking at it and wondering what I had gotten myself into.
The first thing I did was to remove the light, heat absorbing glass and the condensing lens. Then I unscrewed the 4 screws (all screws are 1/4 inch hex screws) holding the bottom on (you have to remove the little rubber foot on the height adjusting foot to get the bottom off). Then I stood looking at it and wondering what I had gotten myself into.
Attachments
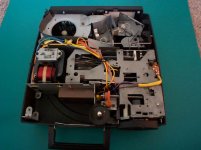
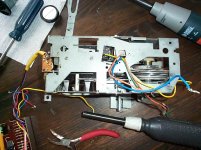
I started by removing the light housing and the holding brackets for the glass and lens. Then I moved onto removing the screws for the fan housing. I also was diagramming the wiring so I know what went where. I continued to disconnect the wires going to the light and fan and removed the fan motor, fan cover, fan wheel, and belts (yes it is a belt drive fan system).
Attachments
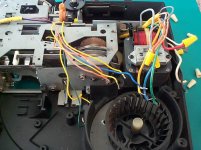

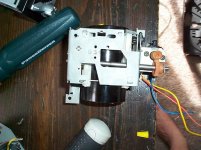
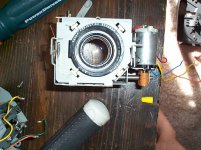
Now once I had that out of the way it was time to remove the main lens system…easier said then done. First there are two arms from the lens harness to the slide mechanism that had rivets that needed to be popped out, then a second control arm to be removed. I had to “think outside the box” because some of the screws were in very tight spaces where my 1/4” hex drive wouldn’t fit…I resorted to using a multi-bit security driver without any drives in it; it had a thin shaft that could fit in the small spaces. After some finagling the lens harness came out. Finished!!!
Attachments
A Few tips for us new guys/gals
Here are a few hints for the newbies out there:
1) It will look harder than it is.
2) Research everything before you start (I was researching for about 2 months).
3) Take the time to find your parts…and keep looking at the Goodwill and Salvation Army.
4) Document everything.
5) Document all wiring harnesses, you might need something later.
6) Take your time.
7) Be patience if something isn’t coming apart…take a break and come back to it later…you don’t want to become frustrated and end up breaking something that you need.
8) Keep everything until you are finished with the whole project.
9) Zip-lock bags are your friend.
10) Have fun and enjoy yourself.
BTW
I did find the AC adaptors...they are about 8 bucks online😀
Thanks for everyone's help so far!!!
I did find the AC adaptors...they are about 8 bucks online😀
Thanks for everyone's help so far!!!
im taggin along on this seems very interesting and will very challenging cant wait to see your results
- Status
- Not open for further replies.
- Home
- General Interest
- Everything Else
- The Moving Image
- DIY Projectors
- My First DIY Projector